
Good lighting is not defined by wattage alone. A room can use powerful fixtures and still feel dim, uneven, or uncomfortable if the light output is not matched to the space.
Two measurements matter most:
- Lumens describe how much light a source produces.
- Lux describes how much of that light reaches a surface.
This guide shows how to estimate the light level required for a room, adjust the result for real conditions, calculate an approximate fixture quantity, and move from a theoretical lumen target to a practical lighting layout.
Lux vs Lumens: Quick Answer
Lumens measure the total light produced by a fixture, while lux measures how much light reaches a surface.
To estimate the basic lumen requirement for a room:
Basic lumens = Room area in m² × Target lux
For example, a 20m² room targeting 200 lux requires approximately 4,000 lumens before utilization, maintenance and other real-room factors are applied.
Use the Lux & Lumens Calculator to estimate the required installed output and approximate fixture quantity for your room.
In This Guide
- What Is the Difference Between Lux and Lumens?
- How to Calculate the Lumens Needed for a Room
- Recommended Lux Levels for Each Room
- Adjusting for Real Room Conditions
- From Lumens to Fixture Quantity
- Ambient, Task and Accent Lighting
- Beam Angle, Ceiling Height and Spacing
- Common Lighting Calculation Mistakes
- Final Lighting Design Checklist
What Is the Difference Between Lux and Lumens?
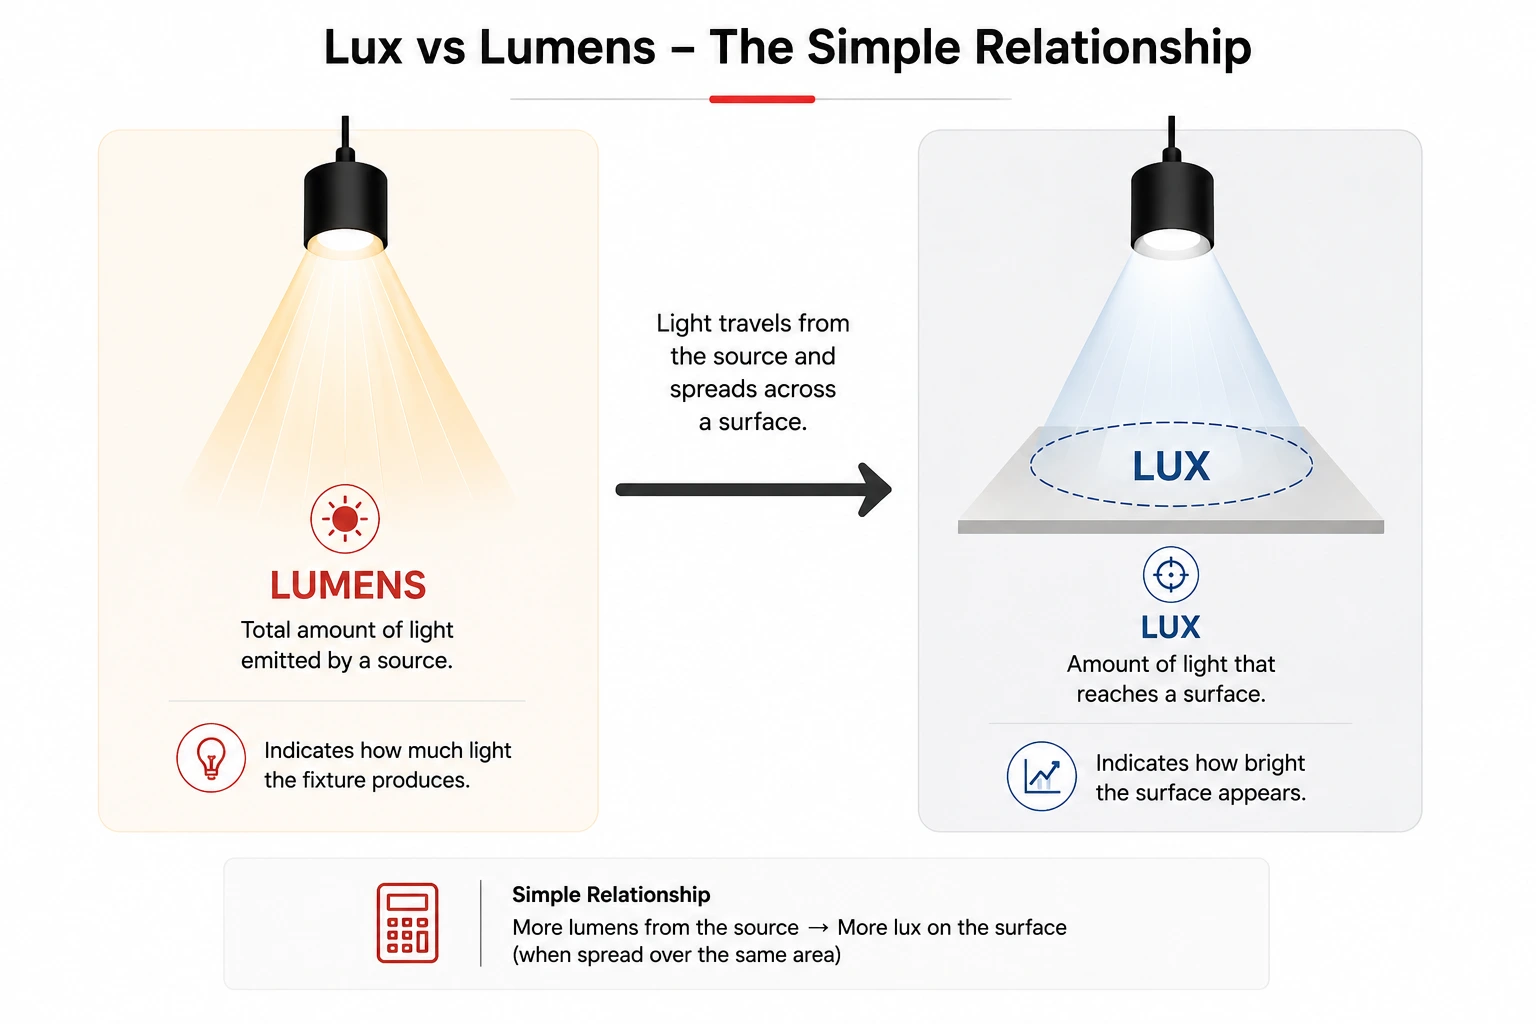
The difference is simple:
- Lumens measure light output
- Lux measures light received on a surface
A fixture may produce a high number of lumens, but the actual lux level depends on how that light is distributed across the room.
Simple Relationship
1 lux = 1 lumen spread over 1 square metre
For example:
- 1,000 lumens spread over 10m² gives approximately 100 lux
- The same 1,000 lumens spread over 5m² gives approximately 200 lux
The light source has not changed. The illuminated area has.
| Measurement | What It Describes | Example |
|---|---|---|
| Lumens | Total light produced | A fixture rated at 1,200 lm |
| Lux | Light reaching a surface | 300 lx on a desk |
| Square metres | Area receiving the light | A 20m² room |
Quick Design Rule
Do not compare fixtures only by wattage.
Use:
- Lumens to compare light output
- Lux to define the required light level
- Room area to calculate the total lumen requirement
How Many Lumens per Square Metre Does a Room Need?
Since one lux represents one lumen received per square metre, the target lux level provides the basic lumens-per-square-metre requirement at the illuminated surface.
For example:
- 100 lux represents a basic target of 100 lumens per m²
- 200 lux represents a basic target of 200 lumens per m²
- 300 lux represents a basic target of 300 lumens per m²
- 500 lux represents a basic target of 500 lumens per m²
This is only the starting requirement. The installed fixture output normally needs to be higher because not every emitted lumen reaches the working surface. Ceiling height, fixture optics, beam angle, room finishes, utilization and maintenance losses must also be considered.
How to Calculate the Lumens Needed for a Room
Once the target lux level is known, the basic calculation is:
Basic required lumens = Room area × Target lux
Example
A room measures 20m² and the target is 200 lux:
200 lux × 20m² = 4,000 lumens
This gives a basic requirement of approximately 4,000 lumens before real-room adjustment factors are applied.
Quick Reference
| Room Area | Target Lux | Basic Lumen Requirement |
|---|---|---|
| 10m² | 150 lux | 1,500 lm |
| 15m² | 200 lux | 3,000 lm |
| 20m² | 300 lux | 6,000 lm |
| 30m² | 300 lux | 9,000 lm |
The result is a starting point. Real rooms may need additional output because of ceiling height, dark finishes, fixture optics, diffusers, and normal light loss over time.
Calculate Your Room’s Lighting Requirement
Enter the room dimensions and target light level to estimate:
- Room area
- Basic lumen requirement
- Required initial luminaire output
- Approximate fitting quantity
- Estimated maintained average lux
Open the Lux & Lumens Calculator
Recommended Lux Levels for Each Room
Choosing the right lux level depends on what happens in the space. General lighting can stay softer, while work areas need more focused illumination.
| Space | Recommended General Lighting |
|---|---|
| Living room | 100–200 lux |
| Bedroom | 100–200 lux |
| Dining room | 150–250 lux |
| Kitchen | 200–300 lux |
| Kitchen worktop | 400–500 lux |
| Bathroom | 200–300 lux |
| Mirror area | 300–500 lux |
| Home office | 300–500 lux |
| Corridor | 100–150 lux |
| Staircase | 100–150 lux |
| Retail area | 300–500 lux |
| Showroom | 300–500 lux |
| Warehouse | 100–300 lux |
Use Ranges, Not One Fixed Number
A room does not always need one uniform light level.
For example:
- A living room may use softer ambient lighting with brighter reading zones.
- A kitchen may have moderate general lighting and stronger task lighting above the worktops.
- A showroom may use a balanced ambient level with brighter accent lighting on displays.
What Can Change the Target?
The final target may need adjustment for:
- The activity in the space
- User age
- Surface colours
- Ceiling height
- Contrast requirements
- Glare control
- Project standards
Use the table as a practical starting point, then refine the design according to the room’s real use.
Adjusting for Real Room Conditions
The basic formula gives the ideal lumen requirement, but real rooms rarely use every lumen efficiently.
Light can be reduced by:
- High ceilings
- Dark walls, floors, or furniture
- Deep diffusers
- Narrow beam angles
- Dust and ageing
- Poor fixture placement
For preliminary planning, the basic result may be adjusted using utilization and maintenance factors:
Adjusted installed lumens = Basic required lumens ÷ Utilization factor ÷ Maintenance factor
Example
A room needs 4,000 lumens under ideal conditions.
Using:
- Utilization factor: 0.70
- Maintenance factor: 0.80
4,000 ÷ 0.70 ÷ 0.80 = 7,143 lumens
This means the installed fixtures should provide approximately 7,100 lumens to achieve the target after real-world losses are considered.
Quick Guide
| Room Condition | Typical Effect |
|---|---|
| Bright finishes and low ceiling | Lower adjustment |
| Average residential room | Moderate adjustment |
| Dark finishes or high ceiling | Higher adjustment |
| Dusty or difficult-to-maintain space | Higher maintenance allowance |
Use these factors as planning tools, not fixed rules. The final values depend on the room geometry, fixture optics, reflectance, and project standards.
From Lumens to Fixture Quantity
Once the adjusted lumen requirement is known, estimate the number of fixtures:
Fixture Quantity = Adjusted installed Lumens ÷ Lumens per Fixture
Always round the calculated fixture quantity up to the next whole fixture, then verify beam coverage and spacing.
Example
Adjusted requirement: 7,100 lumens
Fixture output: 900 lumens
7,100 ÷ 900 = 7.9
Round up to 8 fixtures.
But Quantity Is Only the Start
Eight fixtures can still produce a poor result if they are badly positioned.
Also check:
- Beam angle
- Ceiling height
- Fixture spacing
- Edge distance
- Furniture and task zones
- Required uniformity
Quick Rule
Lumens tell you how much light you need. Layout decides how well that light works.
Ambient, Task and Accent Lighting
A well-lit room rarely depends on one type of light. The best results come from combining three layers.
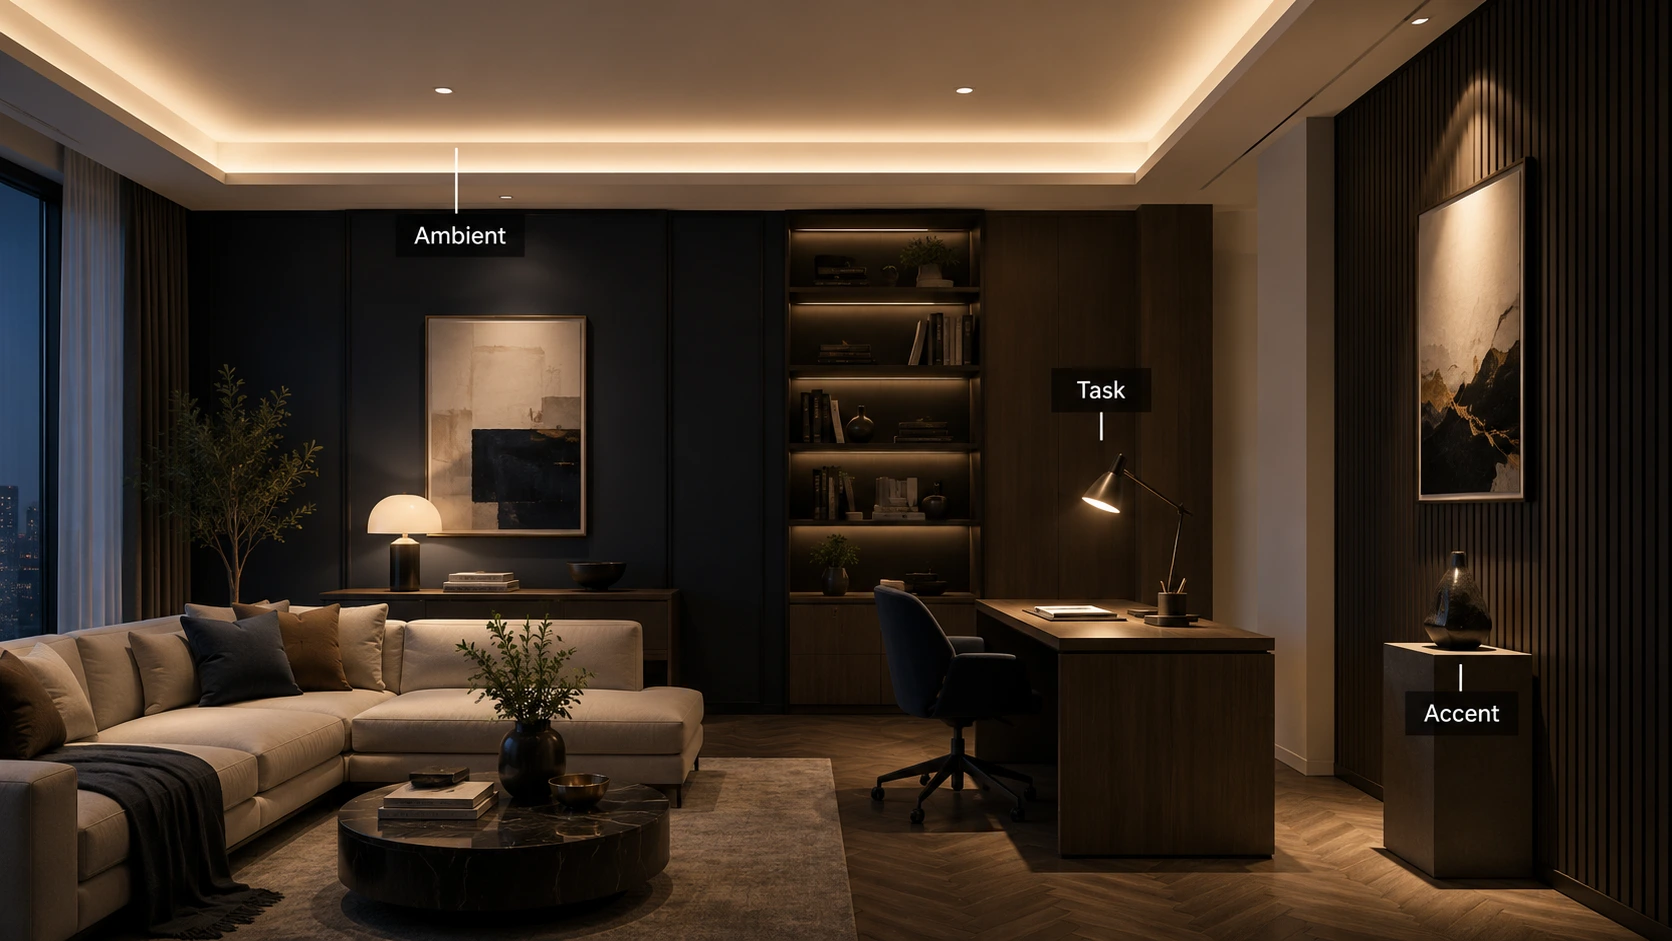
| Lighting Layer | Purpose | Typical Examples |
|---|---|---|
| Ambient | Provides general illumination | Ceiling lights, panels, indirect lighting |
| Task | Supports specific activities | Desk lights, kitchen worktop lighting, reading lights |
| Accent | Highlights features and adds depth | Spotlights, wall washers, display lighting |
How the Layers Work Together
- Ambient lighting makes the room comfortable and usable.
- Task lighting adds stronger light where precision is needed.
- Accent lighting creates focus, contrast, and atmosphere.
Simple Example
In a living room:
- Ceiling lights provide the ambient layer
- A floor lamp supports reading
- Spotlights highlight artwork or textured walls
Quick Design Rule
Do not try to achieve every lighting need with one uniform lux level.
Use softer general lighting, then add brighter light only where the activity requires it.
Beam Angle, Ceiling Height and Fixture Spacing
The same lumen output can feel very different depending on how the light is distributed.
For the detailed geometry, use the beam angle guide; for fixture quantity and positioning, use How Many Spotlights Does a Room Need?.
- Narrow beam: stronger, more focused light
- Medium beam: balanced coverage
- Wide beam: softer, broader illumination
Why Ceiling Height Matters
As mounting height increases, the light spreads over a larger area and the intensity on the surface decreases.
This means higher ceilings may require:
- More output
- A narrower beam
- Closer fixture spacing
- Additional lighting layers
Quick Comparison
| Beam Type | Effect | Best Use |
|---|---|---|
| Narrow | Strong central intensity | Accent lighting, artwork, displays |
| Medium | Balanced spread | General spot lighting |
| Wide | Broad, softer coverage | Ambient lighting and low ceilings |
Spacing Matters
Fixtures placed too far apart create dark gaps.
Fixtures placed too close together can create excessive overlap and uneven brightness.
A good layout balances:
- Beam spread
- Ceiling height
- Room geometry
- Edge distance
- Furniture and focal points
After estimating the fixture quantity, use the Spotlight Layout Calculator to test spacing and coverage before finalizing the layout.
Common Lighting Calculation Mistakes
Even a correct formula can lead to a poor result if the design assumptions are wrong.
| Mistake | Result |
|---|---|
| Choosing fixtures by wattage only | Unreliable light-output comparison |
| Ignoring room area | Incorrect lumen requirement |
| Using one lux target for the whole room | Flat or uncomfortable lighting |
| Forgetting dark finishes | Lower real brightness |
| Ignoring ceiling height | Weak illumination at floor or work level |
| Dividing lumens without checking beam angle | Uneven coverage |
| Rounding fixture quantity down | Underlit space |
| Ignoring maintenance losses | Performance drops over time |
| Placing fixtures before furniture is planned | Light misses task and focal areas |
Quick Check
Before finalizing the design, ask:
- Is the target lux suitable for the room’s use?
- Are task areas treated separately?
- Have ceiling height and surface colours been considered?
- Does the fixture beam suit the spacing?
- Is the quantity rounded up where necessary?
Frequently Asked Questions
What is the difference between lux and lumens?
Lumens measure the total light output produced by a fixture. Lux measures how much light reaches one square metre of a surface.
How do I calculate the lumens needed for a room?
Multiply the room area in square metres by the target lux level. Then adjust the result for utilization, maintenance, ceiling height, room finishes and fixture distribution.
How many lumens does a 20m² room need?
A 20m² room targeting 200 lux has a basic requirement of approximately 4,000 lumens. The required installed output may be higher after real-room adjustment factors are included.
Is wattage the same as brightness?
No. Wattage measures electrical consumption, while lumens measure visible light output. Fixtures with the same wattage can produce different lumen outputs.
Does colour temperature affect lumens?
Colour temperature describes whether the light appears warmer or cooler. It does not directly describe brightness. Compare 3000K vs 4000K lighting separately from lumen output.
Final Lighting Design Checklist
Before selecting fixtures or finalizing the layout, confirm the following:
Room and Target
- Room length and width measured
- Ceiling height confirmed
- Main activities identified
- General and task lux targets selected
- Dark surfaces or low-reflectance finishes considered
Fixture Selection
- Lumens per fixture confirmed
- Beam angle suits the application
- Dimming or control requirements confirmed
Quantity and Layout
- Adjusted lumen requirement calculated
- Fixture quantity rounded up where needed
- Spacing checked against beam spread
- Edge distances reviewed
- Task areas and focal points treated separately
Final Review
- Ambient, task, and accent layers are balanced
- Glare is controlled
- Furniture and circulation are considered
A successful lighting plan combines the right lux target, enough lumens, suitable optics, and a layout that responds to how the room is actually used.
Final Takeaway
Lux tells you how much light reaches the space. Lumens tell you how much light the fixtures produce. The calculation creates the target, but beam angle, ceiling height, spacing, finishes, and lighting layers determine the final result.
Once the required lumens and approximate fixture quantity are established, the next step is to test the layout using the Spotlight Layout Calculator.