
Outdoor lighting does more than illuminate a property after dark. A well-planned lighting scheme improves safety, visibility and comfort while revealing the architecture and landscape in a completely different way at night.
From welcoming entrances and clearly defined pathways to illuminated stone facades, trees and garden features, the best results come from choosing each fixture for a specific purpose rather than simply adding more light.
This guide explains how to plan outdoor lighting for gardens, entrances, pathways and facades, including which fixture types to use, where to position them, and how factors such as IP rating, color temperature and beam angle affect the final result.
Start With the Purpose of Your Outdoor Lighting
Before choosing a fixture, decide what the light needs to accomplish. Most successful outdoor lighting schemes combine four functions.
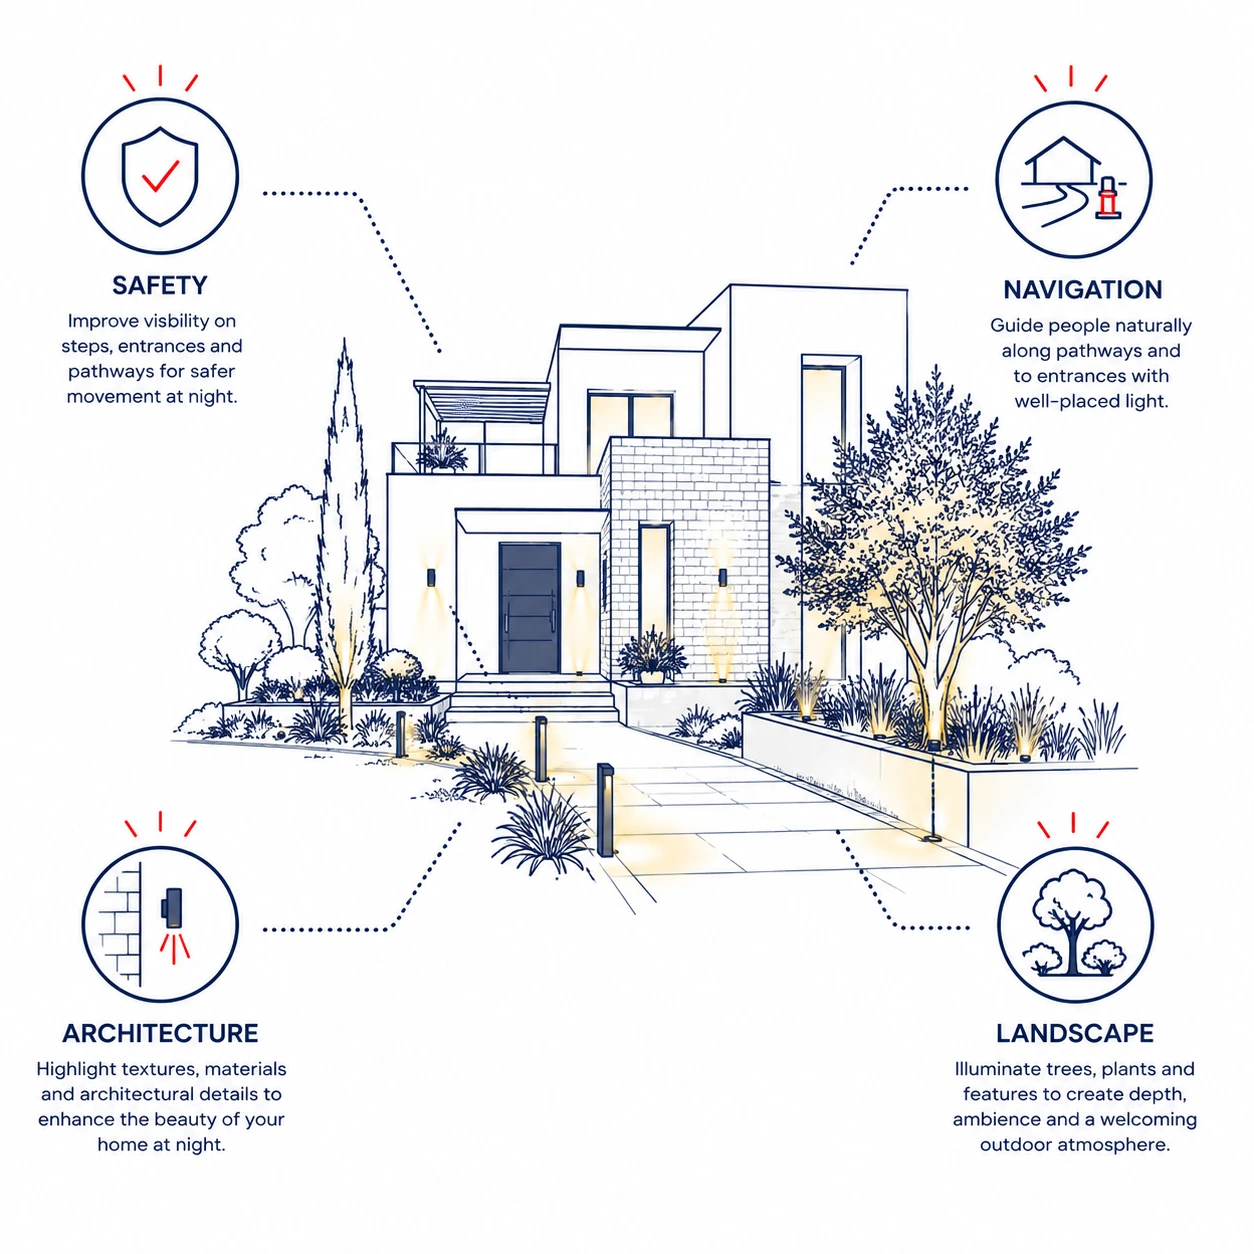
Safety
Steps, changes in level, pathways and entrances need enough illumination to make movement comfortable after dark. The objective is good visibility without creating excessive brightness or glare.
Navigation
Lighting can naturally guide people toward an entrance, along a pathway or through a garden. Bollards, low-level fixtures and carefully positioned wall lights can define circulation without illuminating the entire landscape.
Architecture
Exterior lighting can reveal materials and architectural details that disappear after sunset. Stone walls, columns, textured surfaces and facade elements can be emphasized using techniques such as uplighting, grazing and wall washing.
Landscape & Atmosphere
Trees, planting and landscape features add depth to an exterior at night. Selective accent lighting creates layers of brightness and shadow, producing a more comfortable and visually interesting environment.
The key principle: Don't try to illuminate everything equally. Good outdoor lighting uses contrast. Decide what should be visible, what should become a focal point, and what can remain in shadow.
Planning your exterior? Explore our Outdoor Lighting collection for garden, pathway, facade and entrance lighting.
Choose Outdoor Lighting by Area
Different outdoor areas have different lighting requirements. An entrance needs comfortable visibility and a welcoming atmosphere, while a facade or mature tree may need controlled accent lighting. Choosing fixtures according to the area—and the effect you want to create—produces a more balanced result than using the same type of light throughout the property.
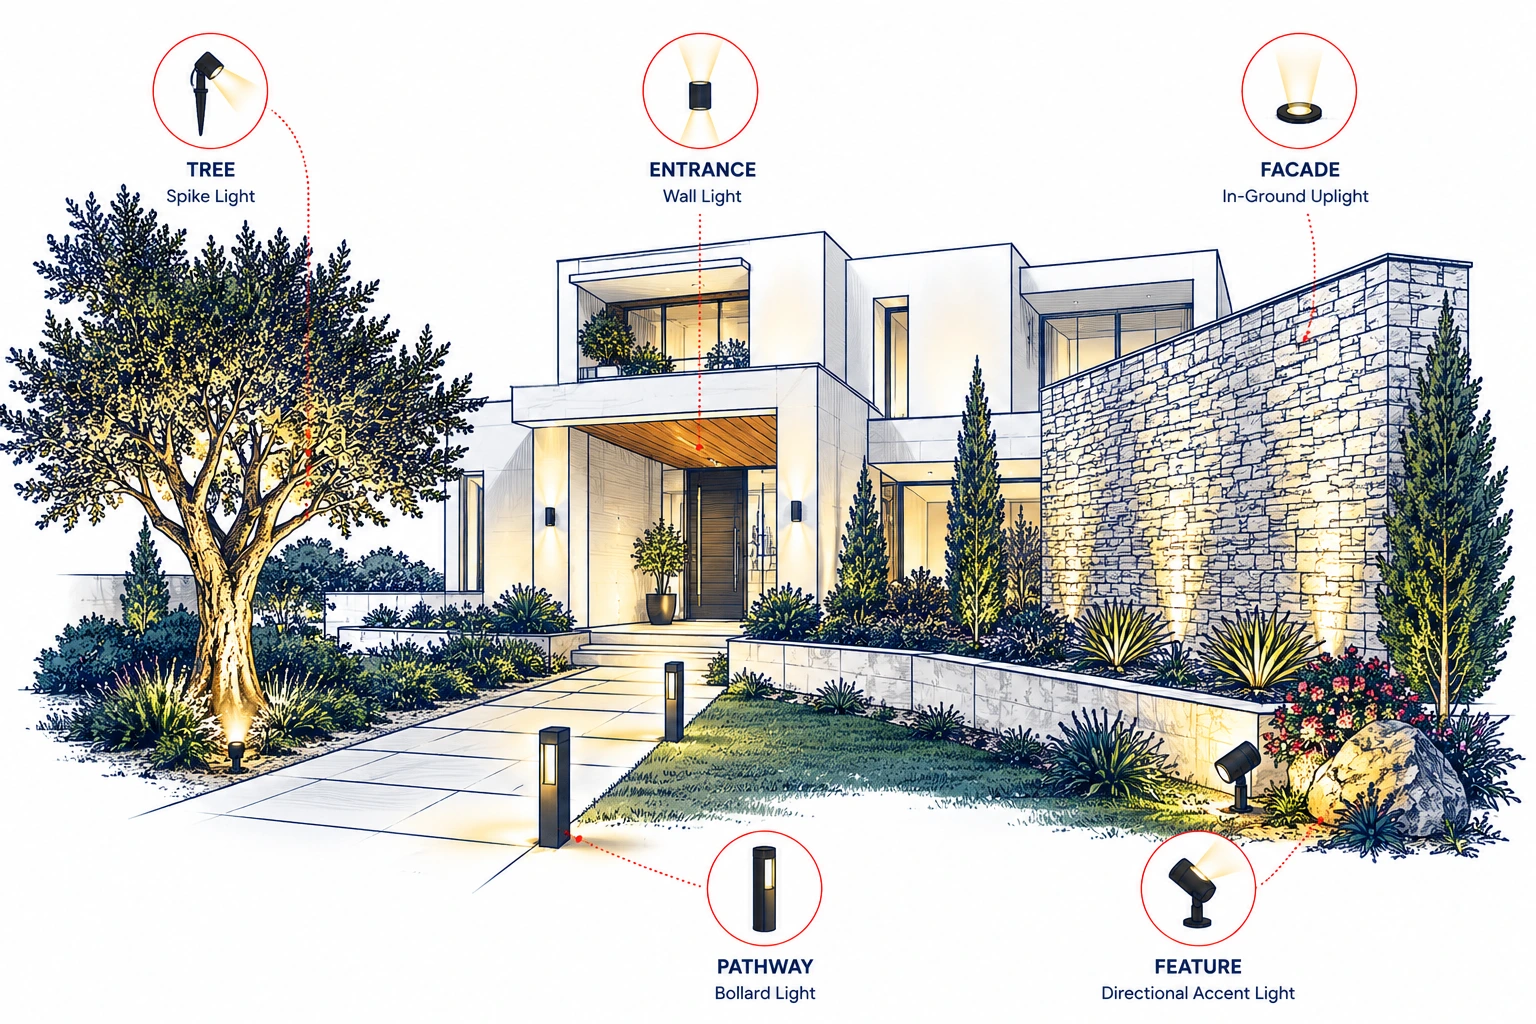
Entrance Lighting
The entrance is usually the first exterior area people experience at night. It should feel welcoming, easy to navigate and comfortably illuminated without directing harsh light toward visitors.
Wall lights beside or around the doorway can provide general illumination while becoming part of the architecture. Ceiling or recessed fixtures can illuminate covered entrances, while carefully positioned accent lighting can highlight stone, wood, house numbers or other entrance details.
A good entrance lighting scheme normally considers three things:
- The doorway — make the entrance immediately identifiable.
- Faces and circulation — provide comfortable visibility for people approaching or leaving.
- Architectural details — use accent light selectively rather than illuminating the entire facade equally.
Avoid placing very bright fixtures directly at eye level. More light does not necessarily improve visibility if glare becomes uncomfortable.
Garden & Landscape Lighting
Garden lighting works best when it reveals selected elements rather than flooding the entire landscape with light.
Trees, planting, sculptures, stone walls and other landscape features can become focal points after dark. Garden spike lights are particularly useful because they can be positioned within planting and aimed toward individual features.
For example:
Small plants & shrubs → soft, controlled accent lighting
Trees → uplighting toward the trunk or canopy
Textured walls → grazing light positioned close to the surface
Sculptures & features → directional accent lighting
Adjustable fixtures also allow the lighting to evolve as plants grow or landscaping changes.
Pathway & Driveway Lighting
Pathway lighting should help people understand where to walk and where the route continues without making the landscape unnecessarily bright.
Bollard lights are a practical solution because they position light close to the walking surface and can define paths, driveways and landscape boundaries. In-ground fixtures can also provide discreet architectural or directional effects where appropriate.
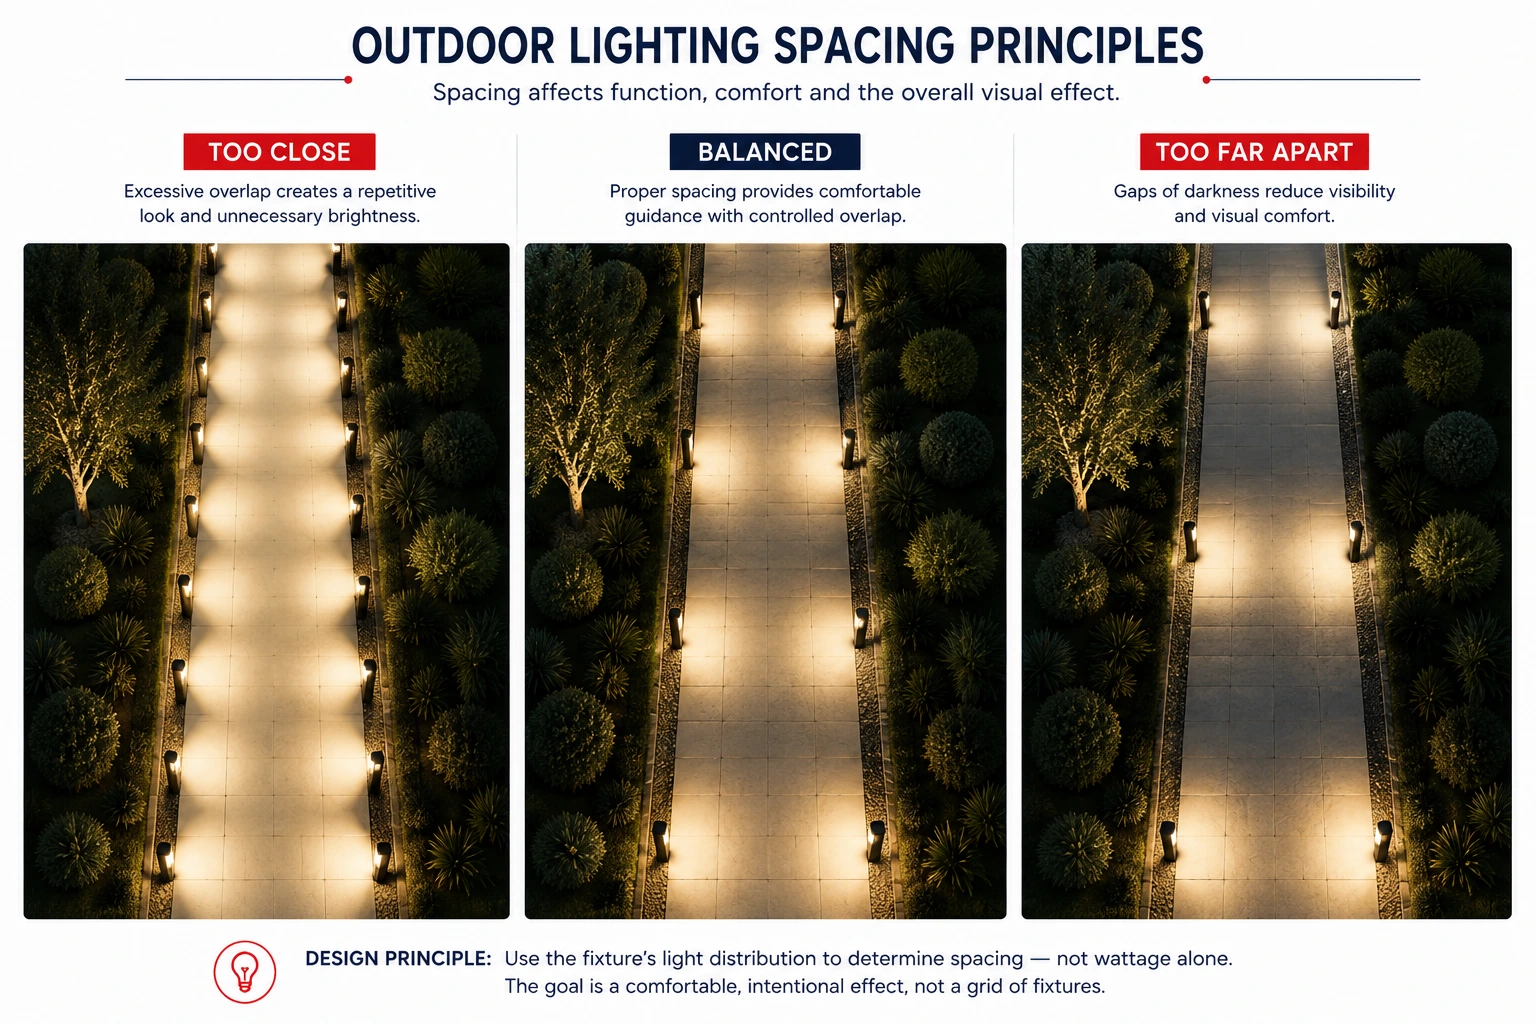
Avoid automatically installing identical fixtures directly opposite each other at very short intervals. This can create a repetitive “runway” effect and introduce more light than the area actually needs.
Instead, consider the fixture's light distribution, the width of the pathway and the surrounding landscape. Alternating placement or wider spacing can often produce a more natural result while maintaining visual guidance.
Facade Lighting
Facade lighting can transform the appearance of a building after sunset, but the technique should respond to the architecture and materials rather than simply making the facade brighter.
Two useful techniques are:
Wall washing — light is distributed more evenly across a surface, helping create broader, softer illumination.
Wall grazing — the fixture is positioned closer to the wall so light travels across the surface at a sharper angle, emphasizing texture, depth and irregularities.
Grazing can be particularly effective on natural stone, textured concrete and other dimensional surfaces, while washing is useful when a more uniform appearance is desired.
In-ground uplights and directional fixtures can also emphasize columns, vertical architectural elements and selected sections of a facade.
Trees & Architectural Features
Not every tree or architectural feature should receive the same lighting treatment.
A narrow tree, column or vertical feature may benefit from a controlled narrow beam, while a broad tree canopy or larger architectural surface may require wider distribution or multiple carefully positioned sources.
Distance matters too. Moving a fixture closer to or farther from its target changes the illuminated area and intensity, even when the fixture itself remains unchanged.
This is why choosing an outdoor fixture based only on wattage can be misleading. Beam angle, lumen output, distance and aiming direction work together to determine the final effect.
Understanding IP Ratings for Outdoor Lights
Choose each fixture for its actual exposure to dust, rain, irrigation and possible water accumulation. IP protection is one part of suitability; drainage, materials, seals and the manufacturer’s installation requirements also matter.
For the meaning and limitations of each protection code, read Lighting IP Ratings Explained. The guidance below applies those ratings to outdoor locations.
Common IP Ratings for Outdoor Lighting
| IP Rating | Protection | Typical Lighting Application |
|---|---|---|
| IP44 | Protected against solid objects over 1 mm and splashing water | Sheltered exterior locations with limited exposure |
| IP54 | Dust-protected and protected against splashing water | Protected outdoor areas |
| IP65 | Dust-tight and protected against water jets | Exposed outdoor lighting such as many wall, bollard and garden fixtures |
| IP67 | Dust-tight and protected against temporary immersion | In-ground and other applications with greater potential water exposure |
| IP68 | Dust-tight and protected for continuous immersion under specified conditions | Specialized submerged applications where the fixture is specifically rated for them |
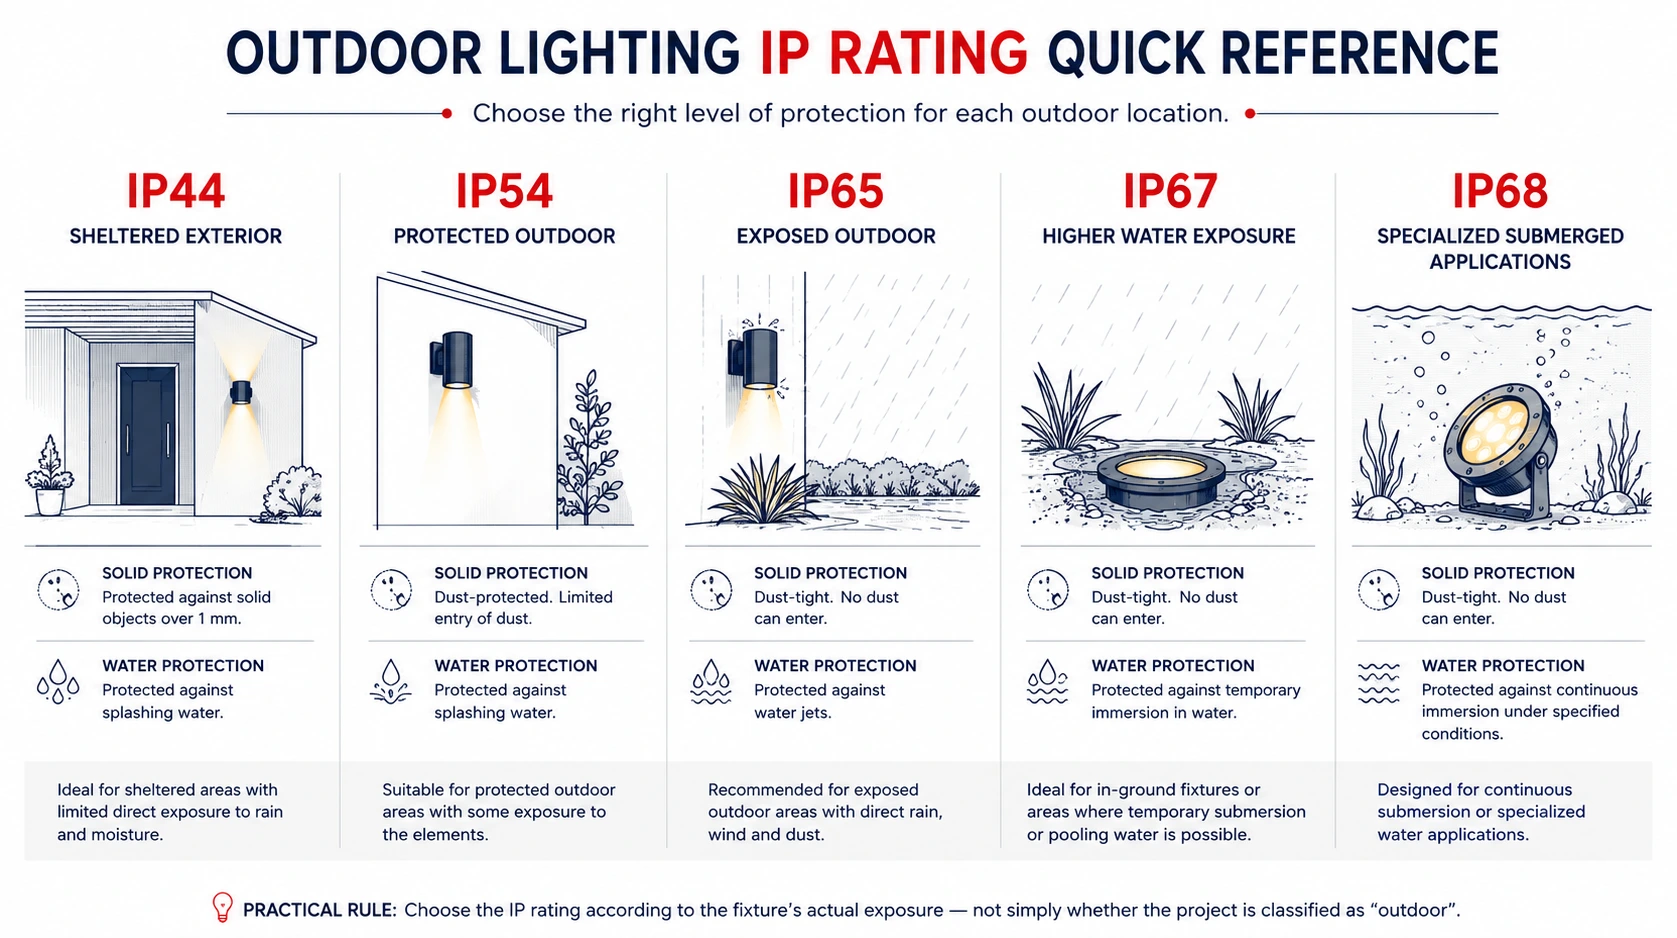
Match the IP Rating to the Location
Rather than choosing one IP rating for an entire outdoor project, consider the conditions around each fixture.
Covered entrance
A fixture protected by the architecture may experience significantly less direct water exposure than one installed on an exposed facade.
Open garden or pathway
Fixtures exposed directly to rain, irrigation and dust generally require greater environmental protection.
In-ground installation
Water accumulation and drainage become particularly important. The fixture rating and installation conditions both need to suit the application.
Pools and submerged applications
These require fixtures specifically designed and rated for the intended installation conditions. An IP rating alone does not make every fixture suitable for every submerged application.
Practical rule: Choose the IP rating according to the fixture's actual exposure—not simply whether the project is classified as “outdoor.”
Choosing the Right Color Temperature for Outdoor Lighting
Color temperature has a major influence on how an outdoor space feels after dark. Two installations using similar fixtures can create completely different atmospheres simply by changing the color of the light.
For most architectural and landscape applications, the choice will often come down to warm 3000K lighting or the cleaner appearance of 4000K.
3000K — Warm & Inviting
3000K produces a warm white light that works particularly well with natural and warm-toned materials.
It is an excellent choice for:
- Residential gardens and terraces
- Entrances
- Natural stone facades
- Wood finishes
- Trees and planting
- Hospitality environments
- Relaxed outdoor seating areas
On stone, vegetation and warm architectural finishes, 3000K generally creates a softer and more welcoming nighttime atmosphere.
For residential outdoor lighting, 3000K is a strong starting point when the objective is warmth and ambience.
4000K — Clean & Contemporary
4000K produces a more neutral white appearance. It can work particularly well where clarity, contrast or a contemporary architectural character is desired.
Consider 4000K for:
- Modern commercial exteriors
- Functional circulation areas
- Contemporary architecture
- Cooler material palettes
- Selected security or task-oriented areas
It can make surfaces appear crisper than 3000K, but using it throughout a residential garden may create a more functional appearance than a warm, relaxed one.
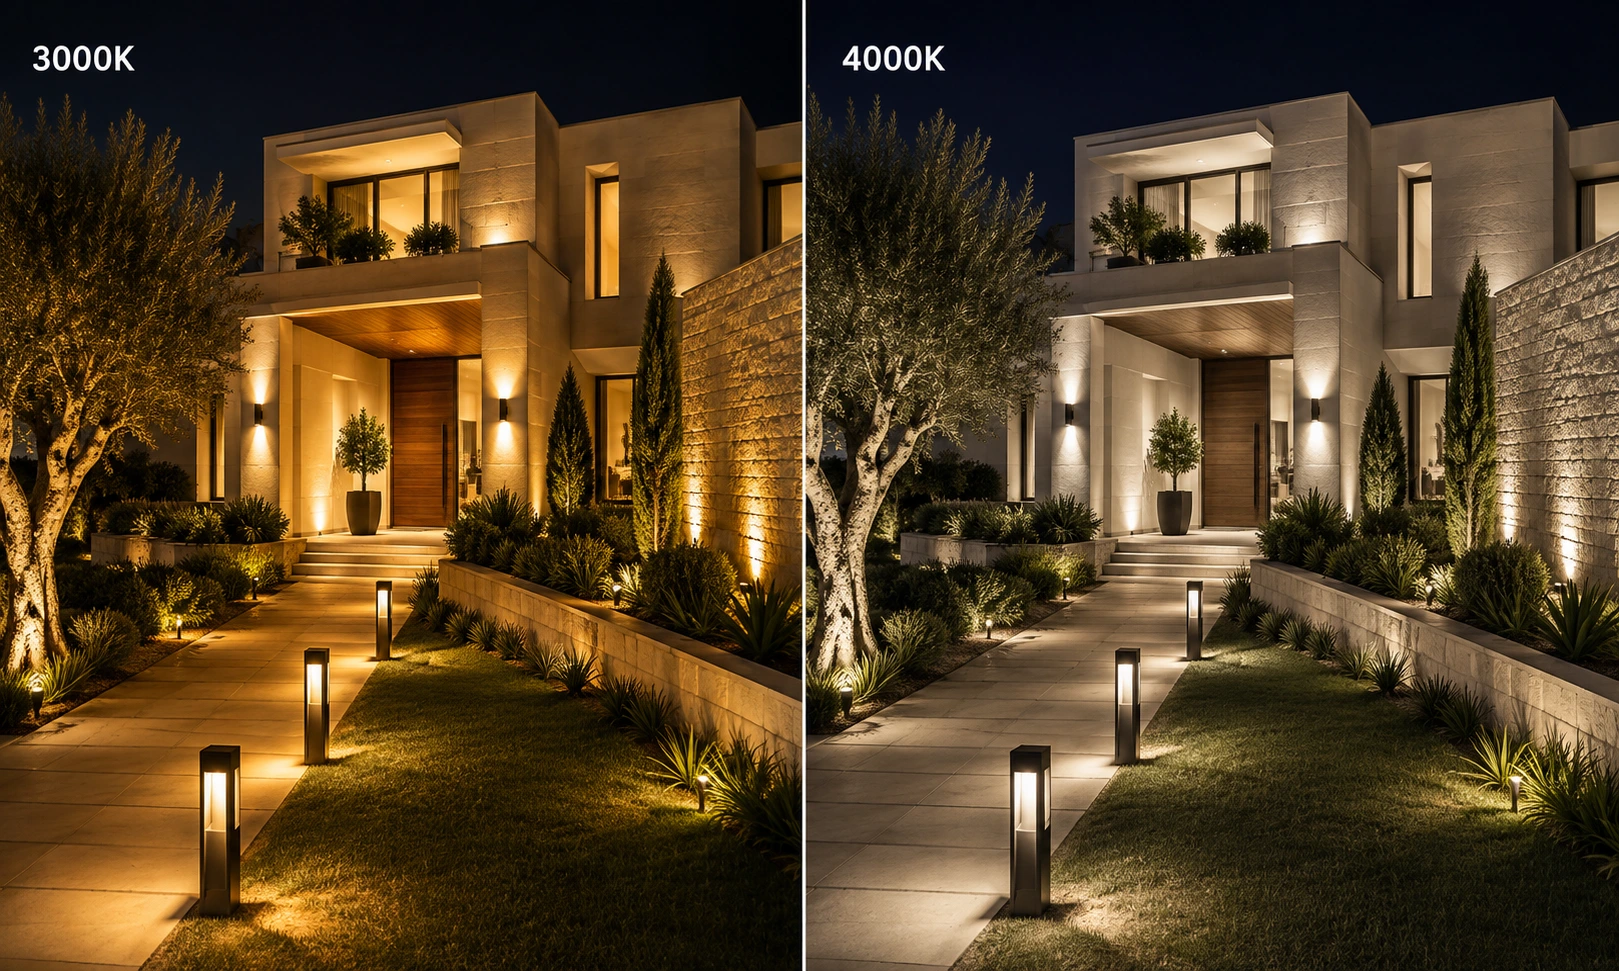
Can You Mix 3000K and 4000K Outdoors?
Yes—but it should be intentional.
Different color temperatures can help distinguish functional areas from decorative ones. For example, a project could use warmer light around landscaping and hospitality areas while using a more neutral light where greater visual clarity is desired.
However, placing different color temperatures immediately beside each other without a clear design reason can make an exterior feel inconsistent.
Design principle: Choose color temperature according to the material, atmosphere and function of the area—not simply according to which fixture is available.
Still deciding between warm and neutral white? Read our 3000K vs 4000K Lighting Guide for a more detailed comparison.
Choosing the Right Beam Angle for Outdoor Lighting
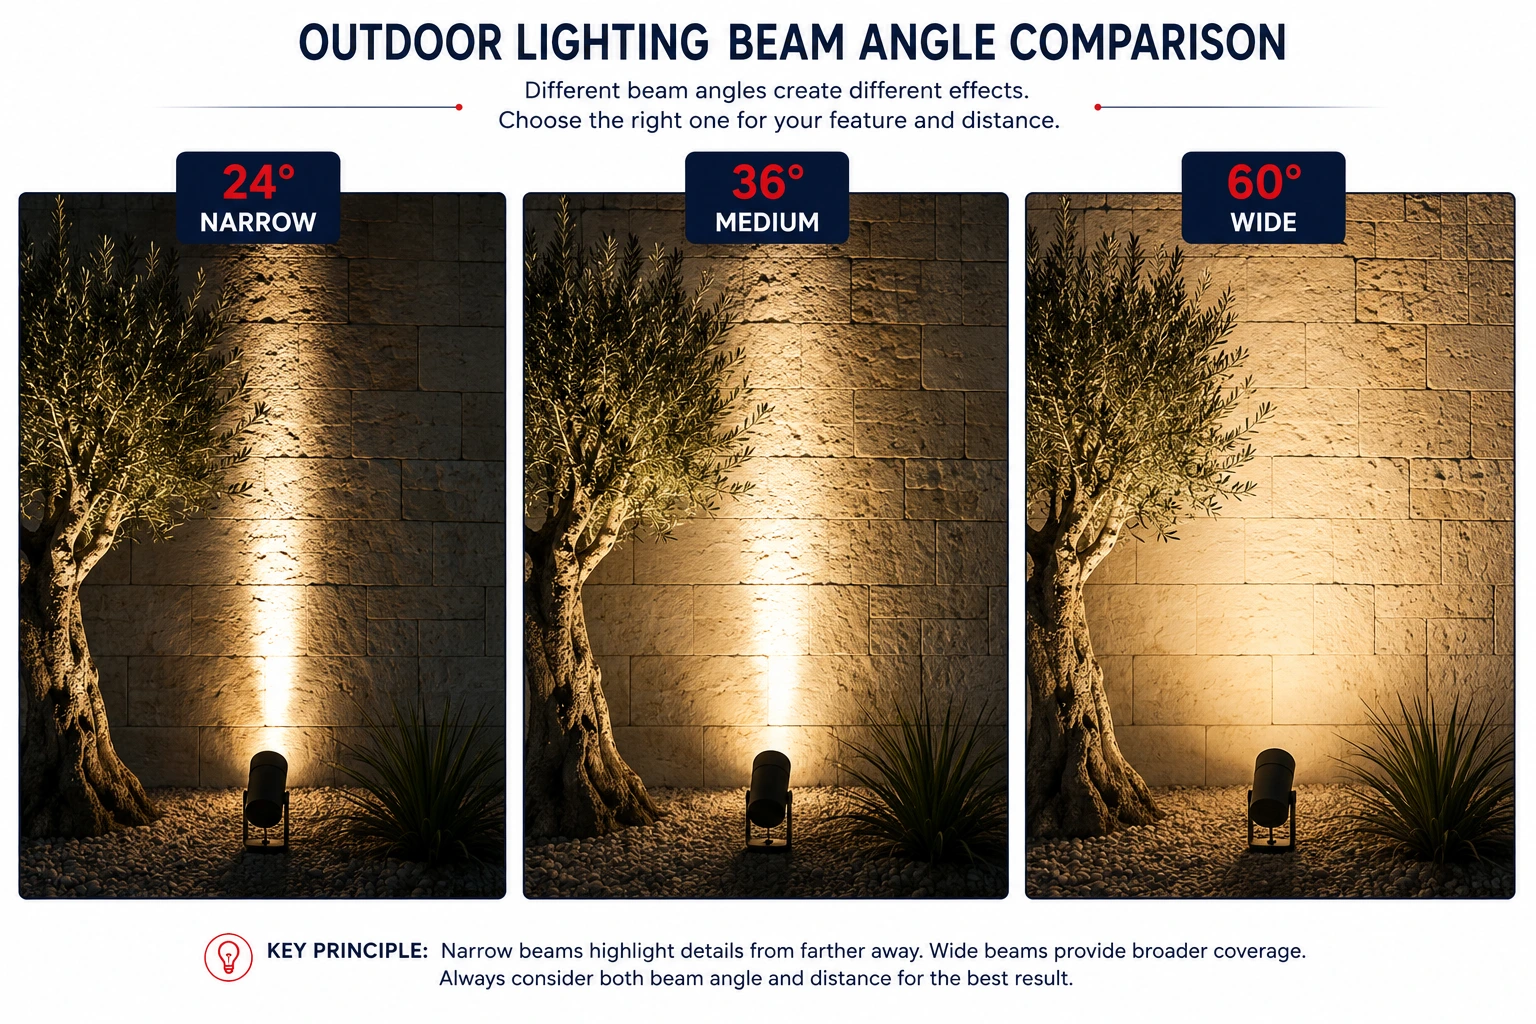
Beam angle determines how concentrated or widely distributed the light will be. Outdoors, this can make the difference between precisely highlighting a tree or column and softly illuminating a larger facade or landscape feature.
Use the Beam Angle Calculator to estimate the light footprint at the actual distance to the wall, tree or feature.
The correct beam depends on the size of the object, distance from the fixture and effect you want to create.
Narrow Beam — Focused Accent Lighting
Narrow beams concentrate light over a smaller area and are useful when you want to emphasize a specific feature.
Typical applications include:
- Tall or narrow trees
- Columns
- Architectural details
- Sculptures
- Features viewed from a greater distance
A narrow beam can create stronger visual contrast, particularly when the surrounding area is intentionally kept darker.
Medium Beam — Versatile Outdoor Accent Lighting
A medium beam provides a balance between concentration and coverage.
It can work well for:
- Medium-sized trees
- Entrance features
- Sections of a facade
- Landscape elements
- General architectural accent lighting
For many outdoor applications, this provides useful flexibility without creating either an excessively concentrated spot or very broad illumination.
Wide Beam — Broader Coverage
Wide beams distribute light across a larger area and are better suited when the objective is to illuminate a broad surface or feature.
Typical uses include:
- Wide tree canopies
- Large walls
- Broad landscape features
- Areas requiring softer, more distributed illumination
However, a wider beam does not automatically mean better general lighting. If too much light falls outside the intended area, the result can lose contrast and create unnecessary spill light.
Distance Changes the Result
Beam angle cannot be considered independently from distance.
As a light source moves farther away from the illuminated surface, its beam covers a larger area. Move the same fixture closer and the illuminated area becomes smaller.
This means that two identical fixtures with the same beam angle can produce very different results simply because they are installed at different distances.
Key principle: Choose beam angle according to what you are illuminating and from where—not according to wattage alone.
For a deeper explanation of 24°, 36° and 60° beams, read our Beam Angle Guide.
Published August 13, 2026 · Updated 9 September 2026
Outdoor lighting does more than illuminate a property after dark. A well-planned lighting scheme improves safety, visibility and comfort while revealing the architecture and landscape in a completely different way at night.
From welcoming entrances and clearly defined pathways to illuminated stone facades, trees and garden features, the best results come from choosing each fixture for a specific purpose rather than simply adding more light.
This guide explains how to plan outdoor lighting for gardens, entrances, pathways and facades, including which fixture types to use, where to position them, and how factors such as IP rating, color temperature and beam angle affect the final result.
Start With the Purpose of Your Outdoor Lighting
Before choosing a fixture, decide what the light needs to accomplish. Most successful outdoor lighting schemes combine four functions.

Safety
Steps, changes in level, pathways and entrances need enough illumination to make movement comfortable after dark. The objective is good visibility without creating excessive brightness or glare.
Navigation
Lighting can naturally guide people toward an entrance, along a pathway or through a garden. Bollards, low-level fixtures and carefully positioned wall lights can define circulation without illuminating the entire landscape.
Architecture
Exterior lighting can reveal materials and architectural details that disappear after sunset. Stone walls, columns, textured surfaces and facade elements can be emphasized using techniques such as uplighting, grazing and wall washing.
Landscape & Atmosphere
Trees, planting and landscape features add depth to an exterior at night. Selective accent lighting creates layers of brightness and shadow, producing a more comfortable and visually interesting environment.
The key principle: Don't try to illuminate everything equally. Good outdoor lighting uses contrast. Decide what should be visible, what should become a focal point, and what can remain in shadow.
Planning your exterior? Explore our Outdoor Lighting collection for garden, pathway, facade and entrance lighting.
Choose Outdoor Lighting by Area
Different outdoor areas have different lighting requirements. An entrance needs comfortable visibility and a welcoming atmosphere, while a facade or mature tree may need controlled accent lighting. Choosing fixtures according to the area—and the effect you want to create—produces a more balanced result than using the same type of light throughout the property.

Entrance Lighting
The entrance is usually the first exterior area people experience at night. It should feel welcoming, easy to navigate and comfortably illuminated without directing harsh light toward visitors.
Wall lights beside or around the doorway can provide general illumination while becoming part of the architecture. Ceiling or recessed fixtures can illuminate covered entrances, while carefully positioned accent lighting can highlight stone, wood, house numbers or other entrance details.
A good entrance lighting scheme normally considers three things:
- The doorway — make the entrance immediately identifiable.
- Faces and circulation — provide comfortable visibility for people approaching or leaving.
- Architectural details — use accent light selectively rather than illuminating the entire facade equally.
Avoid placing very bright fixtures directly at eye level. More light does not necessarily improve visibility if glare becomes uncomfortable.
Garden & Landscape Lighting
Garden lighting works best when it reveals selected elements rather than flooding the entire landscape with light.
Trees, planting, sculptures, stone walls and other landscape features can become focal points after dark. Garden spike lights are particularly useful because they can be positioned within planting and aimed toward individual features.
For example:
Small plants & shrubs → soft, controlled accent lighting
Trees → uplighting toward the trunk or canopy
Textured walls → grazing light positioned close to the surface
Sculptures & features → directional accent lighting
Adjustable fixtures also allow the lighting to evolve as plants grow or landscaping changes.
Pathway & Driveway Lighting
Pathway lighting should help people understand where to walk and where the route continues without making the landscape unnecessarily bright.
Bollard lights are a practical solution because they position light close to the walking surface and can define paths, driveways and landscape boundaries. In-ground fixtures can also provide discreet architectural or directional effects where appropriate.
Avoid automatically installing identical fixtures directly opposite each other at very short intervals. This can create a repetitive “runway” effect and introduce more light than the area actually needs.
Instead, consider the fixture's light distribution, the width of the pathway and the surrounding landscape. Alternating placement or wider spacing can often produce a more natural result while maintaining visual guidance.
Facade Lighting
Facade lighting can transform the appearance of a building after sunset, but the technique should respond to the architecture and materials rather than simply making the facade brighter.
Two useful techniques are:
Wall washing — light is distributed more evenly across a surface, helping create broader, softer illumination.
Wall grazing — the fixture is positioned closer to the wall so light travels across the surface at a sharper angle, emphasizing texture, depth and irregularities.
Grazing can be particularly effective on natural stone, textured concrete and other dimensional surfaces, while washing is useful when a more uniform appearance is desired.
In-ground uplights and directional fixtures can also emphasize columns, vertical architectural elements and selected sections of a facade.
Trees & Architectural Features
Not every tree or architectural feature should receive the same lighting treatment.
A narrow tree, column or vertical feature may benefit from a controlled narrow beam, while a broad tree canopy or larger architectural surface may require wider distribution or multiple carefully positioned sources.
Distance matters too. Moving a fixture closer to or farther from its target changes the illuminated area and intensity, even when the fixture itself remains unchanged.
This is why choosing an outdoor fixture based only on wattage can be misleading. Beam angle, lumen output, distance and aiming direction work together to determine the final effect.
Understanding IP Ratings for Outdoor Lights
Choose each fixture for its actual exposure to dust, rain, irrigation and possible water accumulation. IP protection is one part of suitability; drainage, materials, seals and the manufacturer’s installation requirements also matter.
For the meaning and limitations of each protection code, read Lighting IP Ratings Explained. The guidance below applies those ratings to outdoor locations.
Common IP Ratings for Outdoor Lighting
| IP Rating | Protection | Typical Lighting Application |
|---|---|---|
| IP44 | Protected against solid objects over 1 mm and splashing water | Sheltered exterior locations with limited exposure |
| IP54 | Dust-protected and protected against splashing water | Protected outdoor areas |
| IP65 | Dust-tight and protected against water jets | Exposed outdoor lighting such as many wall, bollard and garden fixtures |
| IP67 | Dust-tight and protected against temporary immersion | In-ground and other applications with greater potential water exposure |
| IP68 | Dust-tight and protected for continuous immersion under specified conditions | Specialized submerged applications where the fixture is specifically rated for them |

Match the IP Rating to the Location
Rather than choosing one IP rating for an entire outdoor project, consider the conditions around each fixture.
Covered entrance
A fixture protected by the architecture may experience significantly less direct water exposure than one installed on an exposed facade.
Open garden or pathway
Fixtures exposed directly to rain, irrigation and dust generally require greater environmental protection.
In-ground installation
Water accumulation and drainage become particularly important. The fixture rating and installation conditions both need to suit the application.
Pools and submerged applications
These require fixtures specifically designed and rated for the intended installation conditions. An IP rating alone does not make every fixture suitable for every submerged application.
Practical rule: Choose the IP rating according to the fixture's actual exposure—not simply whether the project is classified as “outdoor.”
Choosing the Right Color Temperature for Outdoor Lighting
Color temperature has a major influence on how an outdoor space feels after dark. Two installations using similar fixtures can create completely different atmospheres simply by changing the color of the light.
For most architectural and landscape applications, the choice will often come down to warm 3000K lighting or the cleaner appearance of 4000K.
3000K — Warm & Inviting
3000K produces a warm white light that works particularly well with natural and warm-toned materials.
It is an excellent choice for:
- Residential gardens and terraces
- Entrances
- Natural stone facades
- Wood finishes
- Trees and planting
- Hospitality environments
- Relaxed outdoor seating areas
On stone, vegetation and warm architectural finishes, 3000K generally creates a softer and more welcoming nighttime atmosphere.
For residential outdoor lighting, 3000K is a strong starting point when the objective is warmth and ambience.
4000K — Clean & Contemporary
4000K produces a more neutral white appearance. It can work particularly well where clarity, contrast or a contemporary architectural character is desired.
Consider 4000K for:
- Modern commercial exteriors
- Functional circulation areas
- Contemporary architecture
- Cooler material palettes
- Selected security or task-oriented areas
It can make surfaces appear crisper than 3000K, but using it throughout a residential garden may create a more functional appearance than a warm, relaxed one.

Can You Mix 3000K and 4000K Outdoors?
Yes—but it should be intentional.
Different color temperatures can help distinguish functional areas from decorative ones. For example, a project could use warmer light around landscaping and hospitality areas while using a more neutral light where greater visual clarity is desired.
However, placing different color temperatures immediately beside each other without a clear design reason can make an exterior feel inconsistent.
Design principle: Choose color temperature according to the material, atmosphere and function of the area—not simply according to which fixture is available.
Still deciding between warm and neutral white? Read our 3000K vs 4000K Lighting Guide for a more detailed comparison.
Choosing the Right Beam Angle for Outdoor Lighting
Beam angle determines how concentrated or widely distributed the light will be. Outdoors, this can make the difference between precisely highlighting a tree or column and softly illuminating a larger facade or landscape feature.
Use the Beam Angle Calculator to estimate the light footprint at the actual distance to the wall, tree or feature.
The correct beam depends on the size of the object, distance from the fixture and effect you want to create.
Narrow Beam — Focused Accent Lighting
Narrow beams concentrate light over a smaller area and are useful when you want to emphasize a specific feature.
Typical applications include:
- Tall or narrow trees
- Columns
- Architectural details
- Sculptures
- Features viewed from a greater distance
A narrow beam can create stronger visual contrast, particularly when the surrounding area is intentionally kept darker.
Medium Beam — Versatile Outdoor Accent Lighting
A medium beam provides a balance between concentration and coverage.
It can work well for:
- Medium-sized trees
- Entrance features
- Sections of a facade
- Landscape elements
- General architectural accent lighting
For many outdoor applications, this provides useful flexibility without creating either an excessively concentrated spot or very broad illumination.
Wide Beam — Broader Coverage
Wide beams distribute light across a larger area and are better suited when the objective is to illuminate a broad surface or feature.
Typical uses include:
- Wide tree canopies
- Large walls
- Broad landscape features
- Areas requiring softer, more distributed illumination
However, a wider beam does not automatically mean better general lighting. If too much light falls outside the intended area, the result can lose contrast and create unnecessary spill light.

Distance Changes the Result
Beam angle cannot be considered independently from distance.
As a light source moves farther away from the illuminated surface, its beam covers a larger area. Move the same fixture closer and the illuminated area becomes smaller.
This means that two identical fixtures with the same beam angle can produce very different results simply because they are installed at different distances.
Key principle: Choose beam angle according to what you are illuminating and from where—not according to wattage alone.
For a deeper explanation of 24°, 36° and 60° beams, read our Beam Angle Guide.
How Far Apart Should Outdoor Lights Be?
There is no single spacing rule that works for every outdoor lighting project.
The correct distance between fixtures depends on the fixture output, beam angle, mounting height, surrounding surfaces and the visual effect you want to create.
That means spacing should be planned from the lighting effect—not simply from the length of the pathway or wall.
Pathways
For pathways, the goal is usually continuous visual guidance without creating a repetitive line of bright spots.
Very close spacing can produce an overly uniform or “runway” appearance. Wider, carefully planned spacing often feels more natural, especially when the fixtures have good lateral light distribution.
Consider:
- Path width
- Fixture height
- Light distribution
- Surrounding planting
- Alternating versus symmetrical placement
- Whether the path needs orientation lighting or stronger functional illumination
Bollards
Bollards should be spaced according to how far their light actually spreads across the ground.
Two bollards of the same wattage can require very different spacing if one produces a wide asymmetric distribution and the other creates a narrow pool of light.
Design principle: Use the fixture's light distribution to determine spacing—not wattage alone.
Wall Lights
Wall-light spacing depends heavily on the intended effect.
For general exterior illumination, fixtures may be spaced to create comfortable overlap between illuminated areas.
For decorative up/down lighting, wider spacing can preserve contrast and allow each beam pattern to remain visible rather than merging into one continuous wash.
Facade Uplights
For facade lighting, spacing depends on:
- Beam width
- Distance from the wall
- Height of the facade
- Surface texture
- Whether you want distinct columns of light or more continuous illumination
Moving fixtures farther from a facade generally increases beam spread, while positioning them close to the surface creates a more concentrated grazing effect.
Trees & Landscape Features
Landscape lighting is rarely improved by placing fixtures at identical intervals.
Instead, position lights according to the location, size and importance of each feature.
One mature tree may justify its own carefully aimed fixture, while lower planting may only need indirect spill light from nearby sources.
A successful outdoor layout should feel intentional after dark—not like a grid of fixtures.
7 Common Outdoor Lighting Mistakes to Avoid
Even good fixtures can produce poor results when they are incorrectly selected, positioned or aimed. Avoiding a few common mistakes can significantly improve both the appearance and functionality of an outdoor lighting scheme.
1. Over-Lighting the Property
More light is not automatically better. Illuminating every wall, tree and pathway equally removes contrast and can make an exterior feel flat.
Better approach: Choose focal points and deliberately preserve darker areas between them.
2. Creating Glare
An exposed light source directed toward eye level can be uncomfortable even when its lumen output is relatively low.
Better approach: Control the aiming angle, mounting position and beam direction so the light reaches the intended surface rather than the viewer.
3. Choosing Fixtures by Wattage Alone
Wattage describes power consumption—not how the light will actually perform.
Better approach: Consider lumens, beam angle, mounting distance and light distribution together.
4. Using the Wrong IP Rating
A beautiful fixture is still the wrong choice if its environmental protection does not suit its installation location.
Better approach: Match the IP rating to actual exposure to rain, irrigation, dust and water.
5. Ignoring Color Temperature
Mixing noticeably different color temperatures without a design reason can make an exterior feel inconsistent.
Better approach: Establish a primary color temperature and introduce another only when it serves a clear functional or architectural purpose.
6. Spacing Fixtures Mechanically
Installing lights at identical intervals without considering their distribution can create excessive brightness, dark gaps or the “runway” effect we discussed earlier.
Better approach: Plan spacing according to the light pattern and the features being illuminated.
7. Forgetting What the Lighting Looks Like From Inside
Outdoor lighting is often viewed through windows and glass doors as much as it is experienced outside. Poorly aimed fixtures can create glare or distracting bright points when viewed from the interior.
Better approach: Evaluate important exterior lighting positions from both outside and inside the property.
Good outdoor lighting should reveal the property—not reveal every light fixture.
Build Outdoor Lighting in Layers
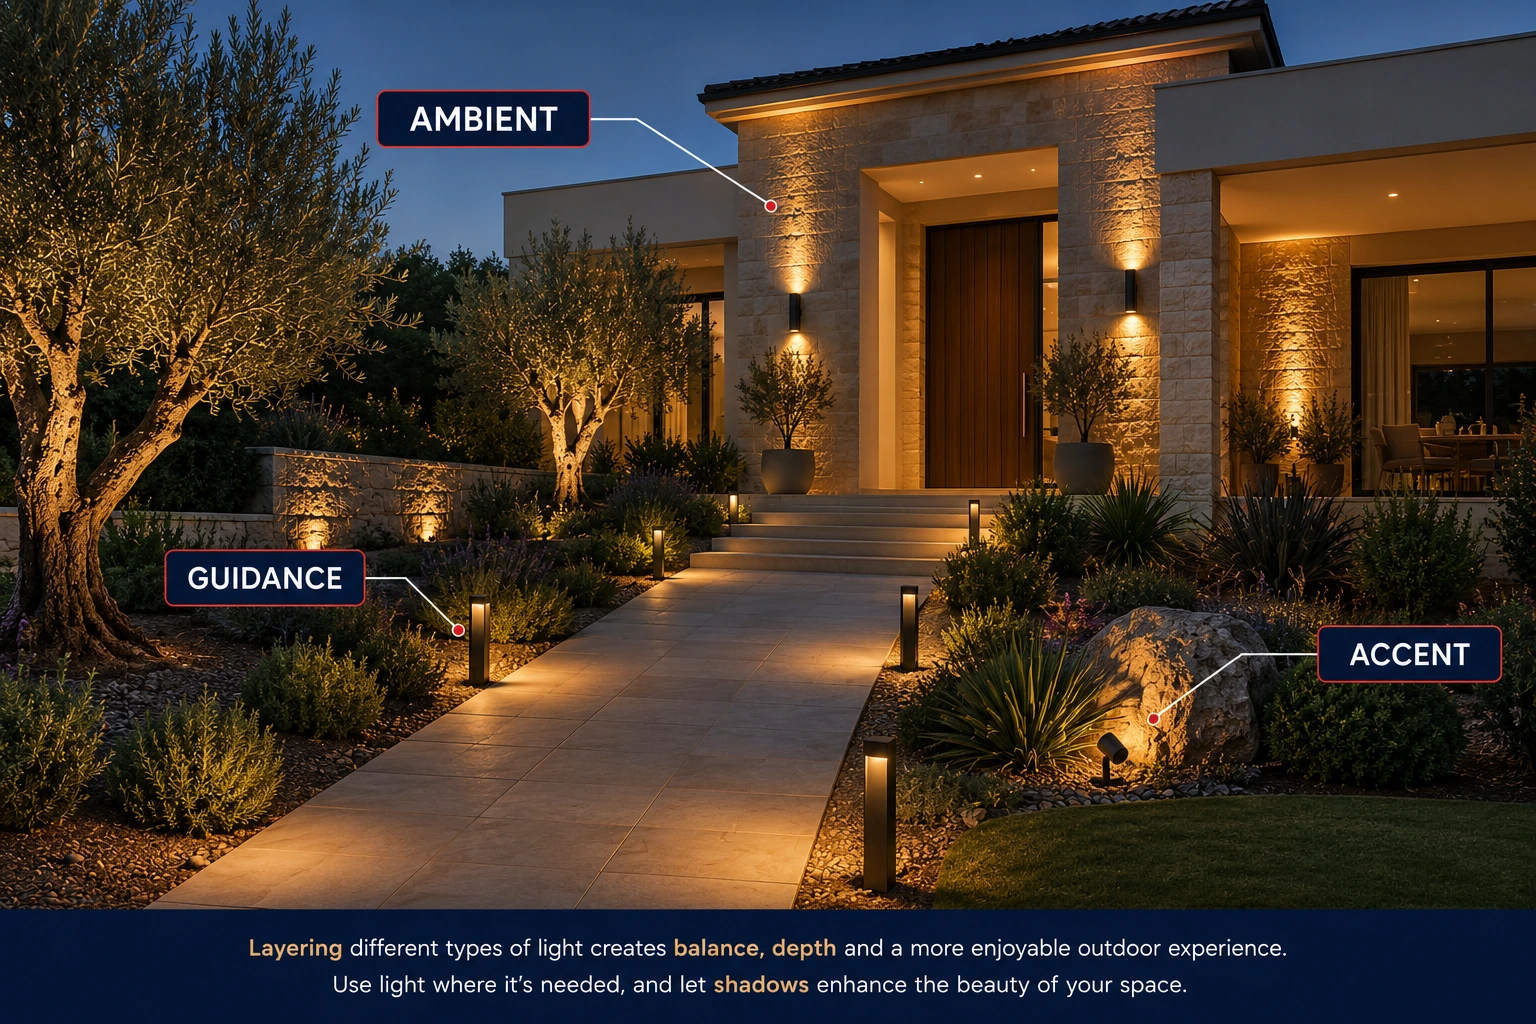
The strongest outdoor lighting schemes rarely rely on one fixture type. Instead, they combine several layers of light, each performing a different role.
Ambient Lighting
Provides the general foundation around entrances, terraces and circulation areas. Wall lights, ceiling fixtures and other architectural lighting can establish comfortable overall visibility.
Guidance Lighting
Helps people move through the property. Bollards, low-level lights and selected in-ground fixtures can define pathways, steps and changes in level.
Accent Lighting
Creates focal points and visual depth. Spike lights, projectors and directional fixtures can highlight trees, stone surfaces, sculptures and architectural features.
The Result: Light + Shadow
The layers should work together rather than compete. Not every surface needs illumination, and not every fixture needs to operate at the same intensity.
Layer the light, not the brightness. Combine functional illumination with carefully selected focal points while preserving enough darkness to create depth.
Outdoor Lighting by Fixture Type
Once the lighting effect is defined, choosing the right fixture becomes much easier. Each outdoor fixture type is suited to different applications.
Garden & Spike Lights
Adjustable and easy to position within landscaping, spike lights are ideal for trees, shrubs, planting, sculptures and architectural accents.
Explore Garden & Spike Lights
Bollard & Pole Lights
Designed for low-level illumination and visual guidance, bollards work well along pathways, driveways, entrances and landscaped circulation areas.
Explore Bollard & Pole Lights
In-Ground Lights
Installed discreetly at ground level, these fixtures can provide architectural uplighting, facade grazing and landscape accents while keeping the fixture itself visually minimal.
Explore In-Ground Lights
Outdoor Wall Lights
Wall-mounted fixtures can combine functional illumination with architectural character around entrances, terraces, exterior walls and circulation areas.
Explore Wall Lights
Choose the fixture for the effect you need—not the other way around. Start with what should be illuminated, then select the fixture, beam and output capable of producing it.
For the complete selection, explore Saleh Deco Outdoor Lighting.
Planning Your Outdoor Lighting Project
A good outdoor lighting plan should be developed before choosing quantities or final fixture positions. Start with the property itself and work from the desired nighttime experience.
1. Identify What Needs Light
Walk through the exterior and identify the important areas:
- Entrances and access points
- Steps and pathways
- Driveways
- Terraces and seating areas
- Trees and landscaping
- Facades and architectural features
Not everything needs to be illuminated.
2. Define the Purpose
For each area, decide whether the light is needed for safety, navigation, ambience or accent lighting. This immediately narrows the appropriate fixture choices.
3. Select the Lighting Effect
Decide how each feature should appear at night: softly illuminated, highlighted with a narrow beam, grazed to reveal texture or broadly washed with light.
Then select the fixture type, beam angle, output and color temperature capable of creating that effect.
4. Check the Installation Environment
Confirm the required IP rating, mounting conditions, electrical supply and exposure to rain, irrigation or water accumulation before finalizing the fixture.
5. Review the Complete Scene
Finally, consider all the lighting together.
Check for excessive brightness, glare, conflicting color temperatures and unnecessary repetition. The objective is a balanced composition where functional lighting and atmosphere work together.
Plan the effect first. Choose the fixture second.
A Simple Outdoor Lighting Checklist
Before finalizing the project, ask:
✓ What needs to be visible?
✓ What deserves to become a focal point?
✓ Where is functional lighting required?
✓ Are the beam angles appropriate?
✓ Is the color temperature consistent?
✓ Does each fixture have a suitable IP rating?
✓ Are pathways comfortably illuminated without over-lighting?
✓ Have glare and views from inside been considered?
✓ Are there enough areas of shadow to preserve depth?
Bring Your Outdoor Lighting Plan Together
Successful outdoor lighting is not about using more fixtures. It is about placing the right light in the right place for the right purpose.
Start with the areas that need visibility, identify the architectural and landscape features worth highlighting, then build the scheme using appropriate fixture types, beam angles, color temperatures and protection ratings.
The result should feel comfortable, intentional and balanced—guiding movement, revealing architecture and allowing the landscape to remain part of the night.
Explore Outdoor Lighting
Discover lighting solutions for gardens, pathways, entrances and architectural applications in our Outdoor Lighting collection.
Planning a Project?
For residential, commercial or landscape projects requiring product selection or lighting support, contact Saleh Deco and share your project requirements with our team.
Good outdoor lighting doesn't compete with the architecture. It reveals it.