
Kitchen lighting has to do several jobs at the same time. It needs to make the room comfortable to move through, provide clear light over work surfaces, illuminate an island or dining area, and still feel pleasant when the cooking is finished.
One of the most common kitchen lighting mistakes is placing ceiling spotlights according to the ceiling rather than according to the worktop below.
If the main light is positioned behind you while you prepare food, your own body can cast a shadow across the countertop. A better kitchen plan starts with the tasks and furniture layout first, then positions the lighting around them.
Planning recessed lighting? See our Spotlight Layout Calculator.
The 4 Lighting Jobs in a Kitchen
A kitchen usually needs more than one type of light. Each layer solves a different problem, and the best results come from combining them rather than asking one fixture to do everything.
Task Lighting
Adds stronger, more focused light where food is prepared, washed or handled.
Typical areas:
- countertops
- sink
- hob
- preparation zones
This is often where under-cabinet lighting becomes especially useful.
LED Strip Lighting Design Guide
General Lighting
Provides comfortable overall illumination for moving around the kitchen and using the space safely.
Typical options:
- recessed spotlights
- surface-mounted ceiling lights
- linear ceiling fixtures
Accent & Mood Lighting
Adds depth and atmosphere when full task lighting is not needed.
Typical options:
- indirect LED strip
- illuminated shelving
- cabinet lighting
- decorative wall or pendant light
Island & Dining Lighting
Provides useful light over the island while also helping define it visually within the room.
Typical options:
- pendant lights
- directional spotlights
- a combination of both
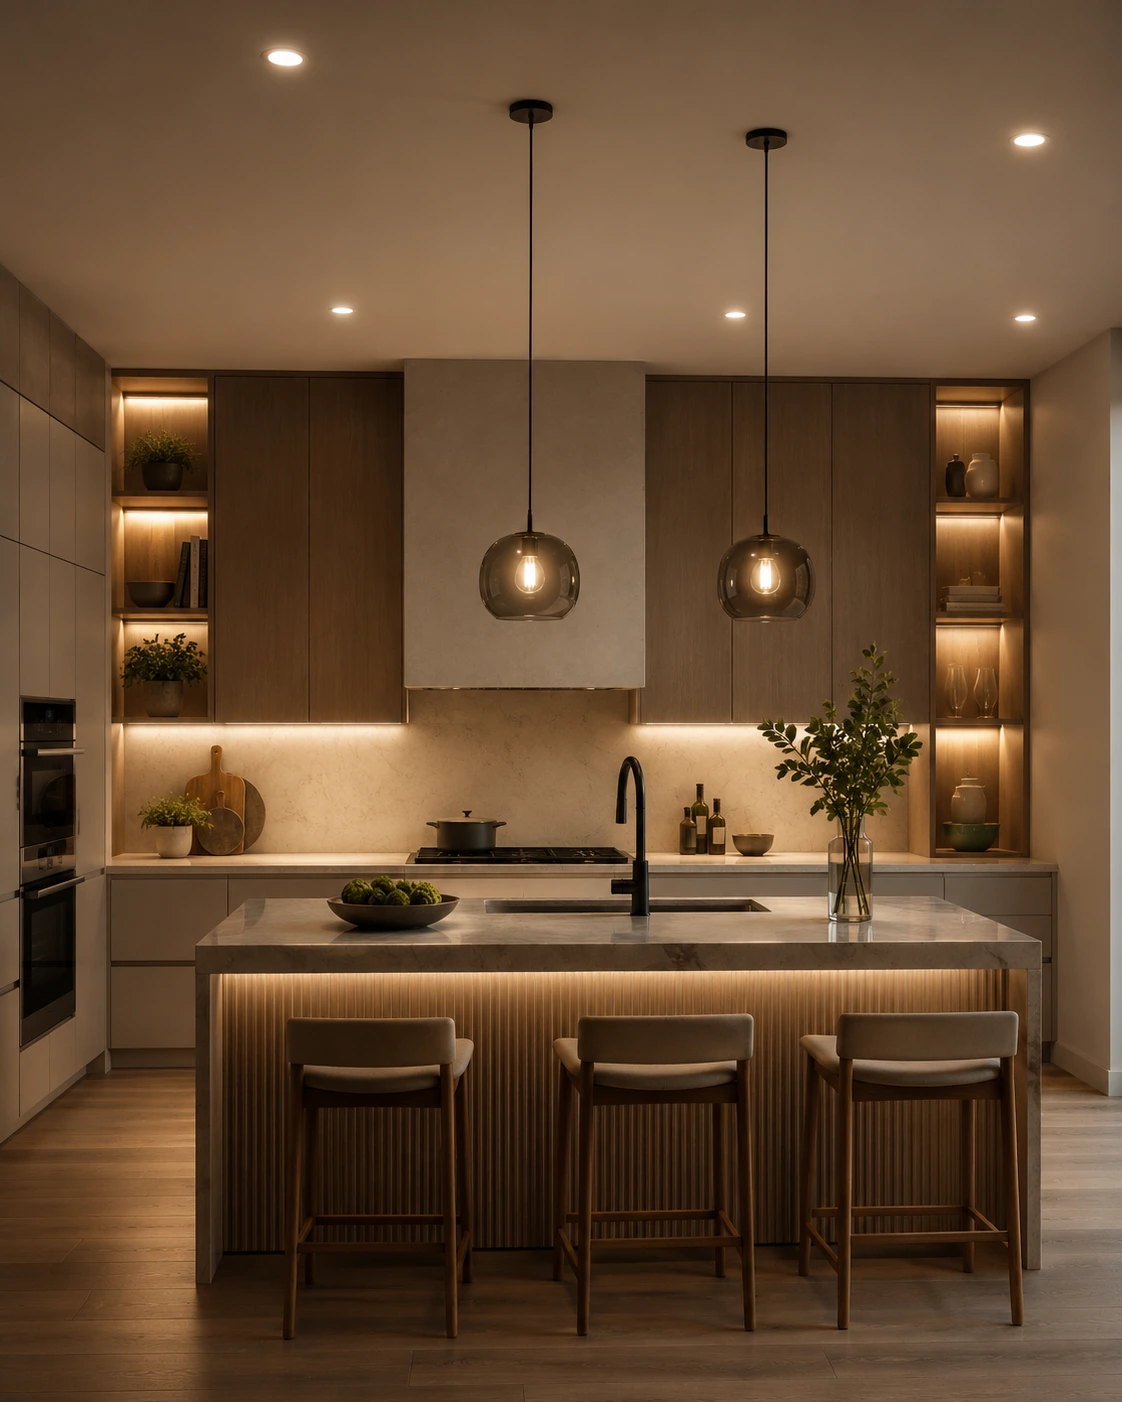
A good kitchen lighting plan is usually layered by function: general light for the room, task light for the worktops, focused light over the island, and softer accent light for atmosphere.
Countertop Task Lighting: Avoid Working in Your Own Shadow
Kitchen worktops need light where the task happens, not just where the ceiling looks balanced. If the main light is behind you, your body can block it and cast a shadow exactly where you are preparing food.
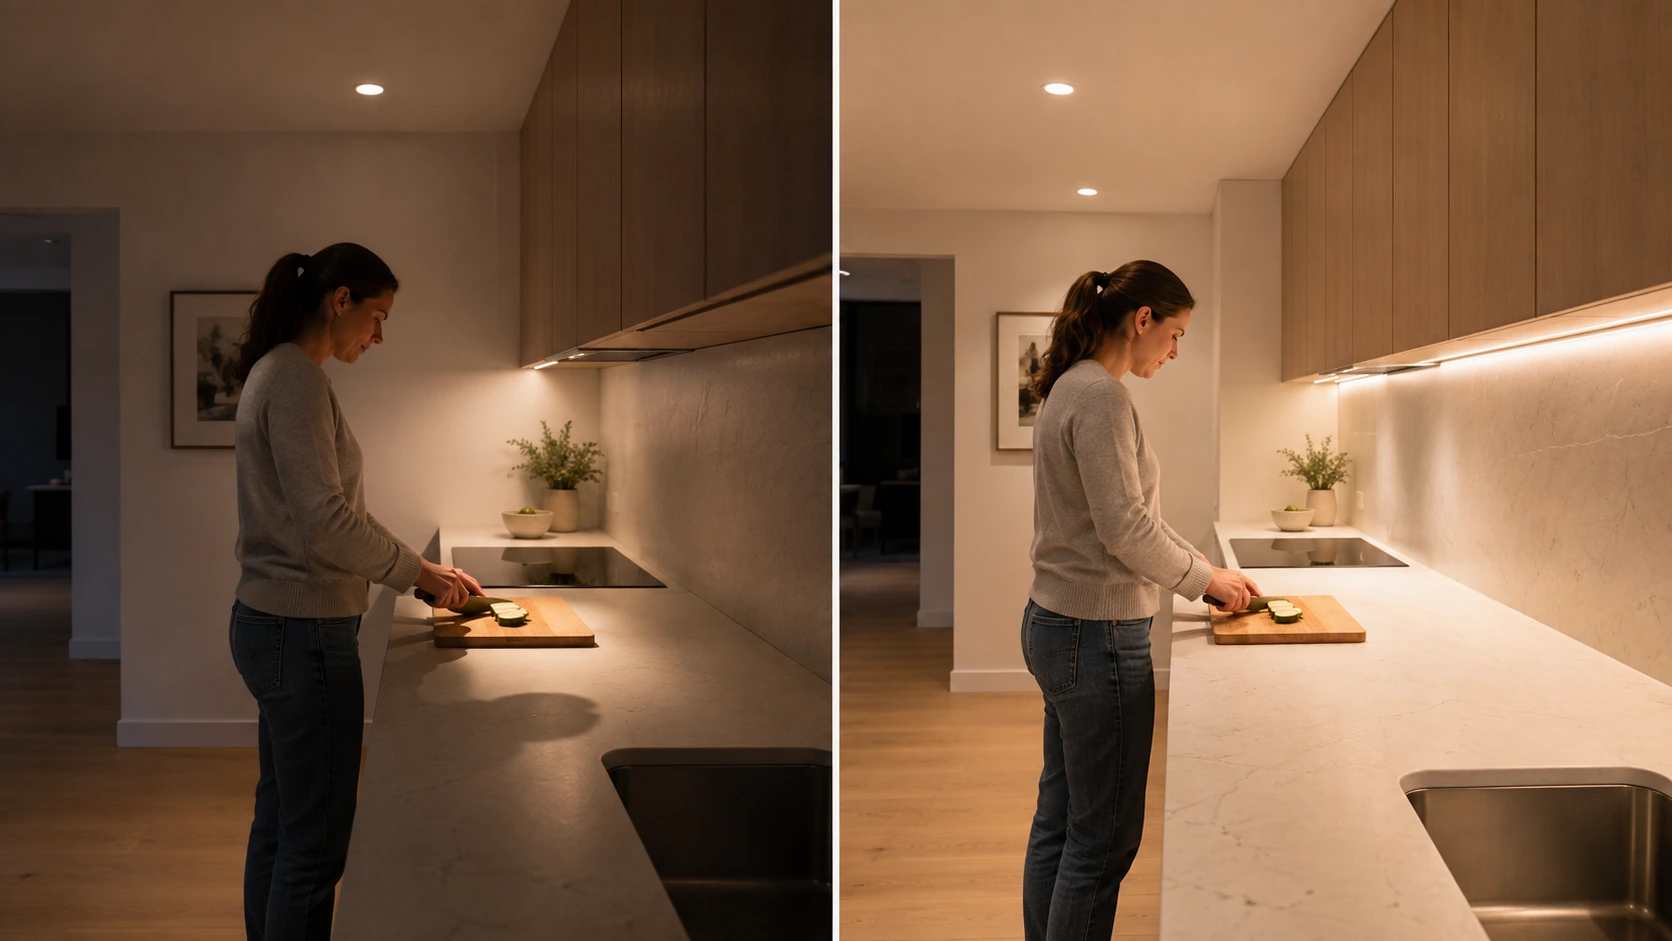
Ceiling Light Behind the User
When the light source sits behind the person using the worktop, their body can interrupt the beam and create a shadow over the preparation area.
Typical result:
- bright floor or aisle
- darker countertop
- reduced visibility while chopping, washing or preparing food
Light the Worktop Directly
Place task lighting so it reaches the countertop from the front, above, or beneath the cabinets.
Better options include:
- under-cabinet LED strip
- correctly positioned recessed spotlights
- directional fittings aimed toward the work surface
1. Start With the Countertop
Plan the light around the work surface first, then coordinate the ceiling layout around it.
2. Keep the User Out of the Beam Path
Avoid positioning the only useful light source directly behind where someone will normally stand.
3. Use Dedicated Task Light Where Needed
Under-cabinet lighting is especially effective because it places the light close to the countertop and reduces dependence on ceiling fixtures.
A kitchen can have plenty of total lumens and still feel poorly lit if the work surface sits in shadow.
LED Strip Lighting Design Guide
Need help with recessed-light positioning? Try the Spotlight Layout Calculator.
How Much Light Does a Kitchen Need?
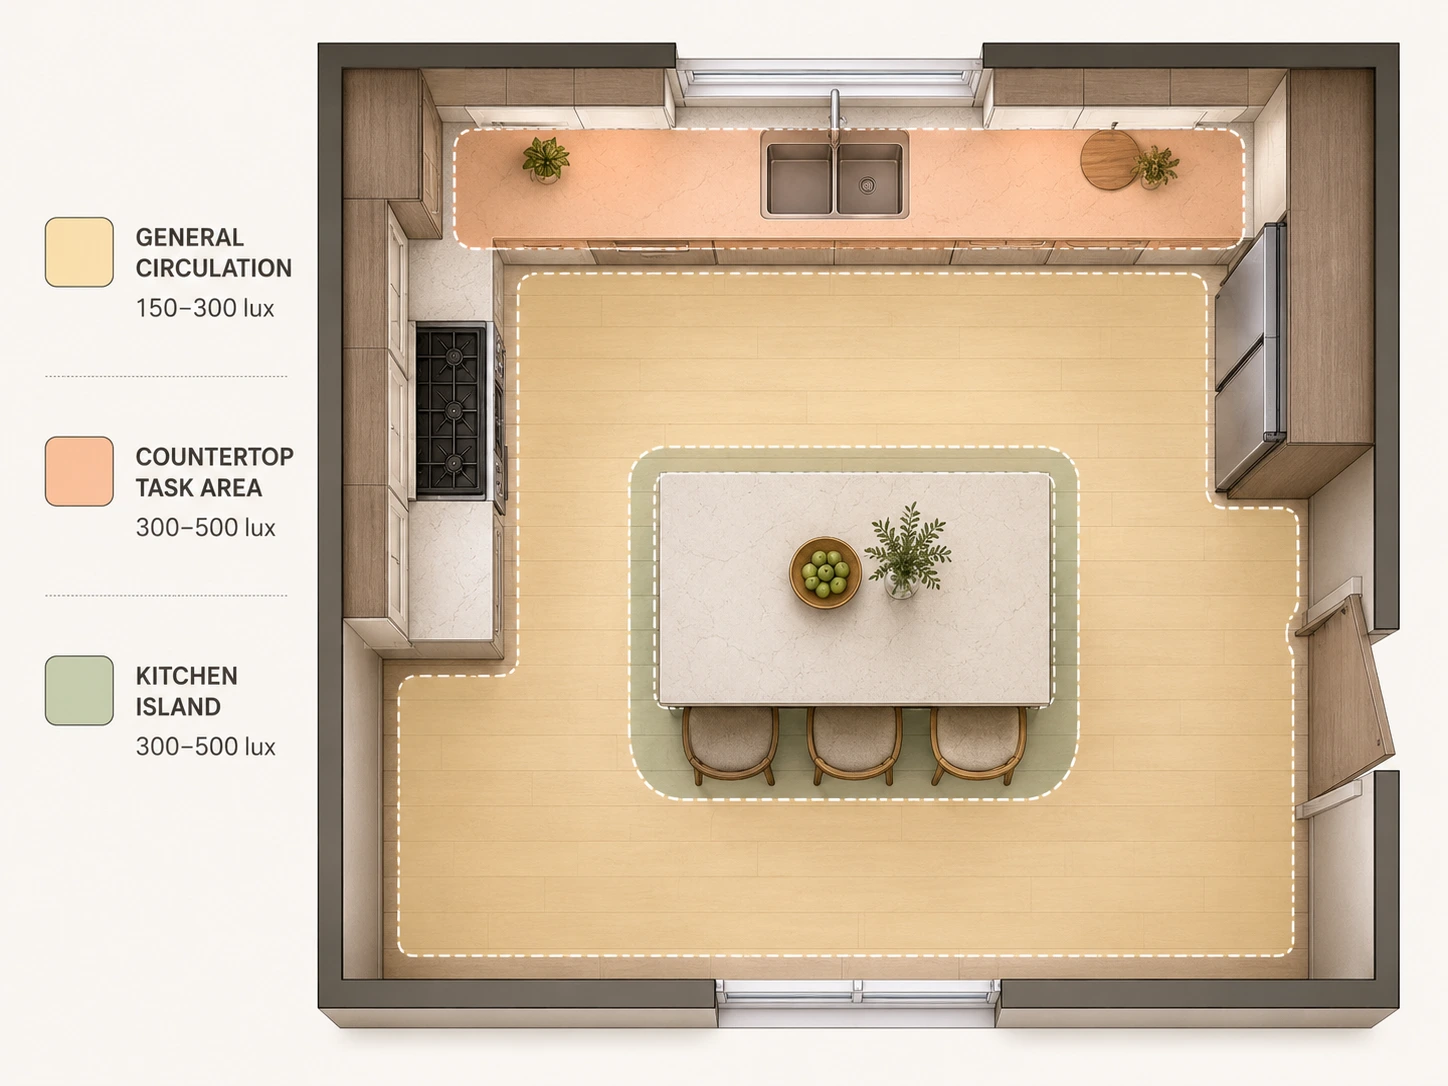
Kitchen lighting should be planned around what people are actually doing in the space. General circulation needs less light than food preparation, which is why one single lux target does not describe the whole room very well.
Lux measures how much light reaches a surface.
In a kitchen, the most important surfaces are usually:
- the floor and circulation area
- the countertop
- the kitchen island
- the sink and preparation zones
A brighter task surface can therefore be useful even when the overall room feels comfortably lit.
General Kitchen Lighting
A comfortable starting range for overall ambient lighting is often around:
200–300 lux
Use this for general movement and room illumination.
Countertops & Food Preparation
Task areas usually benefit from stronger illumination:
400–500 lux
This is especially important for chopping, cooking and detailed preparation.
Kitchen Island
If the island is used for preparation, serving or dining:
300–500 lux
300–500 lux can be a useful planning range depending on the task and desired atmosphere.
Example: 4 × 4 m Kitchen
A 4 × 4 m kitchen has an area of: 16 m²
If you use 200 lux as a starting point for general illumination: 16 m² × 200 lux = 3,200 lumens
That gives you a useful starting estimate for the room’s general lighting.
But this does not mean one 3,200-lumen fixture is automatically the best solution.
The light still needs to be distributed properly, and task areas such as the countertop may need additional dedicated lighting.
Think of the lumen calculation as the starting quantity of light, then use fixture placement and task lighting to decide where that light should actually go.
Calculate your own kitchen requirement with our Lux & Lumens Calculator.
Ceiling Spotlights: Place Them for the Worktops, Not Just the Ceiling
A neat ceiling grid may look organized on plan, but it does not automatically create good kitchen lighting. Spotlight positions should respond to the worktops, island and circulation areas below.
1. Start With the Work Surface
If a countertop is the main preparation zone, position the lighting so the beam reaches that surface clearly.
Avoid placing the only useful spotlight too far behind the person using the counter.
2. Don’t Force Perfect Ceiling Symmetry
Spotlights do not always need to sit in a perfectly even grid.
A slightly adjusted position can be more useful if it improves illumination over:
- the sink
- the hob
- preparation zones
- the edge of an island
3. Match Spacing to the Beam Angle
A narrow beam creates a smaller pool of light, while a wider beam covers more area.
Spacing should therefore depend on:
- ceiling height
- beam angle
- fixture output
- the surface you are trying to illuminate
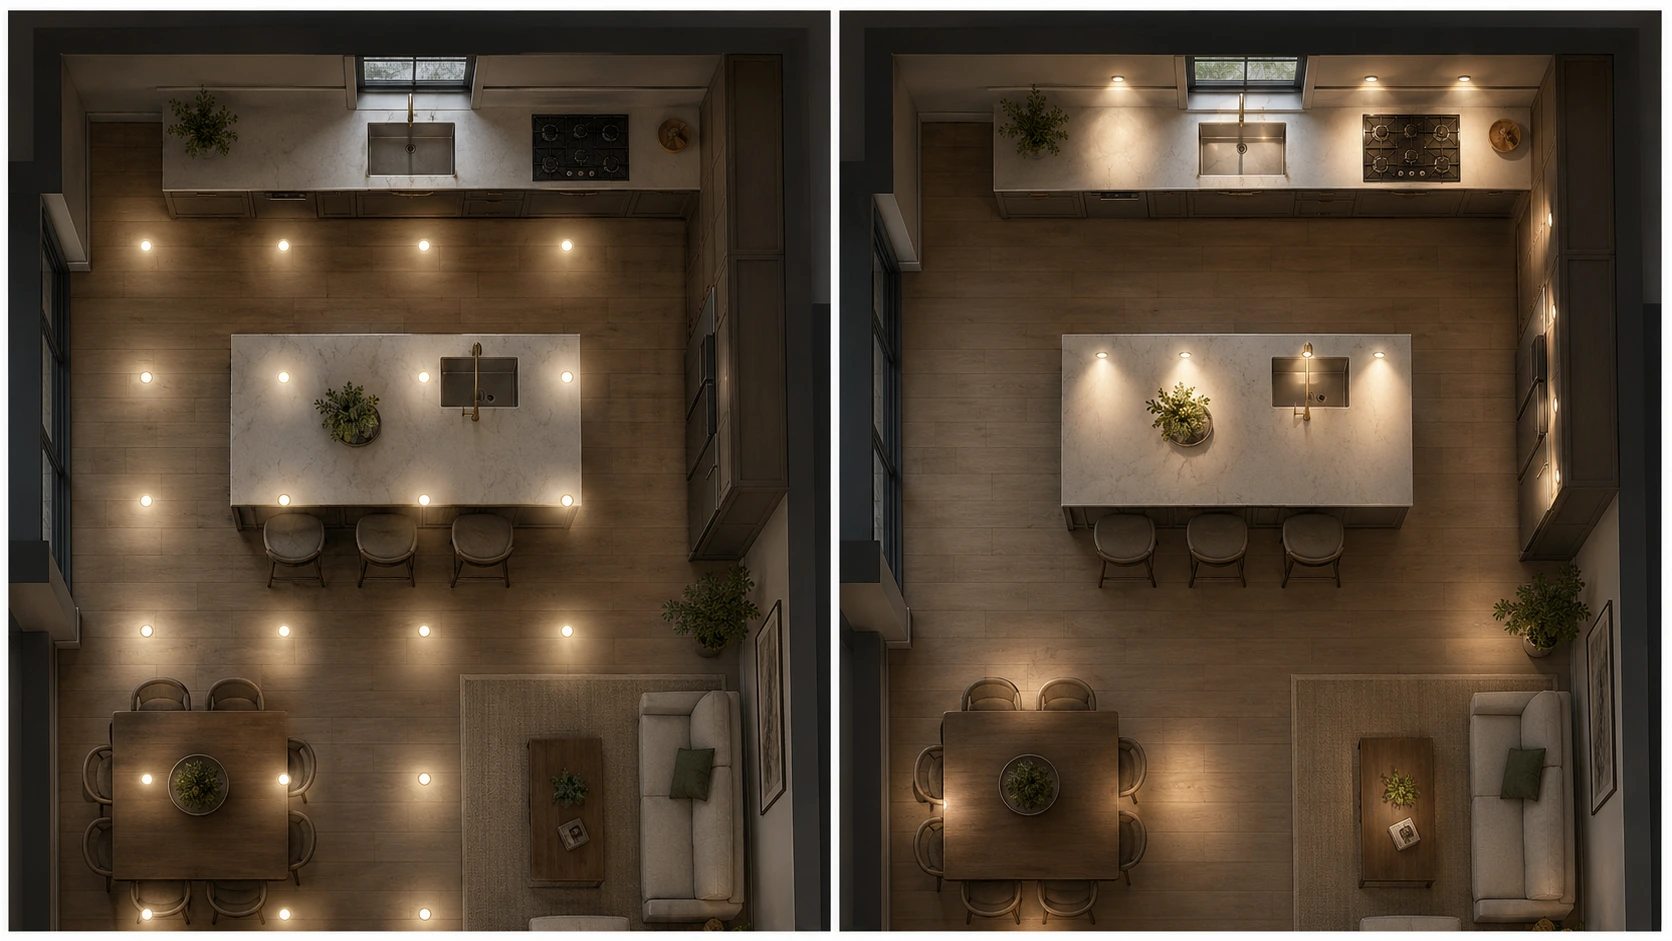
Ceiling-Centred Layout
Looks balanced from above, but may leave worktops under-lit.
Task-Centred Layout
Moves fixtures toward the useful surfaces below, even if the ceiling plan becomes slightly less symmetrical.
A good kitchen spotlight plan is judged by what happens on the countertop—not by how perfect the dots look on the ceiling plan.
How to Choose the Right Beam Angle
Plan your recessed-light positions with our Spotlight Layout Calculator.
Under-Cabinet LED Strip Lighting
Under-cabinet lighting places light close to the countertop, which makes it one of the most effective ways to improve kitchen task lighting without adding more ceiling fixtures.
1. Position the Strip Toward the Front Edge
If the LED strip sits too far back under the cabinet, much of the light can fall onto the backsplash instead of the work surface.
Placing it closer to the front edge usually gives better countertop coverage.
2. Use an Aluminum Profile Where Suitable
An LED profile helps:
- protect the strip
- manage heat
- create a cleaner installation
- reduce visible LED dots when paired with the right diffuser
The result is usually more refined than sticking the strip directly to the cabinet.
3. Size the Driver for the Full Run
The driver must match the strip voltage and provide enough capacity for the total connected load.
For longer runs, also consider:
- voltage drop
- cable length
- where power is injected
- access for future maintenance
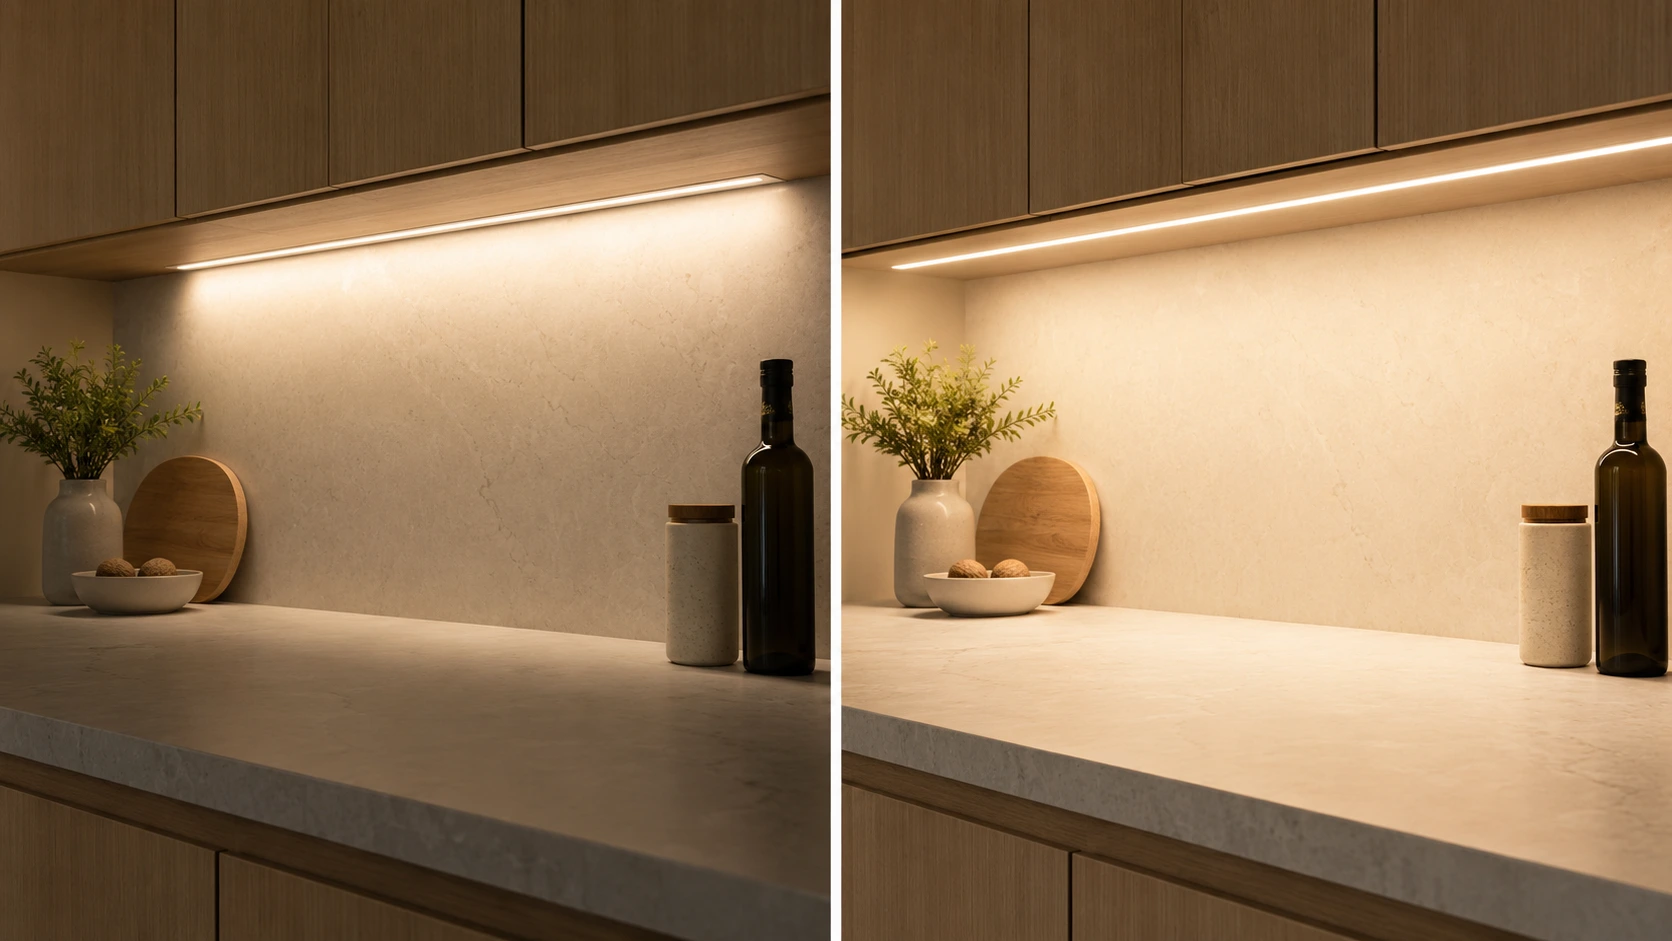
Too Far Back
Light concentrates on the backsplash and may leave the front of the counter noticeably darker.
Closer to the Front
The beam reaches more of the work surface and creates more useful task illumination.
Read the LED Strip Lighting Design Guide
Kitchen Island Lighting: Pendants, Spotlights or Both?
A kitchen island can be used for food preparation, serving, dining or all three. The right lighting depends on whether the priority is task light, visual impact, or a combination of both.
For pendant proportions, use the chandelier and pendant sizing guide and size calculator. If the island connects to a dining area, coordinate it with the Dining Room Lighting Guide.
1. Size the Fixture to the Island
A pendant should feel proportionate to the island rather than dominating it or looking undersized.
2. Keep Sightlines Comfortable
Position hanging fixtures so they do not block views across the kitchen or create glare for seated users.
3. Space Multiple Pendants Evenly
If using two or three pendants, distribute them across the usable island length rather than simply placing them at equal distances from the room walls.
The island should be lit according to how it is used. A preparation island may need stronger task lighting than a breakfast island used mainly for seating.
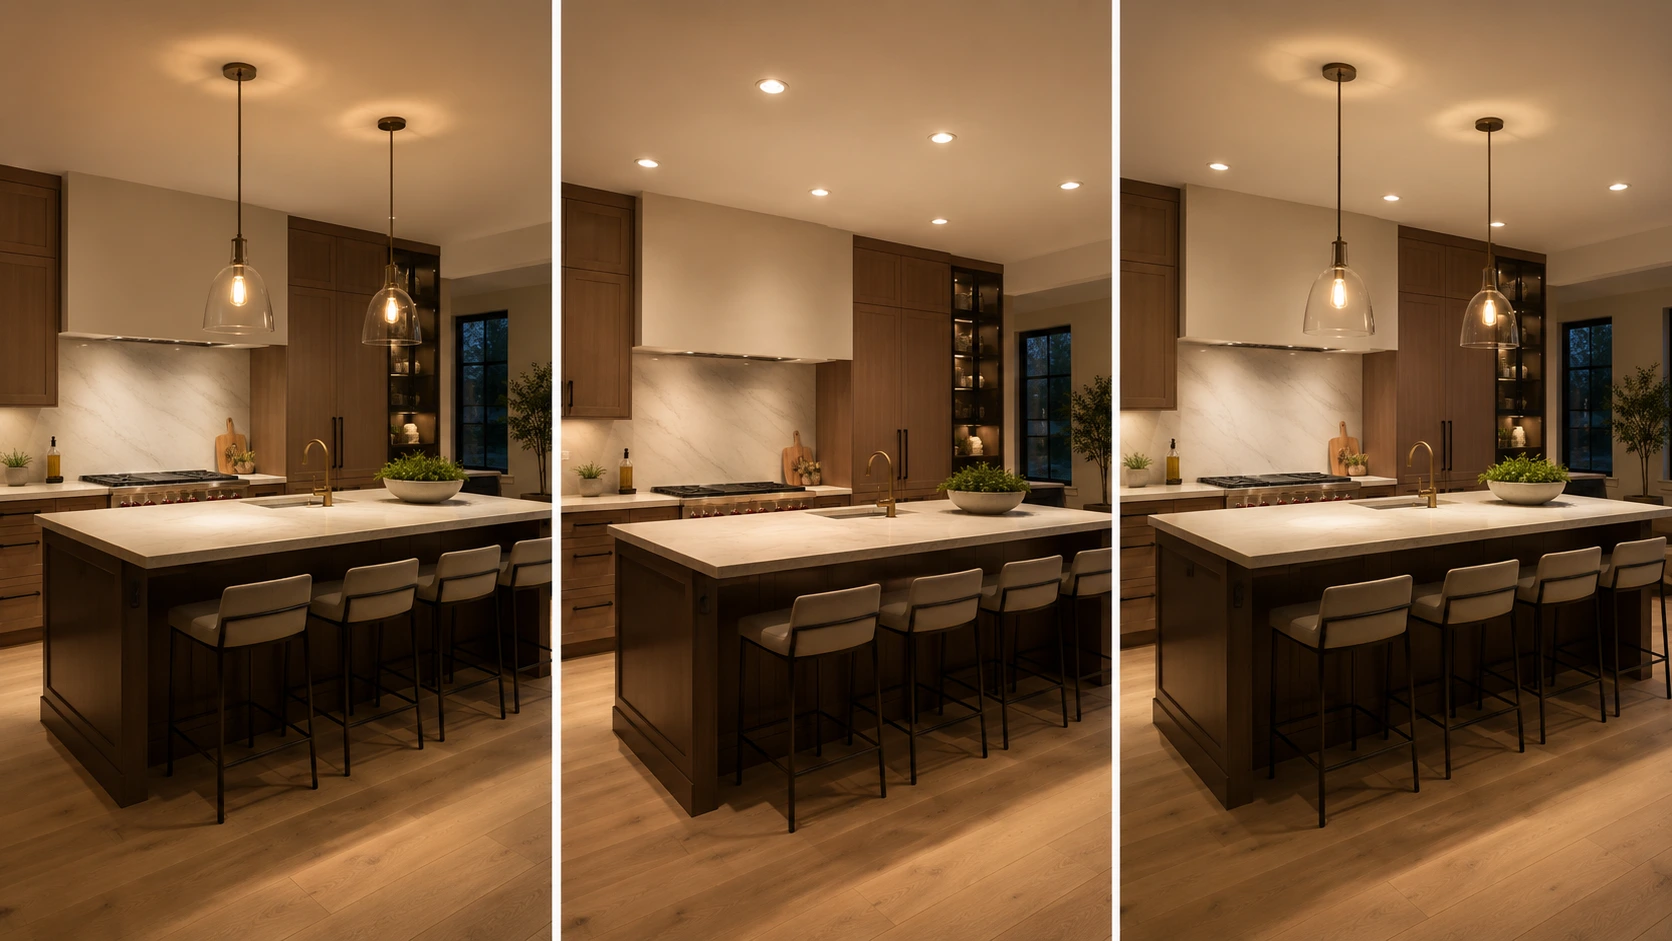
Pendant Lights
Pendants help define the island visually and can provide useful downward light at the same time.
Best when you want:
- a decorative focal point
- clear visual separation of the island
- direct light over seating or serving areas
Watch for:
- fixtures that are too large for the island
- pendants hung too low
- glare at seated eye level
Ceiling Spotlights
Spotlights keep the ceiling visually cleaner and can work well when the island is mainly used as a preparation surface.
Best when you want:
- a minimal ceiling
- flexible beam direction
- task-oriented illumination
Make sure the beams actually cover the island surface rather than falling around it.
Pendants + Spotlights
A combination can work well when the island has several functions.
For example:
- pendants provide decorative presence and local light
- spotlights strengthen task illumination
- separate switching lets each layer be used independently
The goal is not to add more fixtures—it is to give each fixture a clear job.
5 Common Kitchen Lighting Mistakes
A kitchen can look bright and still be frustrating to use. Most problems come from poor placement, weak task lighting, or asking one lighting layer to do too much.
A perfectly even ceiling grid can miss the worktops, sink or island below.
Plan the lighting around the surfaces people actually use, then coordinate the ceiling layout around them.
Ceiling lighting alone may leave worktops in shadow, especially when the user stands between the light source and the counter.
Use dedicated task lighting where needed, such as under-cabinet LED strip.
Circulation areas, food preparation zones and dining areas do not necessarily need the same intensity.
Use stronger task lighting where detailed work happens and softer light where atmosphere matters more.
A pendant can look attractive but still be uncomfortable if the lamp or LED source is directly visible at eye level.
Check hanging height, shielding and sightlines from both standing and seated positions.
General lighting, task lighting and decorative lighting serve different purposes.
Separate controls make the kitchen more flexible for cooking, cleaning, dining and evening use.
Quick check: if every kitchen light has to be switched on just to prepare food comfortably, the lighting layers are probably not doing distinct jobs.
Build Your Kitchen Lighting Plan
Start with the function of each kitchen zone, then choose the fixture type and lighting level that solves that specific need.
I’m Planning the General Lighting
Estimate the overall light requirement first, then distribute it across the room instead of relying on one central source.
I’m Planning the Spotlights
Use the cabinet, countertop, sink and island positions to guide the ceiling layout.
I’m Adding Under-Cabinet Lighting
Plan the LED strip, profile and driver together so the worktop receives useful, even task lighting.
Explore Kitchen Lighting Options
Need Help Planning Your Kitchen Lighting?
Visit our Achrafieh showroom or contact Saleh Deco to compare spotlight options, pendant sizes, LED strip solutions and lighting levels for your kitchen layout.