
Commercial office lighting must support screen work, documents, meetings, circulation and shared spaces without creating unnecessary glare or energy use.
This requires more than placing identical fixtures evenly across a ceiling. The lighting layout must respond to the furniture plan, ceiling construction, daylight, operating patterns and the different activities performed throughout the office.
A successful plan combines suitable maintained illuminance, comfortable light distribution, practical control zones and coordinated installation. This guide explains how those elements work together from the initial office plan through commissioning and final verification.
In This Guide
- What Commercial Office Lighting Must Accomplish
- Divide the Office into Lighting Zones
- Recommended Office Lux Levels
- Maintained Illuminance, Uniformity and Surface Reflectance
- Coordinate Lighting with Open-Plan Workstations
- Control Glare and Screen Reflections
- Choose the Right Luminaire and Ceiling System
- Meeting Rooms, Private Offices and Reception
- Collaboration, Circulation and Support Areas
- Daylight and Perimeter Zoning
- Occupancy Controls, Scheduling and Scenes
- Energy, Maintenance and Upgrade Decisions
- Emergency Lighting and Project Coordination
- Commissioning and Post-Installation Verification
- Common Mistakes and Final Checklist
- Frequently Asked Questions and Related Resources
1. What Commercial Office Lighting Must Accomplish
Commercial office lighting may need to support:
- computer and screen-based work;
- reading, writing and document handling;
- meetings, presentations and video calls;
- reception and visitor orientation;
- informal collaboration;
- safe circulation;
- changing daylight;
- cleaning and after-hours operation;
- and future furniture changes.
These activities do not all require the same lighting. A desk may need clear workplane illumination, while a corridor can operate at a lower level. Meeting rooms may need several scenes, while reception areas must support both staff tasks and visitor-facing spaces.
Before selecting luminaires, confirm:
- the architectural and furniture plans;
- workstation and partition positions;
- the reflected ceiling plan;
- room dimensions and ceiling heights;
- window orientation;
- interior finishes;
- ceiling services;
- operating hours;
- and occupancy patterns.
These conditions affect light levels, fixture positioning, glare, controls and maintenance access.
Plan commercial office lighting around activities, furniture and operating patterns—not by distributing one fixture type evenly across the ceiling.
2. Divide the Office into Lighting Zones
Divide the office into functional zones before selecting fixtures or controls.
Typical zones include:
- open-plan workstations;
- private offices;
- meeting rooms;
- reception and waiting areas;
- collaboration spaces;
- printing and filing areas;
- corridors and stairs;
- kitchens and staff rooms;
- and storage or service rooms.
Each zone may require a different combination of illuminance, distribution, glare control and operating schedule.
A useful lighting zone groups areas with similar:
- activities;
- access to daylight;
- occupancy patterns;
- operating hours;
- and control requirements.
Open-plan workstations, for example, may require consistent workplane lighting across repeated desks. Meeting rooms need separate scene control, while intermittently occupied storage and printing areas may benefit from occupancy sensing.
Define these zones before finalising electrical circuits. This creates a clearer basis for lighting calculations, layout and control strategy.
3. Recommended Office Lux Levels
Illuminance is measured in lux and describes how much light reaches a surface. In an office, the relevant surface is often a desk or meeting table rather than the floor.
| Office area | Practical starting point | Main consideration |
|---|---|---|
| Open-plan workstations | Around 500 lux | Screen comfort, uniformity and layout flexibility |
| Private offices | Around 500 lux | General work and possible local task lighting |
| Meeting and conference rooms | Around 500 lux | Dimming, presentations and video calls |
| Reception desk | Around 300–500 lux | Staff tasks, faces and visitor orientation |
| Waiting areas | Around 200–300 lux | Comfort and atmosphere |
| Collaboration spaces | Around 300–500 lux | Depends on the activities performed |
| Printing and filing areas | Around 300 lux | Documents, labels and equipment controls |
| Corridors | Around 100–200 lux | Safe movement and visual guidance |
| Stairs and landings | Around 100–200 lux | Visibility of steps and level changes |
| Storage rooms | Around 100–200 lux | Increase where small items must be identified |
These are preliminary planning values. Final maintained illuminance should follow the applicable project standard, local requirements and difficulty of the task.
A higher maintained illuminance may be appropriate where task detail is fine, contrast is low, errors have serious consequences or occupants require additional visual support.
Use the correct measurement plane
The calculation plane should match the activity:
- desks and meeting tables are assessed at working height;
- circulation areas may be assessed closer to floor level;
- shelving may require vertical illumination;
- and reception areas may require attention to both the desk and people’s faces.
The common 500-lux office reference does not mean every corridor, lounge and storage area should operate at the same level. Calculate each zone according to its actual use.
For the complete explanation of lux, lumens and room calculations, see the Lux and Lumens Lighting Guide. Preliminary requirements can also be explored with the Lux & Lumens Calculator.
4. Maintained Illuminance, Uniformity and Surface Reflectance
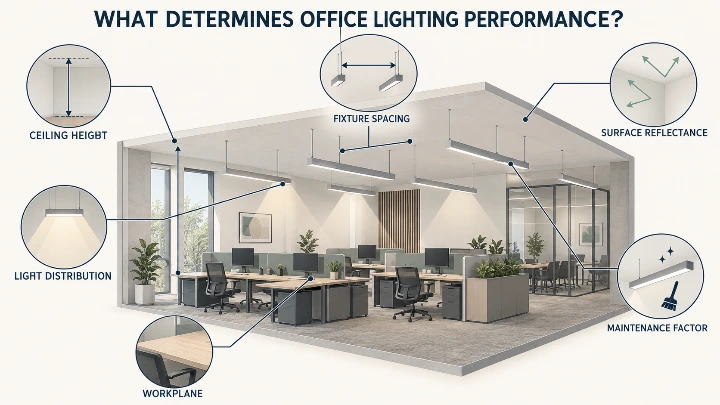
A lighting calculation should consider expected performance during normal operation—not only the output of new, clean luminaires.
Maintained illuminance
Maintained illuminance is the average illuminance below which the lighting level on the specified surface should not fall during the maintenance cycle.
Performance can decline because of:
- gradual reduction in LED output;
- dirt on luminaires and room surfaces;
- environmental conditions;
- failed components;
- and delayed cleaning or maintenance.
A maintenance factor accounts for these changes. It should reflect the selected luminaires, room conditions, cleaning programme and maintenance intervals.
Uniformity
An acceptable average can hide poorly lit desks or bright patches. Differences may result from excessive fixture spacing, narrow distributions, partitions, irregular workstation positions or daylight near windows.
Uniformity describes how consistently light is distributed across areas performing the same task. It does not require every office zone or surface to have equal brightness.
Surface reflectance
Light ceilings and walls reflect more light into the office. Dark ceilings, floors, partitions and furniture absorb more light and can make the same luminaire arrangement perform differently.
Calculations should therefore use realistic:
- room dimensions;
- ceiling heights;
- surface reflectance values;
- major partitions;
- and furniture conditions.
The luminaire output alone does not determine how the completed office will perform.
5. Coordinate Lighting with Open-Plan Workstations
Open-plan lighting should be coordinated with:
- workstation rows;
- desk and screen orientation;
- seated viewing directions;
- partitions;
- circulation routes;
- ceiling grids;
- and future layout changes.
A symmetrical ceiling plan can still produce uneven desk illumination, direct glare or screen reflections.
Coordinate fixture and workstation rows
Linear or modular luminaires may run parallel or perpendicular to desk rows. The most suitable orientation depends on their distribution, spacing, mounting height and the direction employees normally face.
Review the layout from representative seated positions—not only from above. Fixtures do not always need to sit directly above each desk. Depending on their distribution, positioning them between or beside workstation rows may provide better coverage and visual comfort.
Use photometric data for the selected luminaire rather than relying on a generic ceiling symbol.
Consider partitions and flexibility
Desk screens, storage and tall partitions can interrupt light. Include major obstructions where they materially affect the calculation.
Where furniture changes are likely, consider:
- practical coverage beyond one exact desk position;
- reconfigurable control zones;
- accessible wiring and drivers;
- and adaptable systems in selected areas.
For detailed guidance on an individual desk, monitor, task light and window relationship, see the Home Office Lighting Guide.
6. Control Glare and Screen Reflections
An office can achieve its required lux and still feel uncomfortable if bright luminaires dominate the field of view or appear across computer screens.
Direct glare
Direct glare can result from:
- exposed or insufficiently shielded LEDs;
- small, high-output luminous openings;
- repeated luminaires along long sightlines;
- low suspended luminaires;
- and bright downlights against dark ceilings.
Controlled optics, diffusers, recessed light sources and suitable positioning can reduce direct glare while maintaining the required workplane distribution.
Screen reflections
A luminaire may sit outside an employee’s direct view but still appear on the monitor.
The risk depends on:
- screen position and tilt;
- luminaire location;
- screen finish;
- nearby windows;
- and bright surfaces behind the user.
Review screens before finalising the lighting layout because moving workstation rows later can create new reflection paths.
UGR in office projects
Unified Glare Rating evaluates discomfort glare for a defined room, luminaire arrangement and viewing position.
A product described as “UGR<19” does not guarantee that every completed installation will achieve that result. Room dimensions, reflectance, fixture spacing, mounting height and observer position also affect the calculation.
UGR 19 or below is commonly referenced for normal office work areas. Other tasks and support spaces may require different limits under the applicable project standard.
For a complete explanation of glare, CRI, R9, colour consistency and flicker, see Light Quality Explained.
7. Choose the Right Luminaire and Ceiling System
Select office luminaires according to their distribution, visual comfort, installation method and relationship with the ceiling.
Compare ceiling lights and modular lighting systems against the office specification. Where a modular layout is appropriate, use the modular lighting planning guide.
Recessed modular luminaires and panels
These integrate easily into compatible suspended grids and can provide broad general illumination.
Check:
- output and distribution;
- luminous surface and diffusion;
- glare performance;
- driver quality;
- spacing;
- and control compatibility.
A panel is not automatically suitable because it matches a ceiling tile.
Linear lighting
Recessed, surface-mounted or suspended linear luminaires can coordinate with workstation rows, circulation paths and meeting tables.
Continuous systems require accurate alignment, suspension, electrical feeds and consistent colour and brightness between sections.
Direct/indirect suspended luminaires
These direct part of their output toward the workplane and part toward the ceiling. The upward component can improve ceiling brightness where the ceiling is sufficiently light and unobstructed.
Downlights and adjustable lighting
Downlights can suit reception areas, corridors, private offices and smaller rooms. Narrow or widely spaced beams may create bright pools with darker areas between them.
Track systems and adjustable spotlights are more suitable for artwork, reception features, displays and selected collaboration areas than general workstation lighting.
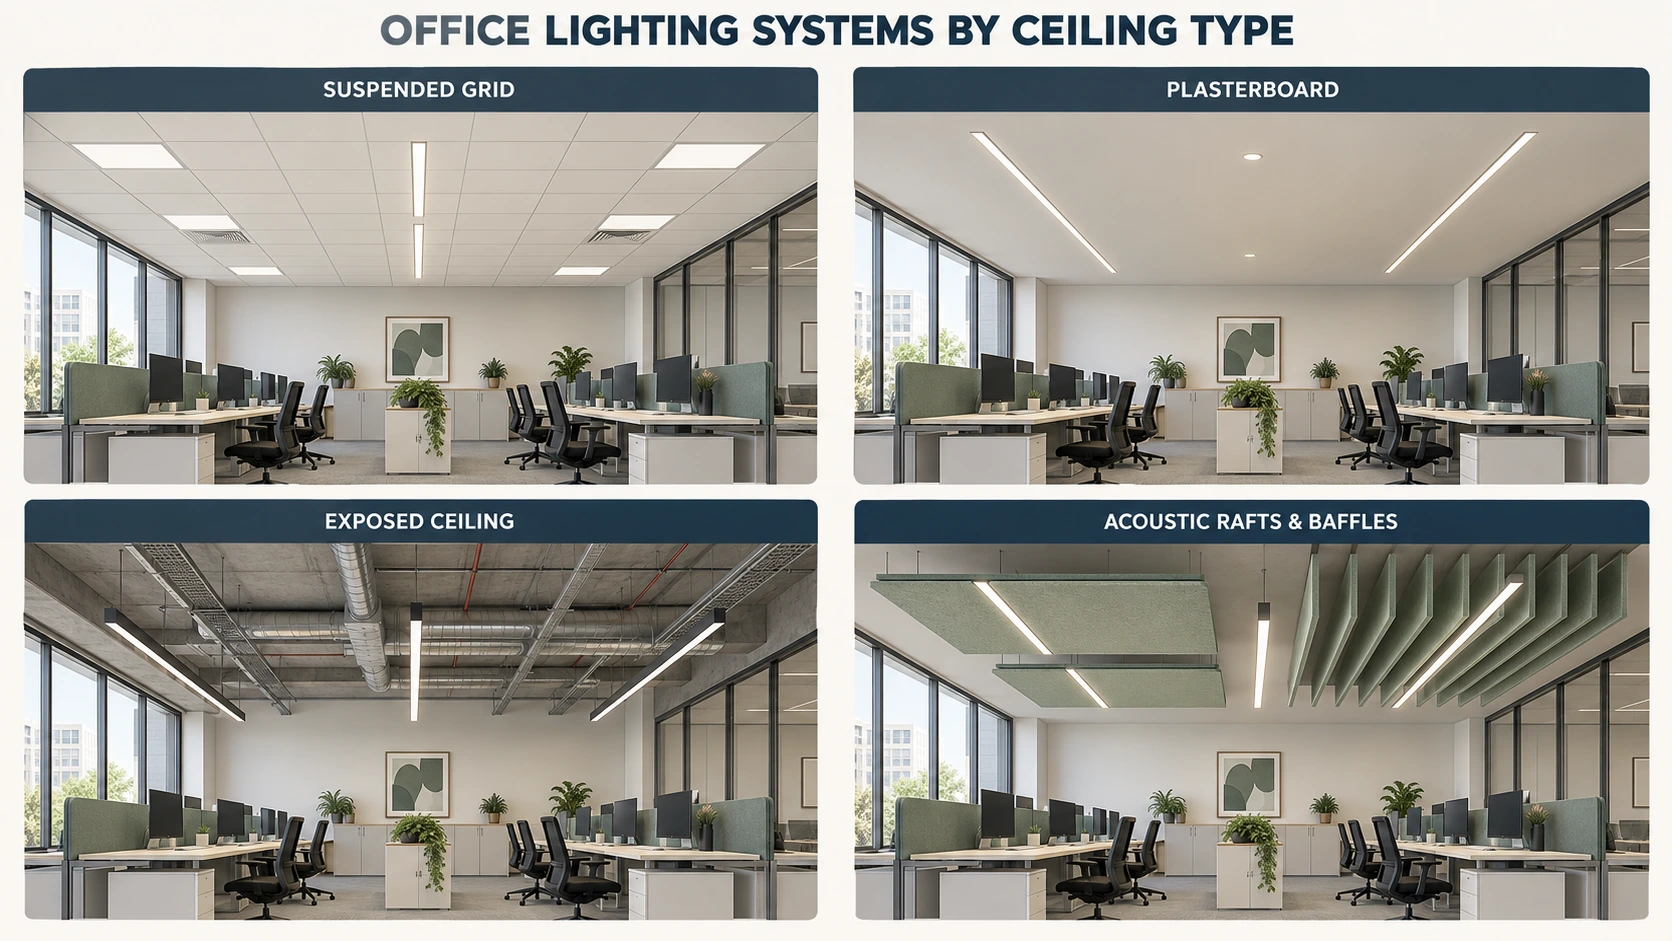
Coordinate the ceiling
Match the lighting approach to:
- suspended grid ceilings;
- plasterboard ceilings;
- exposed ceilings;
- and acoustic rafts or baffles.
Coordinate fixtures with air-conditioning, sprinklers, detectors, speakers, access panels, beams and cable routes.
Choose the required light distribution first, then identify the fixture and mounting method that can deliver it.
8. Meeting Rooms, Private Offices and Reception
Meeting rooms
Meeting rooms may support discussions, paperwork, presentations, video calls and cleaning.
Useful control groups may include:
- lighting over the table;
- lighting near presentation screens;
- wall or background lighting;
- and cleaning lighting.
Presentation scenes should reduce light on the display without leaving participants in darkness. Video-call scenes should illuminate faces and avoid excessively bright backgrounds.
Avoid relying only on downlights directly above seated participants, which can create strong facial shadows.
Private offices
Private offices usually combine desk work, conversations and screen use. They can include comfortable general illumination, local task lighting and individual dimming where practical.
Maintain a reasonable visual transition between the private office and adjoining spaces.
Reception and waiting areas
Reception lighting should support staff tasks, visitor orientation and comfortable facial visibility.
Accent lighting may highlight artwork, materials or company identity, but it should remain secondary to the functional needs of staff and visitors.
Waiting areas can use softer lighting than the reception desk and should be controlled separately where their operating hours differ.
9. Collaboration, Circulation and Support Areas
Collaboration spaces
Breakout areas may support informal meetings, laptops, screens or flexible furniture. Broad general illumination with separate dimming provides more flexibility than one fixed high-output setting.
Corridors and stairs
Corridors need continuous visual guidance rather than workstation-level illumination. Doors, intersections and level changes should remain easy to recognise.
Stair lighting should make treads, risers and landings visible without creating strong shadows or glare in either direction of travel.
Printing, kitchens and storage
Printing and filing zones need sufficient light for controls, documents and labels without shadows from people or open cabinets.
Staff kitchens require practical illumination over preparation surfaces, sinks and appliances. Seating areas may operate at a softer level.
Storage and service rooms may use occupancy sensing, provided the sensor covers the full room and does not switch off while someone remains between shelves.
10. Daylight and Perimeter Zoning
Daylight varies across an office floor. Workstations near windows may receive substantial daylight while internal areas remain dependent on electric lighting.
Divide the floor into practical zones:
- perimeter areas influenced strongly by windows;
- intermediate areas receiving partial daylight;
- and interior areas receiving little useful daylight.
Different façades may also require separate control because their daylight changes at different times.
Control direct sunlight
Daylight dimming cannot control direct sun, heat gain or screen reflections. Blinds, curtains or external shading may still be required.
Daylight-responsive lighting
Photosensors can reduce electric lighting when sufficient daylight is available. For reliable operation:
- the sensor must measure a representative condition;
- controlled luminaires must serve the same daylight zone;
- dimming limits must be configured;
- and internal desks must remain sufficiently illuminated.
| Office zone | Daylight availability | Typical control response |
|---|---|---|
| Perimeter zone | Highest and most variable | Daylight-responsive dimming with separate shading |
| Intermediate zone | Partial daylight | Independent or limited daylight response |
| Interior zone | Little or no useful daylight | Occupancy and schedule-based control |
Daylight only reduces electric-light consumption when the lighting system can respond to it appropriately.
11. Occupancy Controls, Scheduling and Scenes
Controls should reflect how each office zone is occupied.
Occupancy and vacancy sensing
These controls are useful in:
- meeting rooms;
- private offices;
- printing areas;
- kitchens;
- storage rooms;
- corridors;
- and intermittently occupied workstation zones.
Sensor type and position must account for partitions, furniture and limited occupant movement.
Use practical zone sizes
Oversized zones can leave large areas illuminated because one workstation remains occupied. Excessively small zones can make the installation unnecessarily complex.
Zone size should reflect furniture, team organisation, daylight, room boundaries and operating patterns.
Scheduling and scenes
Schedules can reduce lighting outside normal working hours while allowing temporary use for cleaning, maintenance or overtime.
Meeting rooms may include:
- general meeting;
- presentation;
- video conference;
- cleaning;
- and off scenes.
Provide understandable manual control where users need to respond to changing tasks or daylight.
Avoid poor sensor coverage, unstable dimming, short switch-off delays and overrides that leave lights operating indefinitely.
12. Energy, Maintenance and Upgrade Decisions
Office-lighting energy use depends on:
- fixture quantity;
- complete system wattage;
- annual operating hours;
- controls;
- maintenance requirements;
- component life;
- access costs;
- and installation cost.
A lower-wattage luminaire is not automatically more efficient if it provides unsuitable distribution, requires more fixtures or fails to achieve the required maintained illuminance.
Controls can create additional savings by reducing operating hours or average output. Energy and maintenance savings should be shown separately so the business case remains transparent.
For the complete calculation method, see the LED Energy Savings and Payback Guide and use the LED Lighting Cost & Energy Savings Calculator.
Financial results should be considered alongside lighting performance, visual comfort, product quality and expected operating life.
13. Emergency Lighting and Project Coordination
Emergency lighting is separate from the normal office-lighting installation, but both must be coordinated within the same architectural and ceiling plans.
Use Saleh Deco’s professional project support to discuss product specifications and coordination for the proposed scheme.
The emergency design may need to address:
- escape routes;
- exits and direction changes;
- stairs and landings;
- open areas;
- windowless rooms;
- safety equipment;
- and final exits.
Emergency operation may be provided through self-contained emergency luminaires, integrated emergency drivers, a central battery system or another compliant backup source selected to meet the required changeover time, operating duration, monitoring and testing requirements.
Emergency luminaires and signs should be coordinated with the normal lighting, ceiling services and life-safety systems.
The final plan may involve the architect, interior designer, lighting designer, electrical engineer, mechanical engineer, fire-safety team, ceiling contractor, furniture supplier and facility manager.
Review the lighting layout against the latest coordinated drawings. An outdated furniture or ceiling plan can invalidate otherwise accurate calculations.
14. Commissioning and Post-Installation Verification
A project is not complete when the luminaires switch on.
Verify the installation
Confirm:
- luminaire models and quantities;
- positions and mounting heights;
- aiming where applicable;
- drivers and controls;
- colour temperature;
- colour consistency;
- and control groups.
A substituted fixture with different output or distribution can change the calculated result even when its wattage appears similar.
Measure representative areas
Check illuminance at representative workplanes after major furniture and partitions are installed.
Include desks near windows, internal workstations, meeting tables, reception work surfaces and any area that differs from the design assumptions.
Review comfort and controls
From actual working positions, check for:
- visible bright luminaires;
- screen reflections;
- excessive contrast;
- uneven illumination;
- dark ceilings or walls;
- and strong facial shadows.
Test sensor coverage, time delays, daylight response, scenes, manual controls, schedules and temporary overrides.
Document the final zone drawings, sensor settings, schedules, dimming limits, installed products, emergency information and test results. Occupant feedback can identify issues that are difficult to detect before the office is in use.
15. Common Office Lighting Mistakes and Final Checklist
Common mistakes
- Designing before receiving the furniture plan
- Applying 500 lux across the entire floor
- Following the ceiling grid without checking workstations
- Treating UGR as a fixture-only rating
- Comparing fixtures by wattage alone
- Using one control zone for a large office
- Ignoring ceiling services and maintenance access
- Skipping final commissioning
Final checklist
| Planning and coordination | Lighting performance | Controls and operation |
|---|---|---|
| Current architectural and furniture plans confirmed | Maintained illuminance calculated | Control zones defined |
| Ceiling height and construction recorded | Relevant workplanes identified | Occupancy patterns recorded |
| Partitions and major furniture included | Uniformity and glare reviewed | Daylight zones separated |
| Ceiling services coordinated | Screen reflections checked | Sensor coverage verified |
| Surface reflectance considered | CCT, CRI and compatibility specified | Schedules and scenes programmed |
| Maintenance and emergency needs coordinated | Installed performance verified | Commissioning documented |
16. Frequently Asked Questions
How many lux should a commercial office have?
Around 500 lux is a common planning starting point for desk-based office work. Reception, waiting, circulation and storage areas can have different requirements.
The final maintained illuminance should reflect the activity, applicable standard, measurement plane and working conditions.
Is UGR 19 required for every office area?
No single glare target applies automatically to every office space.
UGR 19 or below is commonly referenced for normal office work areas. More demanding tasks or lower-demand support spaces may use different limits.
UGR must be evaluated for the room and layout rather than treated as a universal fixture characteristic.
Are LED panels always suitable for office lighting?
LED panels can be suitable when their output, distribution, glare performance, colour quality, driver and spacing meet the project requirements.
A panel should not be selected only because it fits the ceiling grid. Linear, direct/indirect or surface-mounted luminaires may better suit some office layouts and ceiling types.
Make the Final Decision from Coordinated Information
Commercial office lighting should be planned from the activities and furniture layout outward.
Establish the maintained light levels, select a suitable distribution, coordinate the ceiling and services, control glare, divide the installation into practical operating zones, and verify the completed system after installation.
No single product, lux value or ceiling arrangement can make those decisions independently. The strongest result comes from treating the office, lighting and controls as one coordinated system.
Related Lighting Guides and Tools
- Lux and Lumens Lighting Guide — understand light output, illuminance and calculation principles.
- Light Quality Explained — understand CRI, R9, colour consistency, glare and flicker.
- 3000K vs 4000K Lighting — compare colour-temperature choices for workspaces and other interiors.
- LED Energy Savings and Payback Guide — calculate energy consumption, operating cost and financial return.
- Home Office Lighting Guide — plan an individual desk, monitor, task light and window relationship.
- Lux & Lumens Calculator — estimate lumen requirements and preliminary fixture quantities.
- LED Lighting Cost & Energy Savings Calculator — compare operating costs, savings and payback.
- Explore All Lighting Tools — access the complete collection of lighting calculators and planners.