
A good home office needs more than enough light to see the desk. The lighting has to support reading, writing and computer work while keeping the screen comfortable to view, controlling reflections from windows and fixtures, and preventing the room around the monitor from becoming excessively bright or dark.
That is why a home office should not be planned by simply choosing a ceiling light or arranging spotlights evenly across the room. The starting point is the workstation itself: where the desk sits, where the monitor faces, where daylight enters the room, and which parts of the desk need additional task lighting.
For a typical desk used for reading, writing, typing and computer work, a useful planning target is around 500 lux on the main work surface. The surrounding area can be lower, provided the transition in brightness remains comfortable. This allows the desk to receive the light it needs without unnecessarily lighting the entire room to the same level.
A well-planned home office therefore combines several functions:
- comfortable ambient light for the room;
- focused task light where detailed work takes place;
- controlled brightness around the monitor;
- careful fixture placement to reduce direct and reflected glare;
- suitable color temperature and color rendering for the type of work being performed;
- and separate control of the different lighting layers where practical.
In this guide, we will plan the home office from the desk outward. We will look at desk and screen position, daylight, lux levels, glare, ceiling-light placement, task lighting, video-call lighting, color temperature, CRI, controls, and a complete 3 × 4m worked example showing how the different layers work together.
The goal is not simply to make the room brighter. It is to create a workspace where the desk, screen, window and surrounding room remain visually balanced throughout the working day.
In This Guide
- Home Office Lighting at a Glance
- Desk & Screen Position
- Window & Daylight
- Lux & Lighting Levels
- Lighting Layers
- Glare & UGR
- Ceiling Lights & Spotlights
- Desk Task Lighting
- Background & Video-Call Lighting
- CCT & CRI
- Controls & Lighting Scenes
- Track & Magnetic Lighting
- 3 × 4m Worked Example
- Common Mistakes & Checklist
- Plan & Shop
- FAQ
Home Office Lighting at a Glance
Before choosing fixtures, it helps to separate the home office into different lighting zones. The desk needs the highest level of illumination, while the surrounding room can remain softer. This creates a comfortable visual transition instead of forcing the entire room to operate at the same brightness.
Use the following values as practical planning targets:
| Home Office Area / Requirement | Recommended Starting Point |
|---|---|
| Main desk / work surface | Around 500 lux |
| Immediate area around the desk | Around 300 lux |
| Background area | Around 100 lux or more as a reference |
| General office glare target | UGR ≤19 |
| Technical drawing / precision work | Around 750 lux, UGR ≤16 |
| General color rendering | CRI80 or higher |
| Color-sensitive work | CRI90+ preferred |
| Dedicated daytime home office | 4000K recommended starting point |
| Mixed-use or evening home office | 3000K can feel more comfortable |
| Flexible day-to-evening use | Tunable White where available |
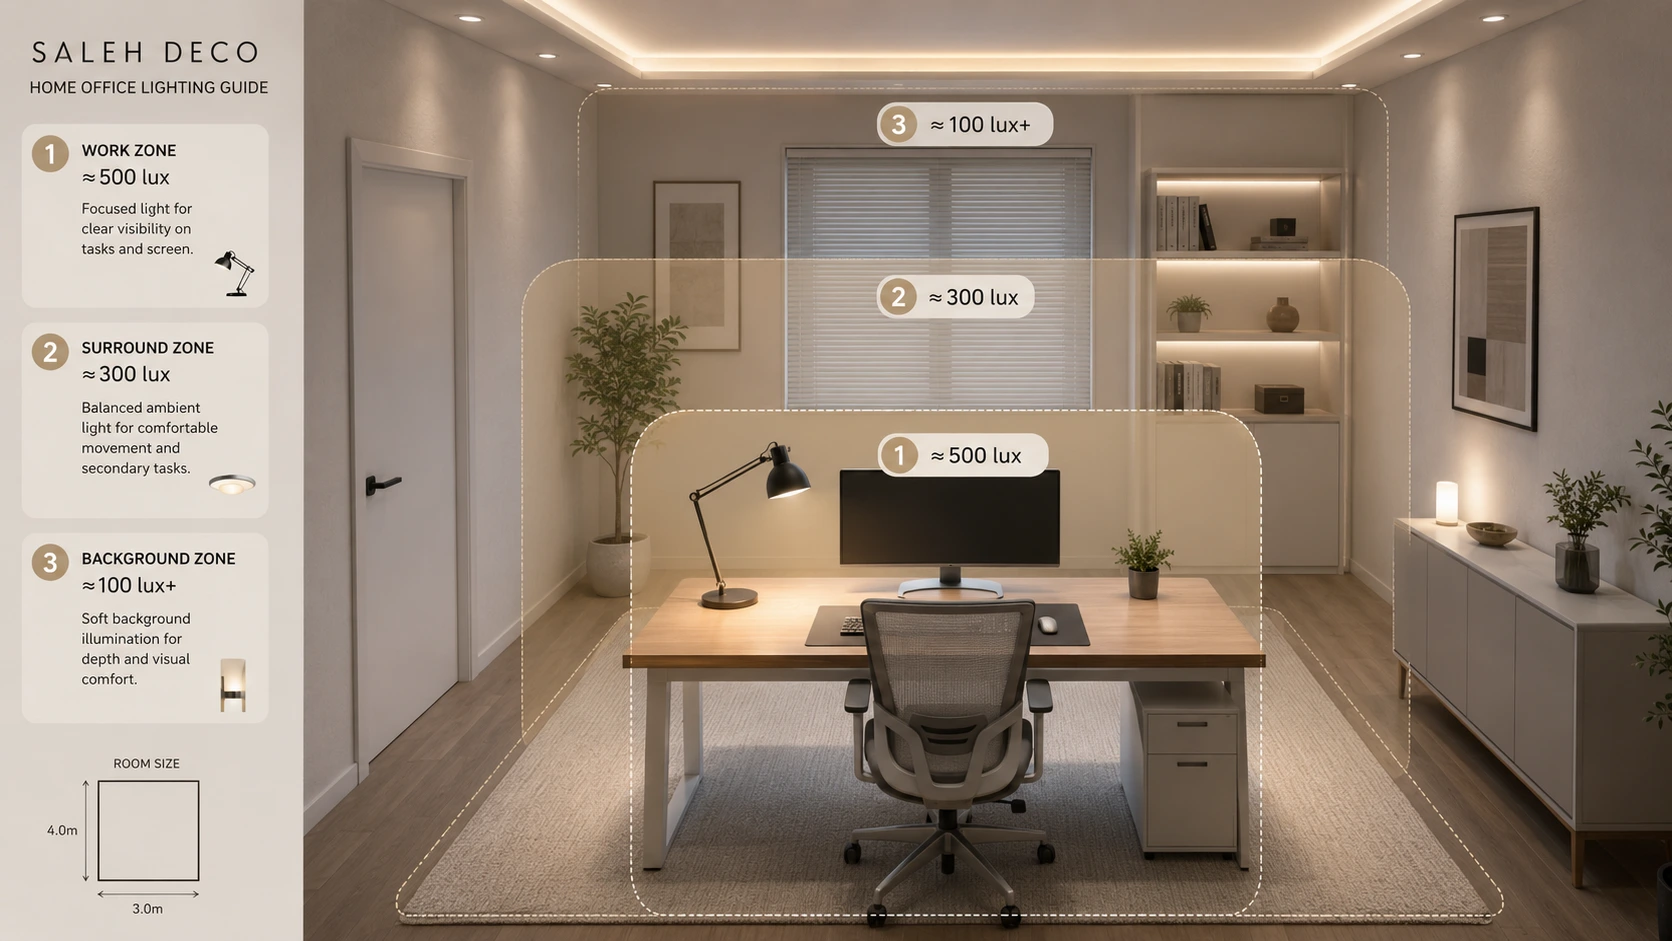
The most important point is that 500 lux is a target for the work surface—not necessarily for the entire room.
For example, a desk used for computer work, writing and paperwork may benefit from approximately 500 lux, while the area immediately around it can remain closer to 300 lux. The rest of the room can be lower again, provided it does not become so dark that the bright monitor and desk feel visually isolated.
This gradual transition helps create a more comfortable working environment:
Desk → brighter
Immediate surroundings → moderately lit
Background → softer, but still visible
The result is usually better than trying to illuminate every square meter of the room to 500 lux.
What UGR Means Here
For a normal home office, UGR ≤19 is a useful glare benchmark for general office lighting. Lower values indicate stronger glare control, and more demanding technical work may use a stricter target such as UGR ≤16.
However, UGR should not be treated as a fixture-only guarantee. The final level of visual comfort also depends on:
where the luminaire is installed;
where the user normally looks;
the position of the monitor;
mounting height;
room dimensions;
and the brightness of surrounding surfaces.
A low-glare fixture can therefore be a strong advantage, but correct placement is still essential.
3000K or 4000K?
There is no requirement that every home office must use one fixed color temperature.
For a dedicated daytime workspace, 4000K is a practical starting point because it gives the room a more neutral, work-oriented appearance.
For an office that also functions as part of a bedroom, living room or evening reading space, 3000K may integrate more naturally with the rest of the home.
Where available, Tunable White gives the greatest flexibility by allowing the workspace to feel more neutral during focused work and warmer later in the day.
CRI for Home Office Lighting
For ordinary computer work, administration, reading and writing, CRI80+ is a sensible benchmark.
Higher color rendering becomes more important when the home office is used for work involving accurate color or material evaluation, such as:
graphic and interior design;
artwork;
photography;
fabric and finish selection;
product samples;
or other color-sensitive tasks.
For these applications, CRI90+ is preferable where available.
These values provide the technical framework for the room, but they do not yet tell us where the fixtures should go. That starts with the most important element in the space: the desk and monitor.
Start With the Desk and Screen — Not the Ceiling
The most important decision in a home office lighting plan is not where the ceiling fixtures go. It is where the desk, monitor and working position will be.
Once the workstation is fixed, the lighting layout can respond to the way the room is actually used.
Before choosing spotlights, ceiling lights or a desk lamp, identify:
where the desk will sit;
which direction the user will face;
where the monitor will be positioned;
where the main window is located;
which part of the desk is used for writing or paperwork;
whether shelving, artwork or storage needs separate lighting;
and which direction the camera will face during video calls.
This creates a workstation-first lighting plan rather than a ceiling-first layout.
Why an Even Ceiling Grid Is Not Enough
Four or six perfectly aligned spotlights may look tidy on a ceiling plan, but symmetry does not guarantee comfortable lighting at the desk.
A fixture can be evenly spaced within the room and still end up:
directly above the monitor;
reflected in the screen;
behind the user's head while they work;
creating a strong shadow across paperwork;
producing too much brightness immediately around the screen;
or illuminating an unused part of the room more strongly than the desk.
The ceiling layout should therefore respond to the workstation rather than forcing the workstation to fit underneath a predetermined grid.
Think in Terms of the User's Normal View
Sit mentally—or physically—in the working position and look toward the monitor.
The main field of view normally contains:
the monitor;
the wall or shelving behind it;
part of the desk surface;
any nearby window;
and some of the ceiling above and beyond the screen.
These are the surfaces that need to feel visually balanced.
A very bright downlight immediately above the screen can become uncomfortable even if the desk technically receives enough lux. Likewise, a perfectly lit desktop can still feel tiring if the monitor sits against an almost completely dark wall.
The aim is not simply to deliver light onto the desk. It is to create a comfortable visual environment around the entire workstation.
Divide the Desk Into Screen and Task Areas
The monitor itself does not need to be illuminated like a sheet of paper.
In fact, directing unnecessary light toward the screen can increase reflections and reduce visual comfort.
Instead, think of the desk as containing two different areas:
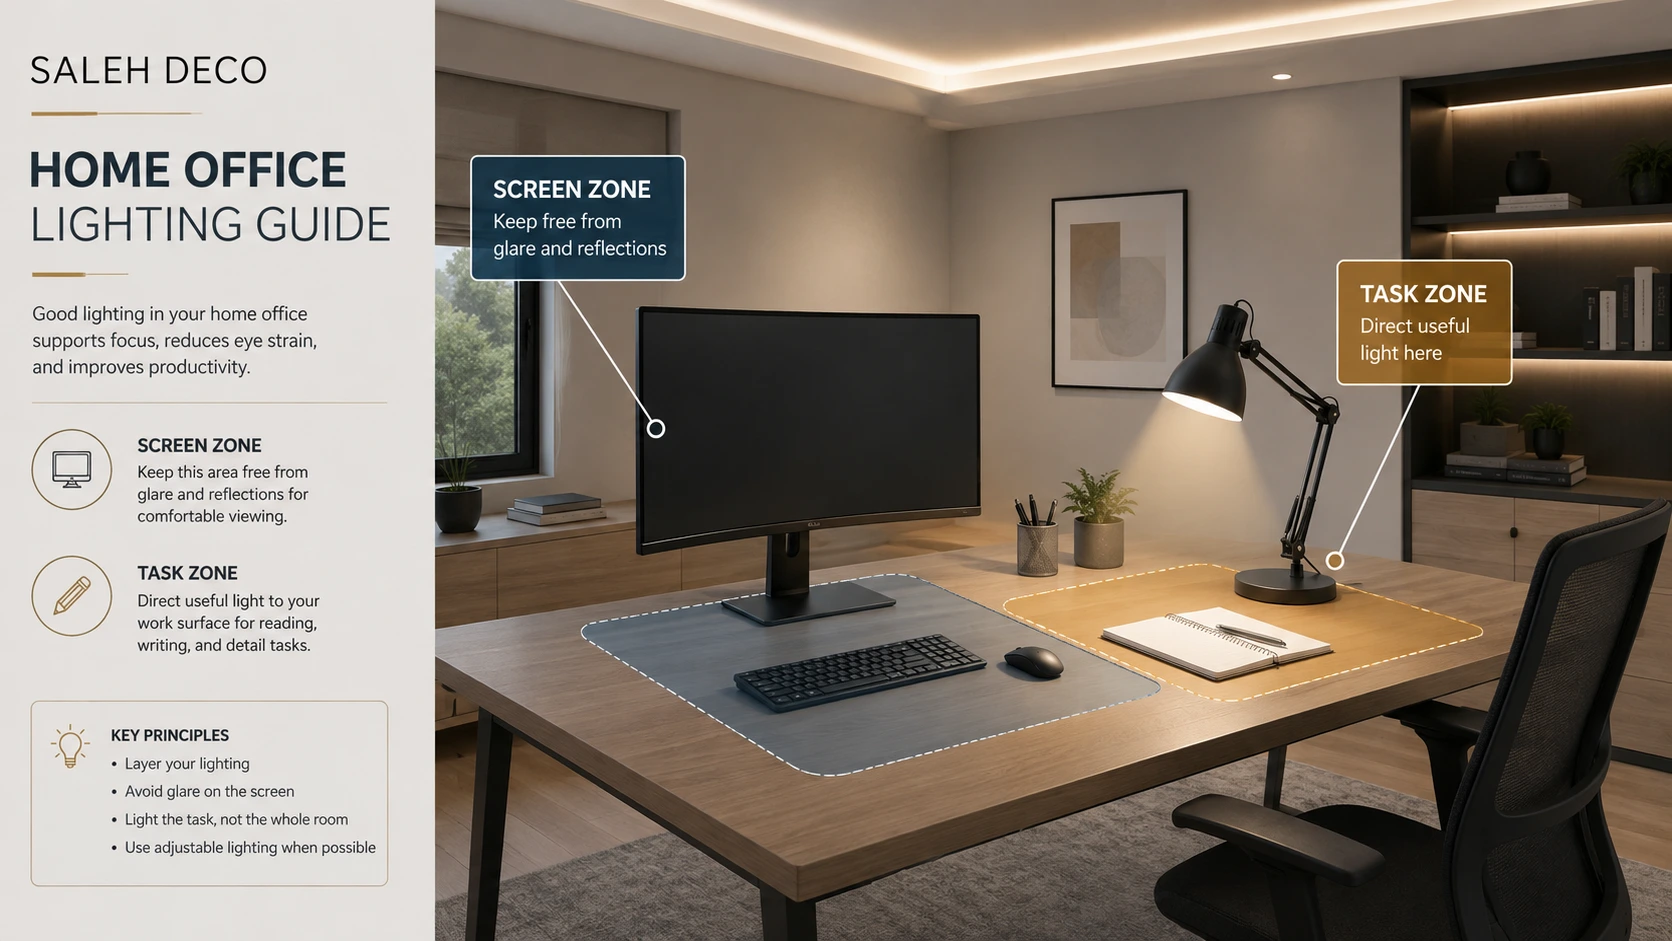
Screen zone
The monitor and the immediate area around it should remain free from strong reflections and direct glare.
Task zone
The part of the desk used for reading, writing, drawing or handling documents may need more direct illumination.
For many users, this means that the best solution is not one powerful light above the entire workstation. It is a combination of:
controlled ambient lighting from the room;
plus an adjustable task light directed toward the working surface.
This makes it easier to reach the required light level on paperwork without unnecessarily increasing the brightness of the monitor area.
Avoid Placing a Strong Downlight Directly Above the Monitor
A ceiling light directly above or slightly behind the monitor can sometimes appear in the screen as a reflection, particularly on glossy or semi-gloss displays.
It can also create an intense bright area in the user's upper field of view.
Where recessed or surface spotlights are used, it is usually better to position the nearest fixtures slightly forward of the workstation or to either side, then use a sufficiently broad beam or diffused distribution to illuminate the working area.
The exact position depends on:
ceiling height;
beam angle;
fixture output;
desk depth;
monitor position;
and whether the luminaire is fixed or adjustable.
This is why spotlight quantity and spacing should be checked together rather than treated as separate decisions.
Consider the Dominant Hand
For users who regularly write or sketch on paper, desk-lamp position also matters.
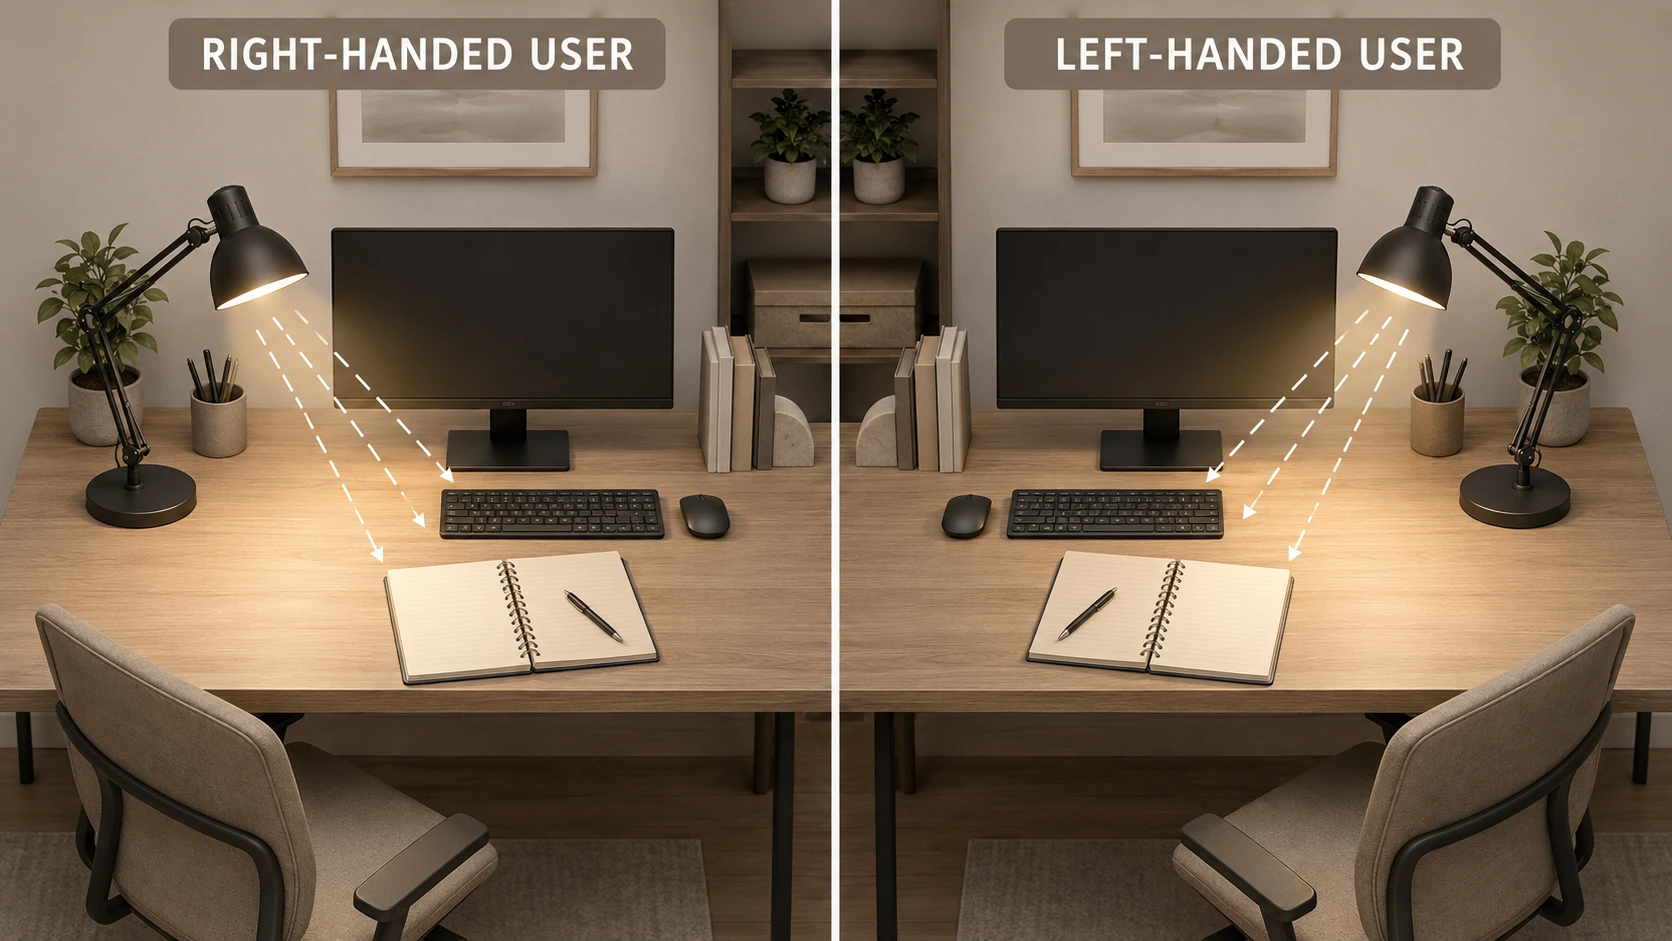
A right-handed user will generally benefit from task light approaching from the left side, reducing the chance that the writing hand casts a shadow over the working area.
A left-handed user can reverse this arrangement.
This is not a rigid rule—the monitor, room layout and lamp design still matter—but it is a useful starting point when positioning an adjustable desk lamp.
Plan for More Than One Type of Work
Many home offices serve several functions during the same day.
A workstation may be used for:
computer work;
reading;
handwriting;
reviewing printed documents;
video calls;
creative work;
or evening study.
Those activities do not necessarily require exactly the same lighting.
For example, screen-heavy work may be comfortable with moderate ambient illumination and limited task light, while detailed paperwork may need considerably more local illumination on the desk.
This is one reason why separate ambient and task lighting is more flexible than relying on a single ceiling source.
A Simple Planning Sequence
Before laying out the lighting, work through the room in this order:
1. Position the desk.
Decide where the workstation belongs based on the room layout and daylight.
2. Position the monitor.
Check the normal viewing direction and likely reflections.
3. Mark the working surface.
Identify where reading, writing and paperwork actually take place.
4. Check the user's field of view.
Look for windows, bright walls or ceiling fixtures that could become distracting.
5. Add the ambient lighting.
Provide comfortable general illumination without concentrating excessive brightness around the monitor.
6. Add task lighting where necessary.
Use localized light to bring the desk to the required working level.
7. Add background or accent light last.
Use it to balance the room, illuminate shelving or improve the visual background without competing with the screen.
Following this order keeps the lighting connected to the way the office will actually be used.
The next step is especially important because even a well-positioned ceiling layout can become uncomfortable if the desk is positioned badly relative to daylight: the relationship between the monitor and the window.
Position the Desk Correctly Relative to Windows
Daylight can make a home office more pleasant to use, but the relationship between the window, desk and monitor has a major effect on screen comfort.
A poorly positioned workstation can create glare even when the artificial lighting is well planned. Bright daylight can reflect directly in the monitor, sit behind the screen as a distracting high-brightness area, or backlight the user during video calls.
A good starting point is to position the monitor so the main window is to the side of the workstation, rather than directly in front of or behind it.
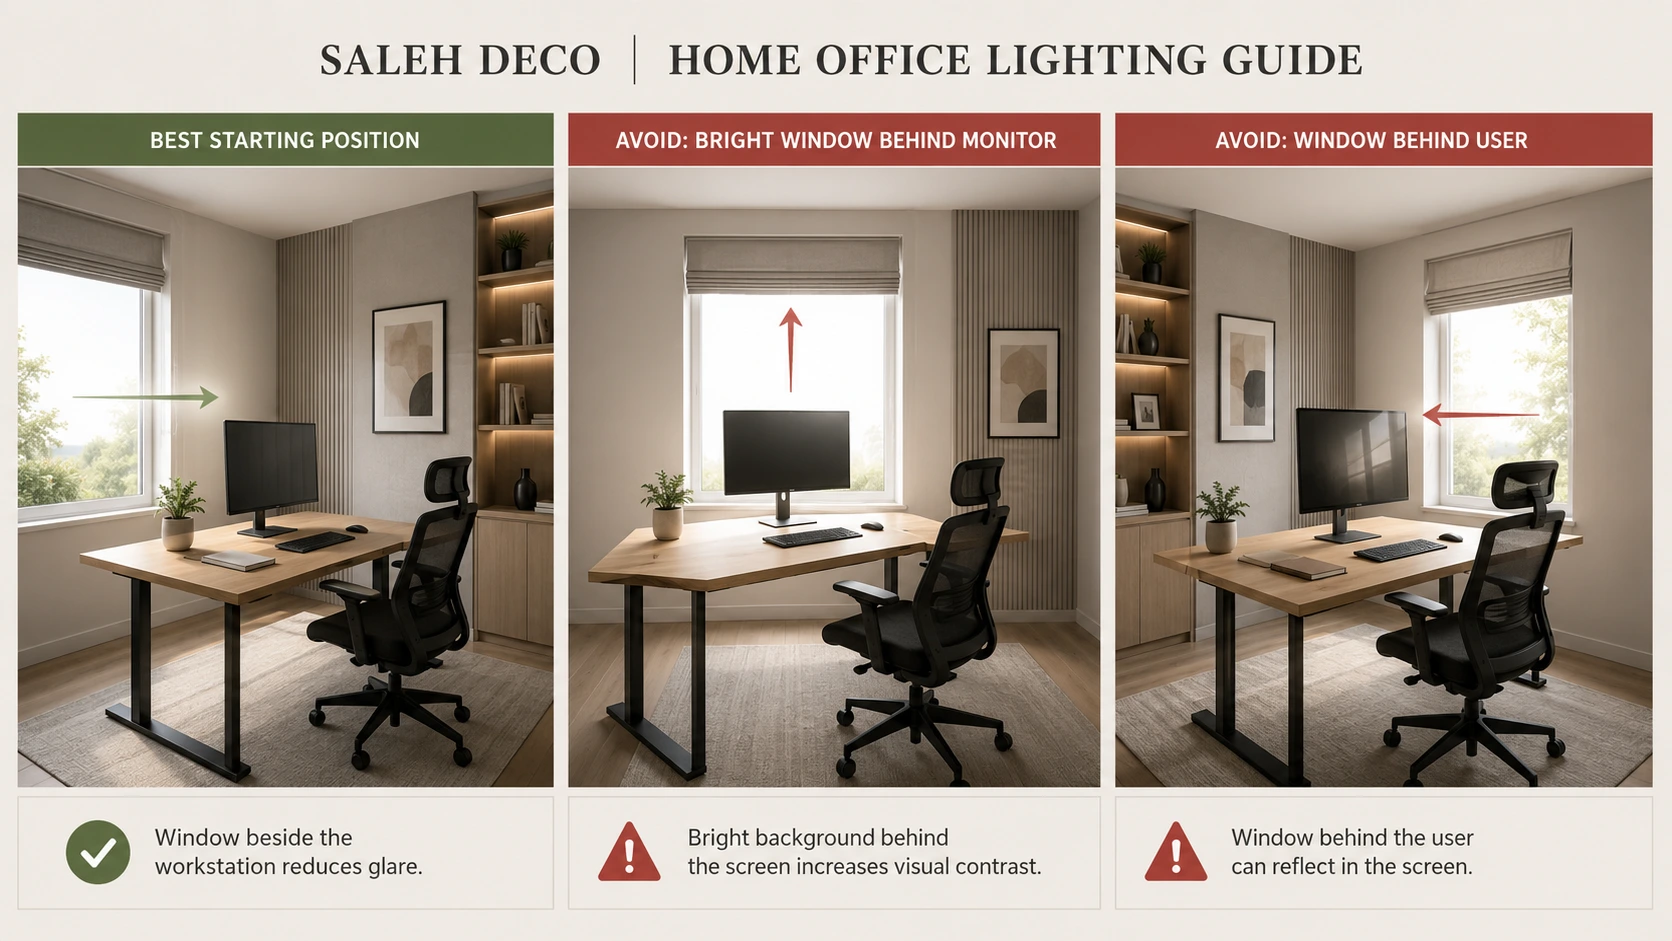
Best Starting Position: Window Beside the Desk
When practical, place the desk so the monitor is approximately perpendicular to the main window.
This arrangement usually makes daylight easier to control because the brightest source is coming from the side rather than directly along the viewing axis.
It also makes it easier to:
reduce screen reflections;
control daylight with blinds or curtains;
keep the monitor background visually balanced;
and use natural light without allowing it to dominate the screen.
The exact desk position still depends on the room, but this is the most useful starting principle.
Avoid Facing a Bright Window
Placing the monitor directly toward a bright window can create a large brightness difference between the screen and the background.
The user's eyes then have to adapt continuously between:
the relatively controlled brightness of the monitor;
and the much brighter daylight beyond it.
Even when no visible reflection appears on the screen, this contrast can make the workstation feel uncomfortable.
If the desk must face a window, use effective daylight control such as:
roller blinds;
curtains;
shutters;
or other adjustable shading.
The goal is not to eliminate daylight, but to keep it from becoming the brightest element in the normal field of view.
Avoid a Window Directly Behind the User
A window behind the user can create a different problem: reflections on the monitor.
The screen can behave like a dark reflective surface, especially when displaying darker content. A bright window behind the seating position may therefore appear as a visible reflection across the display.
This can reduce screen contrast and make text or detail harder to see comfortably.
If the room layout makes this arrangement unavoidable:
use blinds or curtains;
angle the monitor slightly where practical;
reduce direct daylight entering the reflection path;
and check the screen from the actual seated position before finalizing the layout.
Check the Screen at the Time of Day You Actually Work
Daylight conditions change throughout the day.
A desk that works perfectly in the morning may receive direct sunlight or strong reflections later in the afternoon.
Before fixing the workstation permanently, check the space during the hours when the office will be used most.
Pay attention to:
direct sunlight hitting the monitor;
bright reflected patches;
strong contrast behind the screen;
and whether blinds need to remain closed for long periods.
If daylight control has to stay fully closed throughout the working day just to make the monitor usable, the workstation position probably needs reconsideration.
Use Daylight as a Layer, Not as the Entire Lighting Plan
Natural light can contribute significantly during the day, but it should not be the only source supporting the workstation.
Daylight changes with:
time of day;
season;
weather;
orientation;
and shading.
Artificial lighting should therefore maintain a comfortable baseline when daylight falls or becomes uneven.
This is especially important for a home office used:
early in the morning;
late in the afternoon;
at night;
or during video calls where consistent lighting matters.
The most reliable setup combines controlled daylight with stable ambient and task lighting.
Video Calls Need the Same Window Planning
Window position also affects webcam lighting.
A bright window directly behind the user can make the face appear dark while the camera exposes for the much brighter background.
A window in front of or slightly to the side of the user can provide more useful facial illumination, provided it is not too harsh.
For regular video calls, consider:
the direction the camera faces;
the brightness of the background;
whether the face is evenly lit;
and whether the window changes dramatically during the day.
This means the best desk position should support both screen comfort and camera visibility.
Quick Window-Position Check
Before finalizing the desk, sit in the actual working position and check:
Good signs
Window is mainly beside the monitor.
No bright reflection appears in the screen.
The wall behind the monitor is not dramatically brighter than the display.
Daylight can be controlled without completely blocking it.
The face is not strongly backlit during video calls.
Warning signs
Bright window directly behind the screen.
Bright window reflected in the monitor.
Strong sunlight crossing the desk or screen.
The monitor becomes difficult to view at certain hours.
Webcam image is consistently backlit.
Getting this relationship right can reduce glare before any fixture is added. Once the workstation and daylight are under control, the next step is to calculate how much artificial light the desk and surrounding room actually need.
How Much Light Does a Home Office Need?
A typical home office does not need the same light level across the entire room.
The most important target is the working surface. For a desk used for computer work, reading, writing and paperwork, plan around 500 lux on the main task area.
The area immediately surrounding the desk can normally be lower, around 300 lux, while the wider background can remain softer. This creates a gradual transition in brightness and avoids turning a small residential office into an unnecessarily bright commercial-looking space.
A useful way to think about the room is:
Main desk / task area → around 500 lux
Immediate surroundings → around 300 lux
Background → around 100 lux or more as a reference
These values are not three rigid borders that need to be measured exactly across the floor. They describe the lighting hierarchy we want to create.
Why 500 Lux Across the Entire Room Is Usually Unnecessary
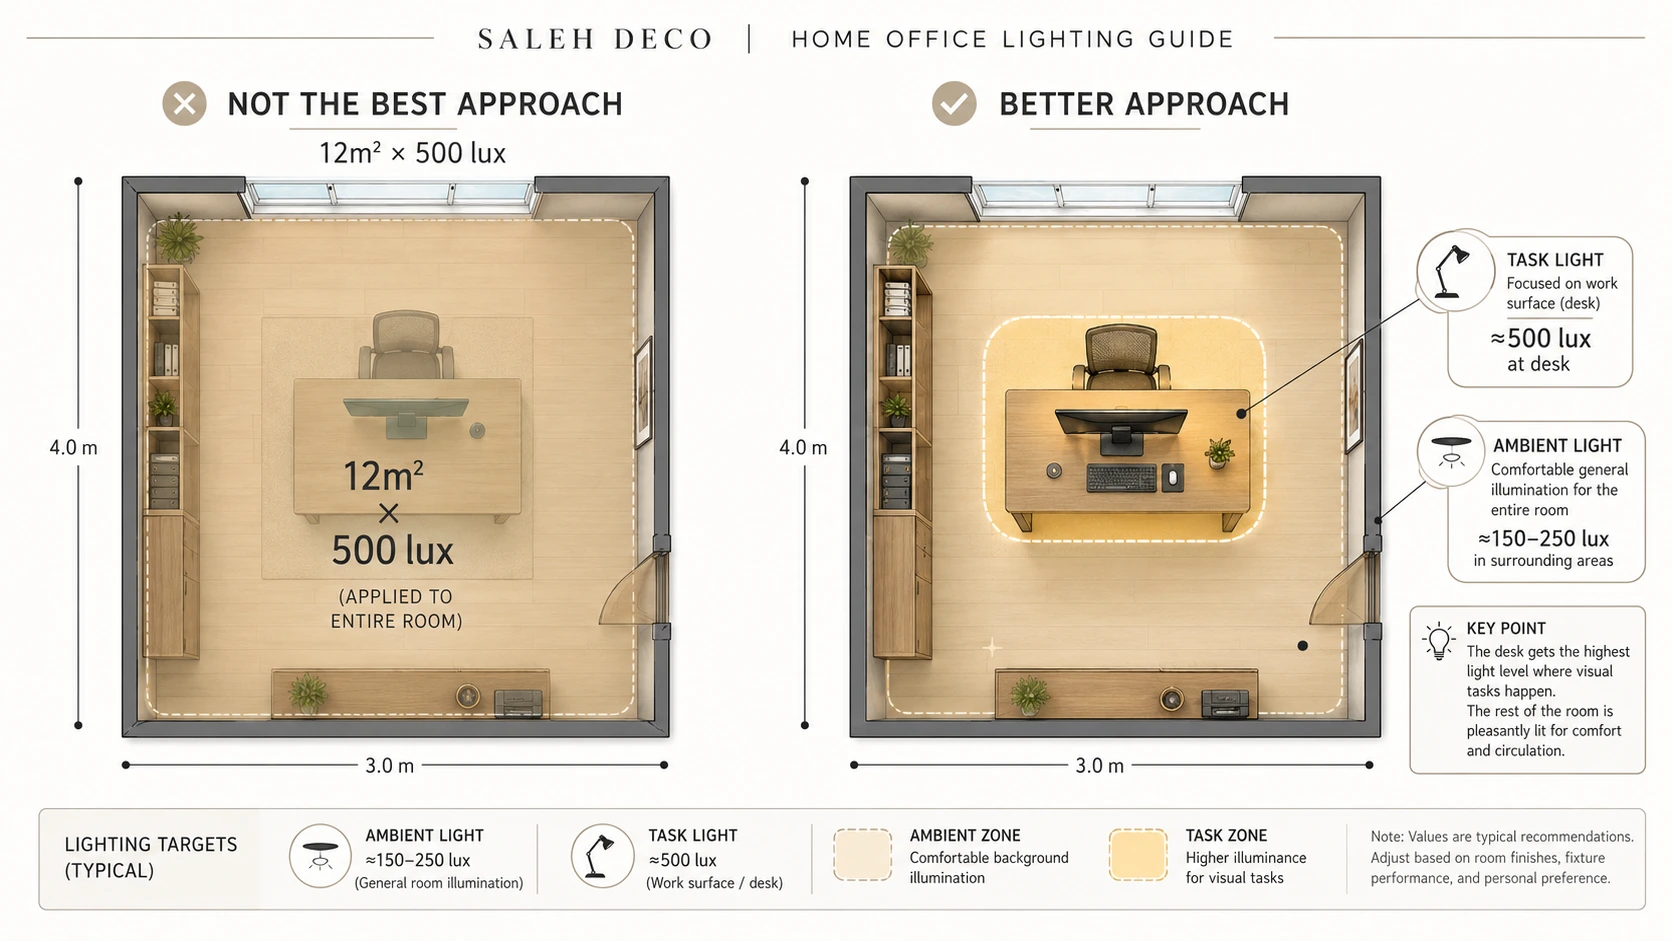
Suppose a home office measures 3 × 4m.
Its total floor area is:
3m × 4m = 12m²
If we simply multiply the whole room by 500 lux:
12m² × 500 lux = 6,000 lumens reaching the working plane
It is tempting to use this result as the room's lighting requirement.
But that assumes the entire 12m² floor area needs to perform like the desk.
Usually it does not.
The bookshelf, circulation area, cabinet and empty floor space do not need the same illumination as the place where someone is reading documents or writing.
A better strategy is to provide a comfortable ambient base level throughout the room and then use localized task lighting to bring the desk to approximately 500 lux.
This is one of the most important differences between simply calculating room brightness and actually designing a home office lighting plan.
Lux Is Measured Where the Work Happens
Lux describes how much light reaches a surface.
For a home office, that means the important measurement plane is usually the desktop, not the floor.
A desk is commonly around 70–75cm above the floor, so the light reaching that surface is what matters for reading, writing and detailed work.
This also explains why fixture lumens alone cannot tell us whether the desk will receive enough light.
The final illuminance depends on factors such as:
fixture output in lumens;
mounting height;
beam angle or light distribution;
distance from the desk;
fixture spacing;
room surface reflectance;
and losses within the installation.
Two fixtures with the same lumen output can therefore produce very different lux levels on the desk.
Calculate Your Home Office Light Requirement
Use the Saleh Deco Lux & Lumens Calculator to estimate the lighting requirement from room dimensions and target lux.
Use Ambient Light for the Room and Task Light for the Desk
For many small home offices, a practical approach is:
Ambient layer
Provides comfortable general illumination across the room.
Task layer
Adds the additional light needed on the desk for reading, writing or detailed work.
For example, if the ambient lighting already provides roughly 200–250 lux around the workstation, the task lamp does not need to provide the full 500 lux by itself.
It only needs to supply the additional useful illumination required to bring the working surface toward the target.
This gives much better control than installing enough ceiling lighting to force the entire room to 500 lux.
It also allows the user to reduce the task layer during screen-heavy work and increase it when working with printed documents.
A Simple Lumen Calculation
For an initial room estimate, the basic relationship is:
Required lumens reaching the surface = Room area × Target lux
For example:
12m² × 250 lux = 3,000 lumens reaching the working plane
However, the lumens emitted by the fixtures must normally be higher than this because not all emitted light reaches the useful surface.
A more realistic planning calculation is:
Fixture lumens = (Area × Target lux) ÷ (Utilization Factor × Maintenance Factor)
The utilization factor allows for how effectively the fixture and room deliver light onto the working plane.
The maintenance factor allows for the gradual reduction in useful light caused by normal ageing, dust and other losses.
For a consumer room-planning example, these factors are estimates rather than a substitute for a full photometric calculation, but they produce a far more realistic result than simply dividing fixture lumens by floor area.
Do Not Use Watts to Calculate Office Brightness
Wattage tells us how much electrical power a light uses.
It does not tell us directly how much usable light reaches the desk.
Two 12W LED fixtures can have different:
lumen outputs;
efficiencies;
beam angles;
optical systems;
and light distributions.
For Home Office planning, prioritize:
Lumens → how much light the fixture produces
and
Lux → how much of that light reaches the work surface
Wattage remains useful for energy and electrical planning, but it should not be used as the primary brightness measure.
More Lumens Are Not Always Better
Adding more light does not automatically improve visual comfort.
A room can exceed the required desk illuminance and still be uncomfortable because:
a bright fixture is visible above the monitor;
the ceiling is much brighter than the screen;
the wall behind the monitor is too dark;
narrow beams create bright and dark patches;
or a task lamp reflects in the display.
The objective is therefore not to maximize lumens.
It is to deliver the right amount of light to the right surfaces while controlling glare and brightness contrast.
What About Detailed or Precision Work?
Some home offices are used for more demanding visual tasks such as:
technical drawing;
drafting;
detailed model work;
fine illustration;
or other precision activities.
These tasks can justify a higher working level of around 750 lux, together with stronger glare control.
Rather than increasing the entire room to this level, it is normally better to strengthen the local task-lighting layer around the precision work area.
The Practical Home Office Rule
For a normal computer-based Home Office, start with:
≈500 lux at the desk
but do not design:
500 lux everywhere.
Instead:
1. Establish comfortable ambient illumination.
2. Measure or estimate what reaches the desk.
3. Add localized task lighting to close the gap.
4. Keep the surrounding room softly illuminated for visual balance.
This approach gives better comfort, greater flexibility and usually requires fewer unnecessary ceiling fixtures.
Later in this guide, we will apply exactly this method to a 3 × 4m Home Office, calculate the ambient and task layers separately, and show how the fixture quantity changes once beam spread and placement are considered.
The Three Home Office Lighting Layers
A comfortable home office usually works best with three separate lighting functions rather than one source trying to do everything.
The goal is simple:
Ambient light makes the room comfortable.
Task light supports detailed work.
Background light balances the visual field around the screen.
Because the desk is the most demanding area, these layers should be planned around the workstation rather than added randomly around the room.
1. Ambient Lighting — The Base Layer
Ambient lighting provides the general illumination that allows you to move around the room, use storage, read the space comfortably and avoid working in an otherwise dark environment.
Suitable ambient sources include:
recessed or surface-mounted technical spotlights;
ceiling lights;
broad-beam downlights;
panel lights;
linear or magnetic-track modules.
For a home office, ambient lighting should feel even and controlled, not intense.
The purpose is not to push the entire room to 500 lux. Instead, it should create a comfortable base level that the task layer can build upon at the desk.
Broad beams or diffused light distributions are often more useful for this layer than narrow accent beams because they create smoother coverage with fewer strong bright and dark patches.
2. Task Lighting — Light Where the Work Happens
Task lighting provides additional illumination directly onto the working surface.
In a home office, this is especially useful for:
writing;
reading printed documents;
drawing;
reviewing samples;
detailed paperwork;
or other close visual work.
An adjustable desk lamp is often the most flexible solution because it allows the light to be directed exactly where it is needed without increasing the brightness of the entire room.
The task lamp should illuminate the paperwork or work surface, not the monitor.
Useful characteristics include:
adjustable or tiltable positioning;
sufficient lumen output;
dimming where available;
a suitable color temperature;
and good color rendering for work where color accuracy matters.
If the ceiling lighting already contributes significantly to the desk, the task lamp only needs to provide the additional light required to bring the working surface toward the target level.
3. Background Lighting — Balance Around the Screen
Background lighting is easy to overlook, but it can make a major difference during long periods of screen work.
A bright monitor against a very dark wall can create an uncomfortable contrast between the display and its surroundings.
Soft illumination on the wall, shelving or room background helps reduce that contrast without competing with the screen.
Suitable sources include:
wall lights;
indirect floor lamps;
shelf lighting;
concealed LED strips;
or softly aimed track spotlights.
This layer should generally remain softer than the desk lighting.
Its purpose is visual balance and depth, not task illumination.
How the Three Layers Work Together
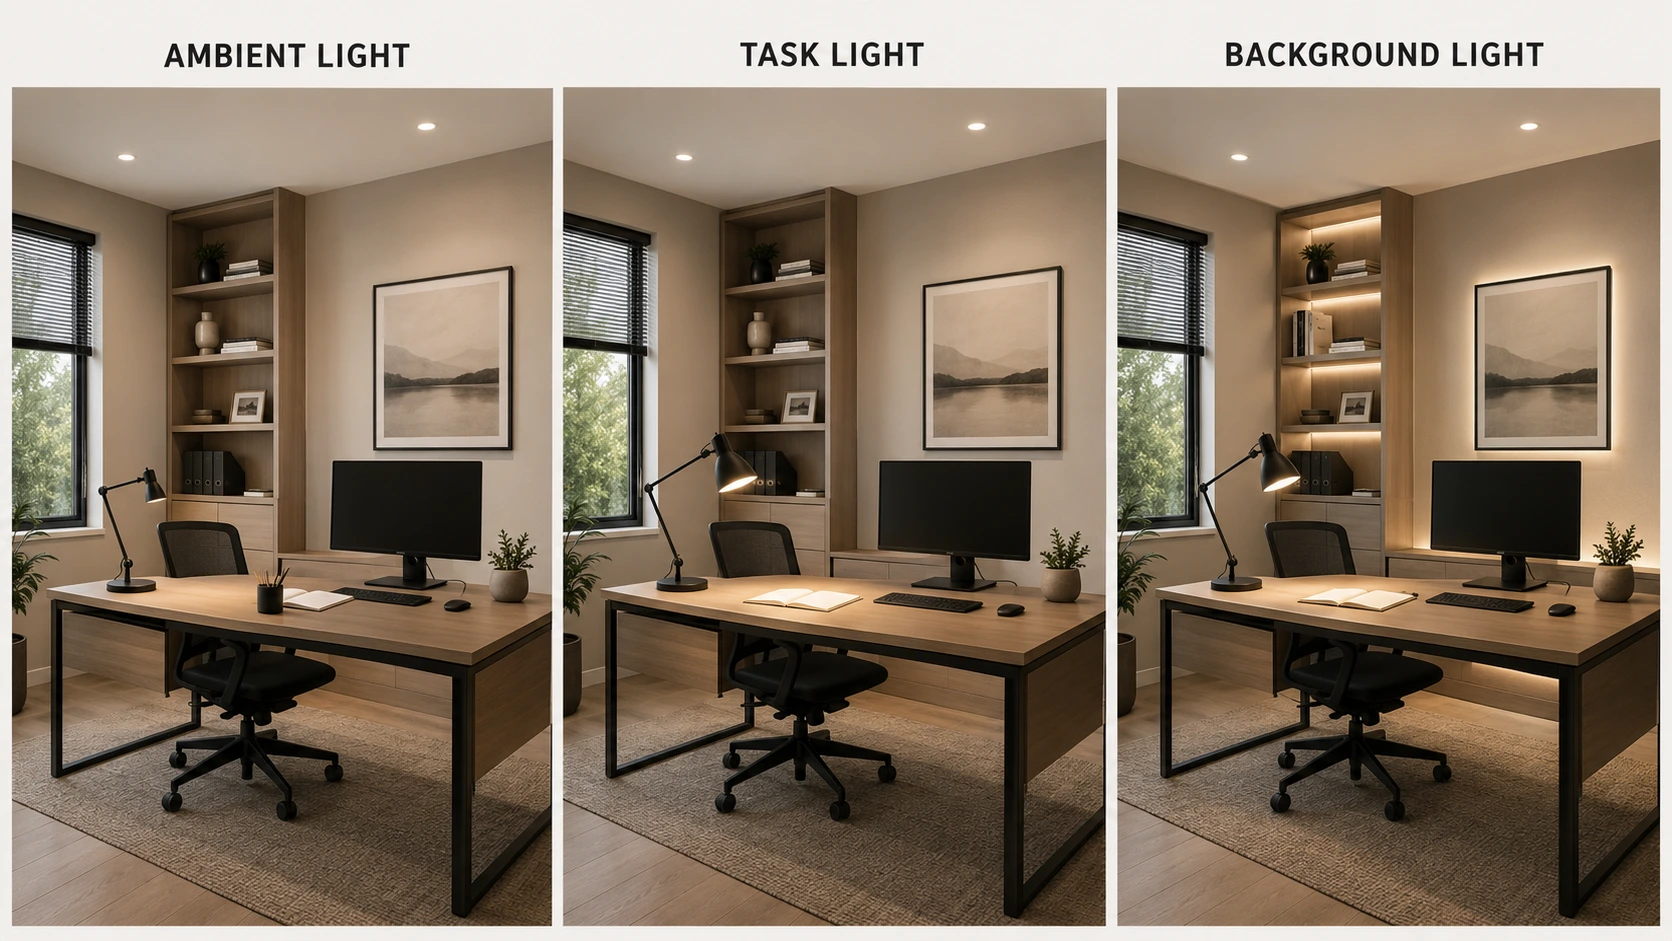
A simple home office setup might operate like this:
Ambient layer
Provides comfortable general room illumination.
Task layer
Raises the desk to the level required for reading, writing or detailed work.
Background layer
Prevents the monitor from sitting against an excessively dark visual field.
This separation also makes the room easier to control.
For example:
Screen-heavy work
Use comfortable ambient light, reduced task light and soft background illumination.
Paperwork or reading
Increase the task light while keeping ambient lighting stable.
Video calls
Balance the face and background rather than relying only on overhead lighting.
Evening use
Reduce overall output and use warmer or dimmer layers where the installed system allows it.
The key principle is that each light source should have a defined job.
Once those jobs are clear, fixture selection becomes much easier—and the next issue to solve is one of the most important in a computer-based workspace: direct glare and screen reflections.
Screen Glare — Direct Glare vs Reflected Glare
A home office can have enough light on the desk and still feel uncomfortable if that light is poorly controlled.
This is especially important around computer screens, where glare can come from two different problems:
Direct glare — a bright light source is visible directly in the user's field of view.
Reflected glare — a bright light source or window is reflected in the monitor or another glossy surface.
The solution is not simply to reduce the amount of light in the room. The goal is to control where the brightness appears and where the light is directed.
Direct Glare — When the Light Source Is Too Bright to Look Toward
Direct glare occurs when a bright luminaire, bare lamp or window sits within or close to the normal viewing direction.
In a home office, common examples include:
a bright recessed spotlight directly above or beyond the monitor;
a desk lamp with the LED or bulb visible from the seated position;
a decorative pendant hanging within the normal line of sight;
or a bright window positioned directly behind the monitor.
The fixture may be producing the correct amount of light, but if its brightest surface is visible while the user is looking at the screen, it can still feel uncomfortable.
This is why fixture placement matters as much as lumen output.
A good ceiling-light layout should illuminate the workstation without forcing the user to look toward a concentrated bright source every time they look at the monitor.
Reflected Glare — When the Light Appears in the Screen
Reflected glare is different.
Instead of looking directly at the light source, the user sees its reflection in the monitor.
Typical causes include:
ceiling lights positioned in the screen's reflection path;
a window behind the user;
a desk lamp aimed toward the monitor;
glossy desk surfaces;
or bright objects immediately behind the seating position.
Dark content on a screen can make these reflections particularly noticeable because the display behaves more like a reflective surface.
The result may be a bright patch or visible fixture reflected across the image, making darker details harder to see comfortably.
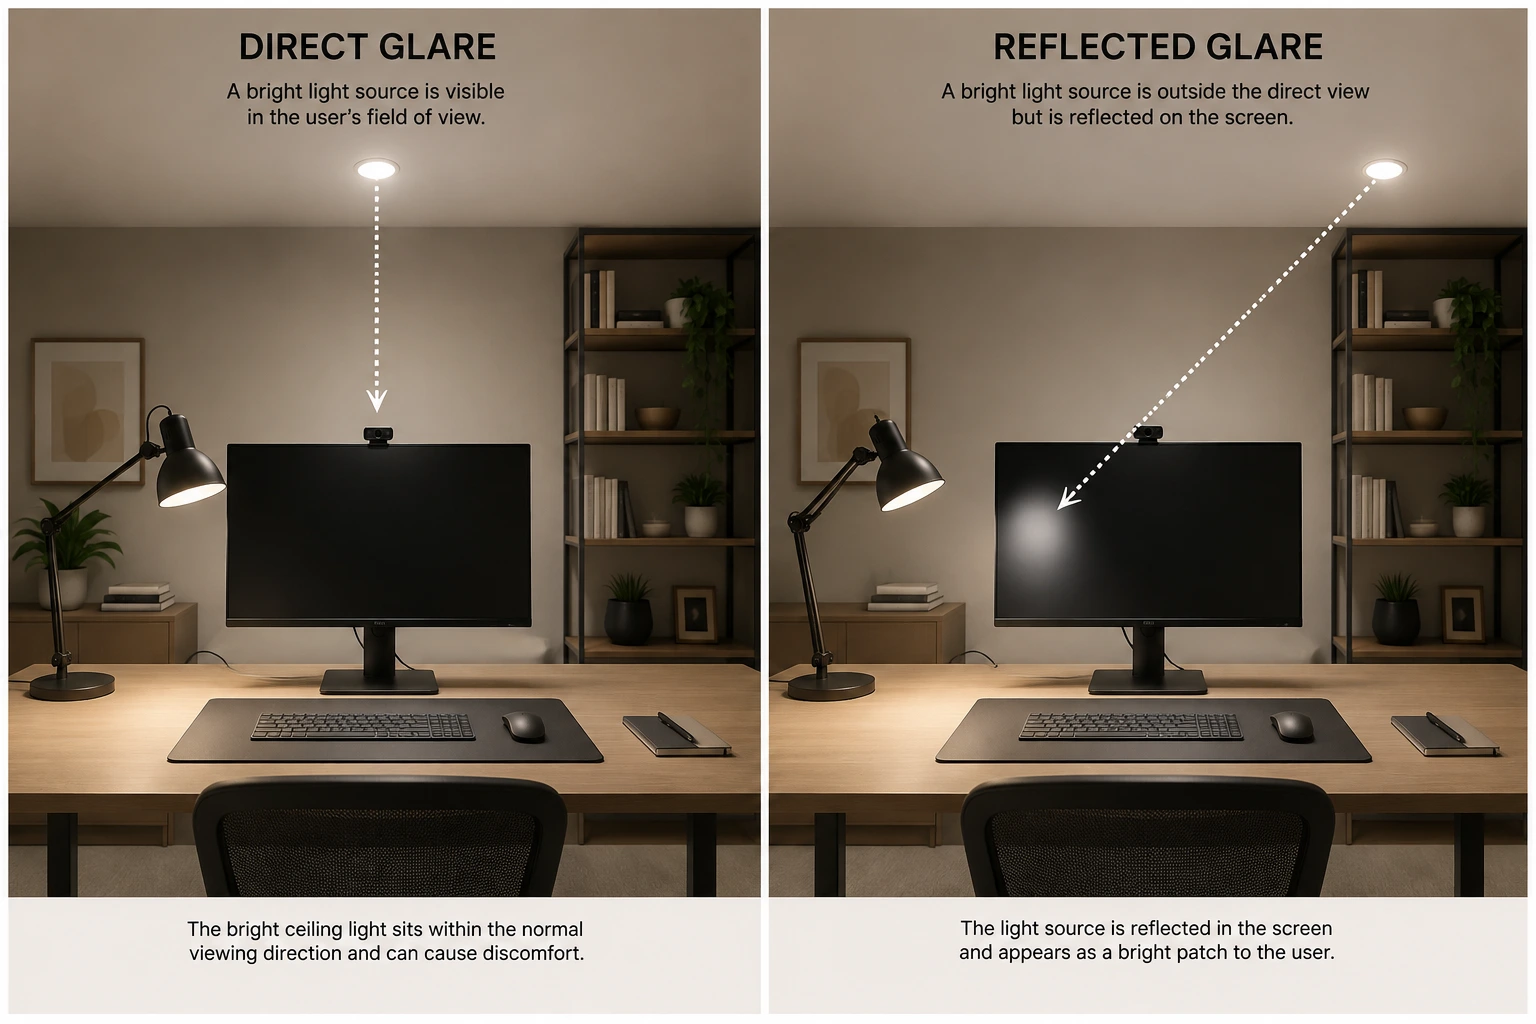
A Simple Reflection Check
Before fixing the ceiling layout permanently, sit at the desk with the monitor in its normal position.
Turn the screen off or display a dark image.
Then look for reflections from:
ceiling fixtures;
windows;
desk lamps;
bright wall lights;
and other strong light sources behind you.
If a fixture appears clearly in the dark screen, its position deserves attention.
Depending on the installation, the solution may be to:
move the fixture;
change its aiming direction;
use a broader or better-shielded luminaire;
adjust the monitor angle;
or control the offending daylight source.
This simple check can reveal reflection problems that are difficult to notice from a ceiling plan alone.
Do Not Aim the Desk Lamp Toward the Monitor
A task lamp should illuminate the working surface, not the display.
Aim the lamp across:
documents;
notebooks;
drawings;
samples;
or the keyboard area where additional light is useful.
Avoid directing its beam toward the monitor.
For a right-handed user, positioning the task lamp toward the left side of the desk is often a useful starting point. A left-handed user can reverse the arrangement.
The objective is to illuminate the task while keeping the light source and its strongest reflection outside the normal viewing direction.
Brightness Contrast Can Be Uncomfortable Even Without a Reflection
Not every screen-lighting problem appears as a visible reflection.
A bright monitor against a nearly black wall can also create a strong brightness difference within the user's field of view.
The opposite can happen as well: a relatively dark display positioned directly in front of a very bright window.
In both cases, the eye repeatedly shifts between areas with very different brightness levels.
That is why background illumination matters.
Softly lighting the wall, shelving or room around the workstation can help create a more gradual visual transition between:
screen → desk → surrounding room
without making the background brighter than the monitor itself.
More Ceiling Light Is Not the Cure for Glare
When a workspace feels uncomfortable, the instinct may be to add more fixtures.
That can make the problem worse.
Additional ceiling lights can introduce:
more visible bright sources;
more monitor reflections;
stronger ceiling brightness;
and greater contrast between individual pools of light.
Before increasing output, check:
Is the desk actually too dark?
or
Is the existing light simply in the wrong place?
If the desk needs additional illumination, a controlled task light may solve the problem more effectively than adding another ceiling spotlight.
Glare Control Starts With Fixture Selection and Placement
When choosing general lighting for a home office, favour fixtures that allow the light to reach the room without exposing an unnecessarily bright source to the user.
Useful characteristics can include:
recessed or shielded light sources;
diffusers;
deeper optical designs;
broad and even light distribution;
and documented glare performance where available.
However, no fixture specification removes the need for good placement.
Even a well-designed low-glare luminaire can become uncomfortable if it is installed directly within the user's normal viewing direction or reflected in the screen.
The next technical concept helps us evaluate glare more systematically: UGR, or Unified Glare Rating, and why UGR ≤19 is an important benchmark for office lighting.
What Does UGR ≤19 Mean for a Home Office?
When comparing lighting for a computer-based workspace, you may see a specification such as UGR<19.
For glare terminology, see Light Quality Explained. For shared workplaces, lighting zones and commissioning, continue with the Commercial Office Lighting Guide.
UGR stands for Unified Glare Rating. It is a method used to assess the likelihood of discomfort glare from luminaires within a person's field of view.
For normal office activities such as:
computer work;
reading;
writing;
typing;
and general desk-based tasks,
UGR ≤19 is an important office-lighting benchmark.
For more visually demanding activities such as technical drawing or precision work, a stricter glare target such as UGR ≤16 may be appropriate.
However, UGR needs to be understood correctly before using it to choose a fixture.
Lower UGR Means Better Glare Control
As a general principle, a lower UGR value indicates better control of discomfort glare.
For a home office:
UGR ≤19
Suitable benchmark for normal office work.
UGR ≤16
Stronger glare control for more demanding visual tasks.
A well-shielded recessed spotlight, deep reflector or properly designed diffused luminaire may therefore be preferable to a fixture with a very bright exposed emitting surface.
But the UGR number is only part of the story.
UGR Is Not Simply a Fixture Rating
One of the most important things to understand is that UGR relates to the complete lighting arrangement, not just the luminaire itself.
The resulting glare depends on factors including:
luminaire brightness;
fixture position;
number of fixtures;
mounting height;
room dimensions;
wall and ceiling reflectance;
viewing direction;
and the position of the user.
This means a fixture marketed or documented as suitable for UGR<19 applications does not automatically guarantee that every room using that fixture will achieve UGR≤19.
For example, a low-glare spotlight may perform well when positioned outside the main viewing direction but become much more noticeable if it is installed directly above and beyond the monitor.
The fixture and the layout have to work together.
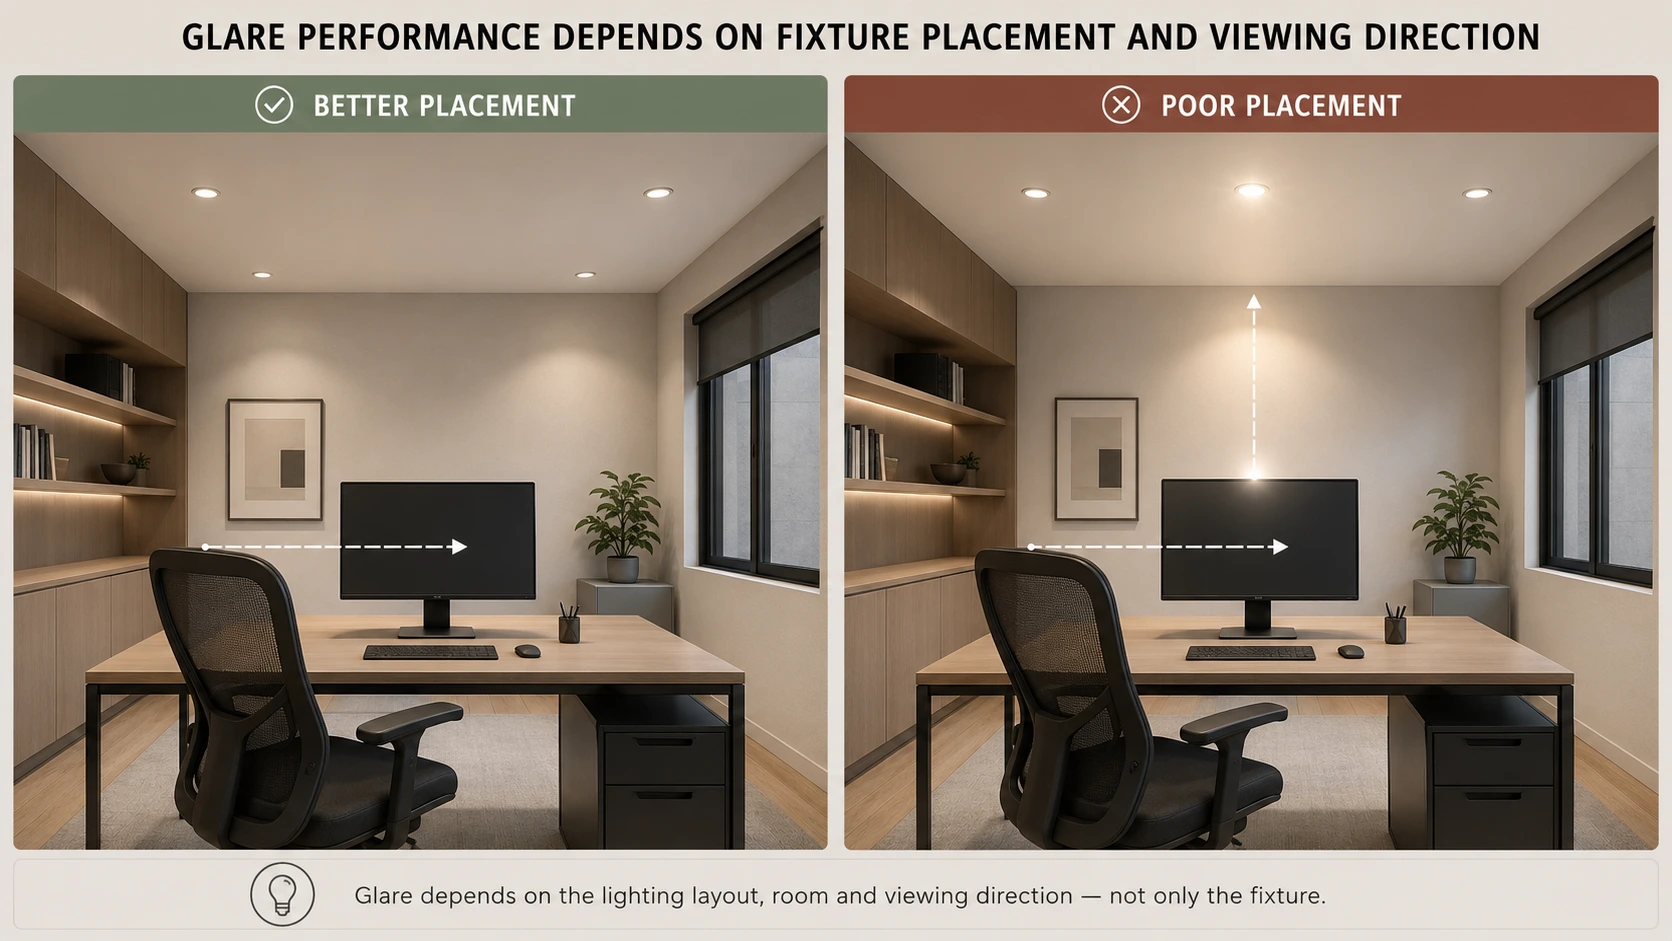
Think About the Seated Viewing Direction
UGR becomes particularly relevant in a home office because the user often looks in approximately the same direction for long periods.
Consider the normal seated view toward the monitor.
If several bright ceiling fixtures are visible directly above or behind the display, they can contribute to discomfort even when the desk receives the correct lux level.
A better layout aims to keep the brightest luminaire surfaces away from this normal viewing direction while still delivering enough useful light onto the room and desk.
This is another reason why the workstation should be positioned before the ceiling-light layout is finalized.
UGR and Screen Reflections Are Not the Same Thing
UGR mainly addresses discomfort glare from luminaires seen within the visual field.
It should not be confused with reflected glare on a computer screen.
A home office can theoretically use low-glare luminaires and still suffer from screen reflections if:
a fixture sits in the monitor's reflection path;
a window is behind the user;
or a task lamp is aimed toward the display.
Likewise, a monitor may have no visible reflection while the user is still uncomfortable because a bright ceiling fixture is directly visible above it.
So both need to be checked separately:
UGR / direct discomfort glare
How bright the luminaires appear within the user's field of view.
Screen reflection control
Whether windows or luminaires are reflected in the display.
A good home office lighting plan needs to manage both.
Do Not Reject a Suitable Fixture Just Because UGR Is Not Listed
For practical product selection, documented UGR performance is valuable—but it should not become the only way to judge a fixture.
Not every residential or decorative luminaire is supplied with complete UGR data.
If a product does not state UGR, evaluate the characteristics that influence visual comfort instead:
Is the light source deeply recessed or exposed?
Is there a diffuser?
Does the fixture have a deep reflector?
Is the beam broad or highly concentrated?
Will the emitting surface be directly visible from the desk?
Can the fixture be positioned away from the normal viewing direction?
Is the output appropriate for the room rather than unnecessarily high?
Documented UGR<19 should therefore be treated as a strong advantage when it is verified, not as a reason to automatically exclude every product where the value is unavailable.
What to Look for in a Home Office Ceiling Fixture
For general lighting around a computer workstation, prioritize:
controlled or shielded light sources;
comfortable broad or appropriate beam distribution;
sufficient lumen output without excessive brightness;
good fixture placement relative to the monitor;
documented UGR≤19 where available;
dimming where useful;
and suitable CCT and CRI for the type of work being performed.
A fixture with excellent glare control but the wrong beam, output or position can still produce a poor result.
The best choice is therefore the luminaire that delivers comfortable light in the actual room layout, not simply the fixture with the most impressive specification sheet.
In the next section, we will apply these principles directly to the ceiling and look at where home office downlights and spotlights should actually be positioned around the desk.
Choosing Ceiling Lights and Spotlights for a Home Office
Ceiling lighting in a home office should provide a comfortable ambient base without creating glare around the monitor.
The best fixture is not necessarily the brightest one. What matters is how its:
lumen output;
beam angle;
optical design;
mounting position;
glare control;
and spacing
work together in the actual room.
For most home offices, ceiling lighting should support the workstation rather than trying to provide all 500 lux at the desk by itself.
Broad, Even Light Usually Works Better for Ambient Lighting
For general illumination, wider beams or diffused fixtures are often easier to work with than narrow spotlights.
A broad distribution helps:
spread light more evenly across the room;
reduce isolated bright patches;
soften transitions between fixtures;
and create a more comfortable ambient layer around the workstation.
Narrow beams can still be useful, but they are generally better suited to:
artwork;
bookshelves;
architectural details;
or specific accent areas.
Using several narrow-beam fixtures as the only ambient source can leave strong pools of light separated by darker areas.
Do Not Put a Downlight Directly Above the Monitor by Default
One of the most common mistakes is treating the monitor position as irrelevant when laying out the ceiling.
A bright fixture directly above or slightly beyond the monitor may:
sit inside the user's normal field of view;
reflect in the screen;
produce excessive brightness immediately around the display;
or create an uncomfortable contrast against darker surroundings.
A better starting point is to position the nearest ceiling fixtures slightly forward of the workstation or to either side, then use their beam spread to illuminate the desk and surrounding area.
The exact offset depends on:
ceiling height;
desk depth;
beam angle;
fixture output;
and the position of the monitor.
The principle is more important than one universal dimension:
Light the workstation without placing the brightest source directly in the viewing path.
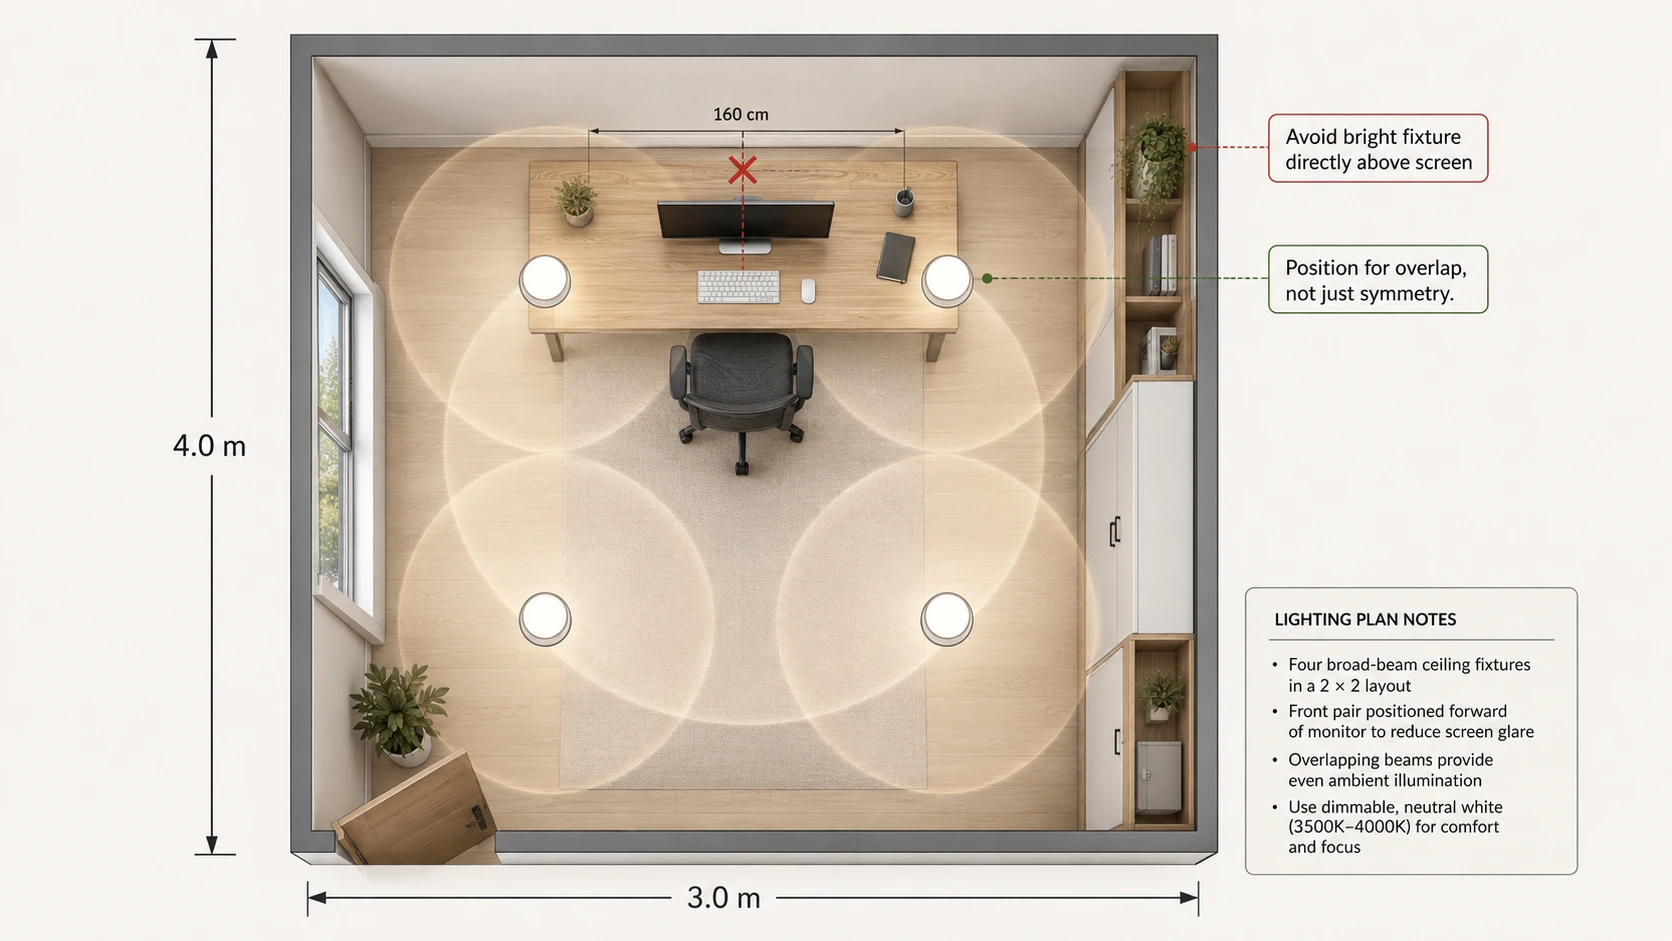
Beam Angle Changes How Many Fixtures You Need
Two fixtures with the same lumen output can behave very differently if their beam angles are different.
For example:
24° beam
Creates a concentrated pool of light. Better for focused accent lighting.
36° beam
Provides a useful balance between concentration and spread.
60° beam
Covers a wider area and is often easier to use for smooth ambient illumination in a small home office.
A narrow beam therefore cannot simply replace a broad-beam fixture one-for-one.
If the beam becomes narrower, you may need:
more fixtures;
closer spacing;
different aiming;
or an additional ambient source
to maintain even coverage.
This is why spotlight quantity should always be considered together with beam angle and mounting height.
Recessed Spotlights
Recessed spotlights can work particularly well where a clean ceiling appearance is desired.
Look for:
controlled or recessed light sources;
suitable lumen output;
an appropriate beam angle;
glare-controlled optics where available;
and spacing that avoids positioning a bright source directly above the monitor.
For general home-office ambient lighting, broad or medium beams are usually easier to integrate than very narrow accent beams.
Surface-Mounted Spotlights
Surface-mounted fixtures can provide similar functional lighting where recessed installation is not possible.
Because the body projects below the ceiling, pay extra attention to:
whether the bright emitting surface is visible from the desk;
mounting height;
beam direction;
and fixture depth.
A deep or shielded optical design can help reduce direct brightness in the normal viewing direction.
Adjustable Spotlights
Adjustable or tiltable fixtures become useful when the office contains:
shelving;
artwork;
sample boards;
secondary work surfaces;
or areas that may change over time.
They allow light to be directed toward useful surfaces instead of simply pointing vertically downward.
However, adjustable does not automatically mean better for the main desk.
A badly aimed adjustable spotlight can create more glare than a well-positioned fixed fixture.
Aim it at the surface you want to illuminate, not toward the user's eyes or monitor.
Ceiling Lights and Diffused Fixtures
A broad ceiling light, panel-style source or diffused fixture can be a good alternative to multiple spotlights.
These fixtures can provide:
smoother ambient coverage;
fewer concentrated bright points;
and a visually calmer ceiling.
They can be especially useful in compact offices where several separate downlights would feel excessive.
The main questions remain the same:
Is the output appropriate?
Is the emitting surface comfortable to look toward?
Does it illuminate the desk and surroundings evenly?
Is it positioned to avoid screen reflections?
Track and Magnetic Systems
Track or magnetic lighting can be particularly useful in a flexible home office.
A system can combine:
broader linear modules for ambient illumination;
directional spotlights for shelves or artwork;
and adjustable modules for changing layouts.
This makes it easier to adapt the room if:
the desk moves;
shelving changes;
a second work area is added;
or the room later serves another purpose.
For a permanent small workstation, a full track system may not be necessary. But for larger or changing offices, its flexibility can be a major advantage.
What Specifications Should You Compare?
When comparing ceiling fixtures for a home office, prioritize:
Lumens
How much light the fixture actually produces.
Beam Angle / Distribution
How widely that light spreads.
UGR or Glare Performance
Useful advantage where verified.
Color Temperature (CCT)
4000K is a practical starting point for a dedicated work-oriented room, with 3000K suitable for warmer mixed-use spaces.
CRI
CRI80+ is suitable for general office work; CRI90+ is preferable for color-sensitive tasks.
Dimming
Useful when the office is used for both screen-heavy work and detailed paperwork.
Adjustability
Helpful for shelves, artwork and secondary work zones.
Wattage should remain a secondary specification. It tells you about electrical consumption—not how effectively the fixture will illuminate the desk.
A Practical Ceiling-Light Rule
For a small home office:
Create a comfortable ambient layer first.
Use broad or controlled light distribution.
Keep bright fixtures outside the normal monitor viewing direction.
Check beam overlap rather than spacing fixtures by appearance alone.
Use the desk lamp to provide the final task-light boost when needed.
This approach often produces a more comfortable result than filling the ceiling with enough spotlights to achieve 500 lux everywhere.
Later in the worked example, we will apply this principle to a 3 × 4m office using four broad-beam ceiling fixtures, then compare their contribution with the separate task-lighting layer at the desk.
Planning Spotlights for Your Home Office?
Use the Saleh Deco Spotlight Layout Calculator to estimate fixture quantity and spacing based on room dimensions, beam angle and mounting height.
Choosing a Desk Task Light
A desk lamp should not be treated as a decorative extra in a home office. Its main job is to provide additional useful light exactly where detailed work happens without forcing the entire room to become brighter.
This is particularly important when the desk is used for:
reading printed documents;
handwriting;
sketching or drawing;
reviewing samples;
fine detail work;
or tasks that require more light than screen-only work.
A well-positioned task lamp can raise the working surface toward the target illuminance while keeping the surrounding room comfortable.
Light the Work Surface, Not the Monitor
The most important rule is simple:
Aim the task light at the document or work area, not toward the screen.
The beam should fall across the part of the desk where extra illumination is useful.
Avoid aiming the lamp toward:
the monitor;
the user's eyes;
glossy desk surfaces that can create reflections;
or other reflective objects near the screen.
A desk lamp that produces enough lumens but sends that light in the wrong direction can still make the workstation less comfortable.
Adjustable Lamps Give Better Control
An adjustable lamp is usually more useful than a fixed decorative lamp because the user can change:
the angle of the light;
the distance from the work surface;
the illuminated area;
and the amount of light reaching the task.
Useful forms include:
adjustable arms;
tiltable heads;
articulated joints;
or directional shades.
This flexibility becomes especially valuable when the same desk is used for both computer work and paperwork.
Position the Lamp According to the Task
For writing and drawing, the position of the lamp can help reduce hand shadows.
A practical starting point is:
Right-handed user → lamp toward the left side
Left-handed user → lamp toward the right side
The light should cross the work surface rather than coming from directly behind the writing hand.
This does not need to be followed rigidly. Monitor position, desk size and lamp design still matter. But it is a useful starting point for a comfortable layout.
How Bright Should a Desk Lamp Be?
The task lamp does not necessarily need to provide the full 500 lux target by itself.
If the ceiling lighting already contributes part of the illumination at the desk, the task lamp only needs to provide the remaining amount.
For example:
If the ambient lighting provides approximately:
225 lux at the workstation
and the target is:
500 lux
the task layer needs to add roughly:
275 lux
over the working area.
For a desk area of approximately:
1.6m × 0.75m = 1.2m²
a practical task lamp in the region of 600–800 lumens, depending on its distribution and distance from the desk, can provide useful additional illumination.
This is why an 800lm adjustable lamp is a sensible starting specification for the worked example later in this guide.
The lamp can then be dimmed or repositioned rather than being operated at maximum output all the time.
Dimming Is Particularly Useful at a Desk
The ideal task-light level changes depending on what the user is doing.
For example:
Screen work
Less task light may be needed.
Reading or paperwork
More local illumination may be useful.
Detailed creative work
The task layer may need to operate at a higher level.
A dimmable lamp makes it easier to adapt the desk without changing the entire room lighting.
Where dimming is available, it is therefore a meaningful functional advantage rather than simply an extra feature.
Choose the Right Color Temperature
The task lamp should generally work visually with the rest of the room.
For a dedicated daytime office, 4000K can provide a neutral working appearance.
For a mixed-use residential office or evening workspace, 3000K may feel more comfortable.
If the ambient ceiling lighting and desk lamp use very different color temperatures, the desk can feel visually disconnected from the room.
Where possible, keep the main work layers reasonably consistent unless a tunable system is being used intentionally.
CRI Matters More for Color-Sensitive Work
For ordinary administration, reading and computer work, CRI80+ is a practical benchmark.
If the desk is used for:
graphic design;
interior or material selection;
artwork;
product samples;
photography;
fabrics;
or other color-sensitive work,
CRI90+ is preferable where available.
Higher color rendering will not make the desk brighter, but it can make colors and materials appear more natural and easier to evaluate accurately.
Replaceable-Bulb Desk Lamps Need the Right Lamp Too
Some table lamps use a replaceable bulb rather than an integrated LED source.
In these cases, the fixture alone does not determine:
lumen output;
color temperature;
CRI;
or dimming capability.
The selected bulb becomes part of the lighting specification.
For a replaceable-lamp desk light, confirm:
lamp base;
bulb dimensions;
lumen output;
CCT;
CRI where important;
and dimming compatibility where required.
Do not assume that two lamps with the same E27 or GU10 base will produce the same quality or amount of light.
What to Compare When Choosing a Task Lamp
For home-office use, prioritize:
Adjustability
Can the light be aimed toward the task?
Lumens
Is there enough output to supplement the ambient layer?
Can the light level be adapted to different work?
Color Temperature (CCT)
Does it suit the room and working pattern?
CRI
Is color rendering appropriate for the task?
Control Method
Is the lamp easy to operate from the desk?
Light Source / Lamp Base
Integrated LED or replaceable lamp architecture.
A beautiful table lamp can still be a poor task light if it cannot direct useful illumination toward the work surface.
The Practical Task-Light Rule
A good desk lamp should:
Add light only where it is needed.
Remain outside the normal viewing direction.
Avoid reflecting in the monitor.
Reduce hand shadows where possible.
Be adjustable enough to support different tasks.
Provide sufficient output without needing to run at maximum brightness at all times.
When the task layer is planned correctly, the ceiling lighting can remain softer and more comfortable.
The next step is to consider the other side of screen comfort: how to light the background around the workstation so the monitor does not sit against an excessively dark room.
Background Lighting & Screen Comfort
The desk may be the main working area, but the wall and room around the monitor are also part of the visual environment.
A common home-office mistake is to illuminate the desk and leave everything behind the screen almost completely dark.
The result can look dramatic, but it is not necessarily comfortable for prolonged screen work.
A better approach is to provide soft background illumination around the workstation, allowing the eye to move between the screen and surrounding room without an extreme change in brightness.
Avoid the “Bright Screen in a Dark Room” Effect
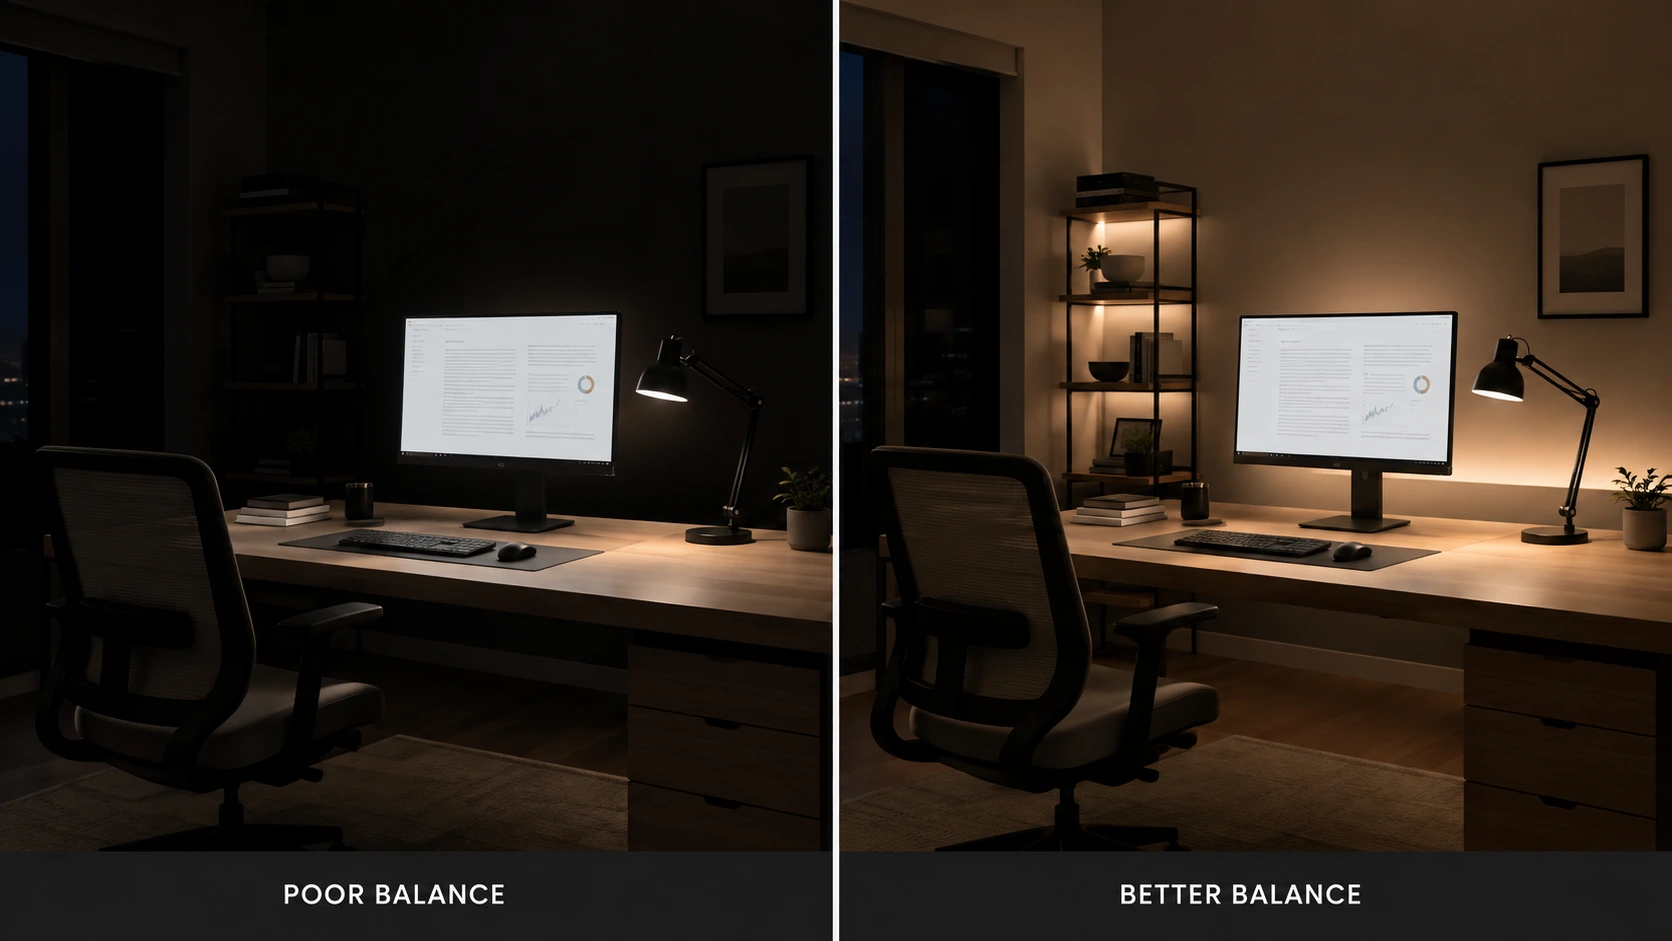
Imagine working at night with:
the monitor brightly illuminated;
a task lamp focused on the desk;
and the rest of the room almost black.
The desk may technically have enough light, but the monitor becomes one of the brightest objects in the entire field of view.
Each time the user looks:
screen → keyboard → document → wall → screen
the eye is moving between surfaces with very different brightness levels.
That is why comfortable office lighting is not simply about reaching 500 lux on the desk.
It is also about maintaining a reasonable brightness relationship between the workstation and the room around it.
The Background Should Be Visible, Not Bright
Background lighting does not need to compete with the desk.
Its purpose is to provide a softer visual layer behind and around the monitor.
Useful areas to illuminate include:
the wall behind the screen;
shelving beside the desk;
bookcases;
joinery;
artwork;
or another vertical surface within the normal field of view.
The ideal result is a background that remains clearly visible without becoming brighter or more distracting than the main workstation.
Think of the visual hierarchy as:
Task surface → brightest working area
Monitor → controlled display brightness
Surrounding wall / shelving → softer supporting light
Rest of room → comfortable ambient level
The exact relationship will change with daylight, monitor brightness and personal preference, but the principle remains the same.
Wall Lighting Can Add Useful Vertical Illumination
Ceiling lights mainly illuminate horizontal surfaces such as the desk and floor.
A wall behind the monitor can still remain relatively dark.
A wall light or softly directed source can add vertical illumination, helping the room feel visually balanced without increasing desk brightness unnecessarily.
Good applications include:
a wall light beside the workstation;
an indirect light washing the wall;
or a softly illuminated decorative surface away from the screen's reflection path.
The light should remain subtle.
A bright decorative wall lamp directly beside the monitor can simply create a new glare source.
Shelf Lighting Works Well Behind or Beside a Desk
Built-in shelves and bookcases provide a natural place for background lighting.
Soft shelf illumination can:
create depth behind the workstation;
illuminate books or objects;
prevent the background from disappearing into darkness;
and improve the appearance of the room during video calls.
The lighting should ideally be concealed or shielded so the LED source itself is not visible from the desk.
Seeing a soft illuminated shelf is usually more comfortable than looking directly at a bright strip or individual LED points.
LED Strip Lighting Is Useful — If It Is Used for the Right Job
LED strip can work particularly well in a home office when integrated into:
shelves;
cabinets;
bookcases;
recessed architectural details;
or indirect ceiling features.
Its role here is primarily:
background, indirect or architectural lighting
rather than primary desk illumination.
A strip hidden inside an aluminum profile with a suitable diffuser can create a continuous soft line of light without exposing individual LED points.
This can be especially useful behind shelving or along joinery near the workstation.
Do Not Use Decorative LED Strip as a Substitute for Task Lighting
A glowing shelf may improve the appearance and visual balance of the office, but it does not automatically provide the illuminance required for reading or writing.
The desk task still needs to be evaluated separately.
So:
LED strip behind shelving → background layer
Desk lamp → task layer
Ceiling fixture → ambient layer
Each has a different purpose.
Keeping those roles separate prevents decorative lighting from being mistaken for useful task illumination.
Avoid Visible LED Points Around the Monitor
If LED strip is used where it can be seen from the working position, individual bright LED points may become distracting.
Where possible:
conceal the strip from direct view;
place it inside a profile;
use an appropriate diffuser;
or position the strip so the illuminated surface is visible rather than the LEDs themselves.
The desired effect is:
see the light
rather than:
see the light source.
This principle applies equally to strips, shelf lights and small architectural fixtures.
Indirect Floor Lamps Can Also Balance the Room
A floor lamp can provide background illumination without requiring fixed electrical installation.
An uplighter or softly diffused floor lamp positioned away from the monitor can illuminate:
a wall;
a corner;
or part of the ceiling.
This is useful when:
the office is rented;
the room layout may change;
built-in lighting is unavailable;
or additional evening background light is needed.
As with every other source, check that it does not reflect in the monitor from the seated position.
Background Lighting and Video Calls
Background lighting also affects how the office appears on camera.
A completely dark background behind the user can make the webcam image feel flat, while one extremely bright shelf or lamp can distract from the face.
A softer illuminated wall or bookcase usually produces a more balanced result.
But background lighting should not be used to fix poor facial lighting.
Those are two different jobs:
Background lighting → gives the room depth
Face lighting → makes the person visible
We will address face lighting separately in the next section.
Dimming Is Particularly Valuable for the Background Layer
Background illumination often needs less output than users initially expect.
Dimming allows it to be adjusted according to:
monitor brightness;
time of day;
daylight;
video calls;
and evening use.
During daytime, the background layer may contribute very little because the room already receives natural light.
At night, the same layer may become much more valuable.
This makes background lighting one of the strongest candidates for separate control from the main ambient and task lights.
The Practical Background-Lighting Rule
Use background lighting to reduce excessive contrast, add visual depth and support the screen environment—not to make the office brighter everywhere.
A good setup usually follows these principles:
Keep the wall or shelving around the monitor softly visible.
Avoid bright exposed sources in the user's field of view.
Conceal LED strips and illuminate surfaces rather than eyes.
Keep background light softer than the task area.
Check all sources for screen reflections from the seated position.
Control the background layer separately where practical.
Once the workstation, desk and background are balanced, there is one more lighting condition that needs its own treatment: how the same home office should be lit when the monitor becomes a camera during a video call.
Video-Call Lighting for a Home Office
A home office may be comfortable for screen work and still look poor on camera.
Video calls introduce a different lighting problem: the camera must balance the brightness of the face, background, monitor and window at the same time.
The goal is not to make the room look like a studio. It is to keep the face clearly visible without creating harsh shadows, strong backlighting or an excessively bright background.
Avoid a Bright Window Behind You
One of the most common video-call problems is sitting with a bright window directly behind the chair.
The camera sees:
bright window → darker face
and often adjusts its exposure to protect the bright background.
The result can be:
an underexposed face;
reduced facial detail;
a silhouette effect;
or an over-bright window that dominates the image.
If the desk cannot be repositioned, reduce the brightness difference using:
blinds;
curtains;
adjustable shading;
or additional face lighting.
The objective is to bring the face and background into a more balanced range.
A Window in Front or Slightly to the Side Can Help
Daylight can provide excellent facial illumination when it comes from a useful direction.
A window positioned:
in front of the user;
or slightly to one side
can produce soft, broad light across the face.
Side daylight often creates more natural shape than a light directly above the user.
However, direct sunlight can become too strong and inconsistent.
If the window is harsh, use:
sheer curtains;
blinds;
or another form of diffusion
to soften the daylight before it reaches the face.
Overhead Lighting Alone Is Usually Not Enough
A ceiling fixture directly above the desk may provide enough illumination for the room but still produce poor facial lighting.
Light from directly overhead can create:
dark eye sockets;
shadows under the nose;
shadows beneath the chin;
and uneven facial contrast.
This is especially noticeable when the camera is close to eye level.
Overhead lighting should therefore remain part of the ambient layer, not the only source illuminating the face.
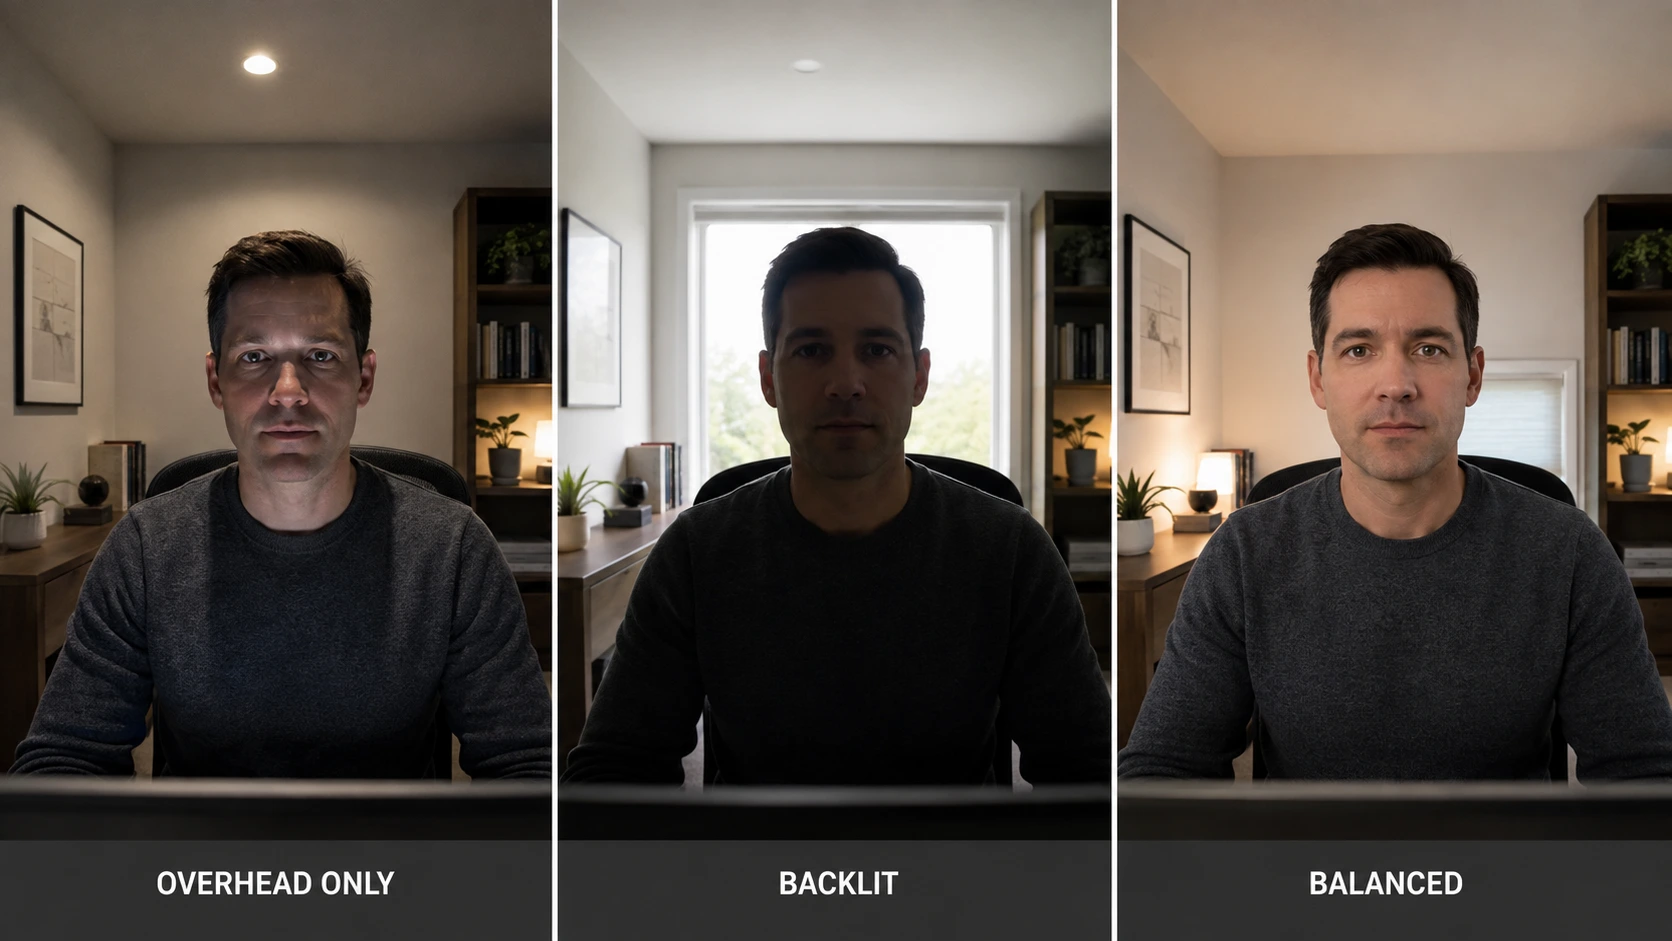
Add Soft Frontal or Slightly Off-Axis Light
For regular video calls, a soft light positioned near the camera can improve facial visibility considerably.
The light does not need to sit directly behind the monitor.
A practical position is:
slightly above eye level;
close to the camera direction;
and slightly to one side.
This provides more even illumination while preserving some natural facial shape.
Useful sources can include:
an adjustable table lamp with a diffused shade;
a small dedicated video light;
a wall light positioned appropriately;
or controlled daylight from a nearby window.
The source should be soft enough to avoid creating harsh highlights on the face.
Keep the Face Brighter Than the Background — But Not Dramatically
The user's face should normally remain one of the clearest elements in the frame.
However, the background should not disappear into darkness.
A good video-call setup usually has:
Face → clearly illuminated
Background → softer but visible
Monitor / window → controlled
If the shelving or wall behind the user is almost black, the image can feel flat and overly contrasted.
If the background is brighter than the face, attention is pulled away from the person speaking.
The best result is a controlled hierarchy rather than equal brightness everywhere.
Background Lighting Should Create Depth
Soft illumination on:
shelving;
a wall;
artwork;
or a bookcase
can make the background feel more intentional on camera.
This can also help separate the user visually from the wall behind them.
Avoid:
exposed LED strips;
very bright decorative bulbs;
strong spotlights aimed toward the camera;
or one intensely illuminated object in the background.
The background should support the image, not become its focal point.
Watch for Reflections in Glasses
Users who wear glasses may experience reflections from:
desk lamps;
ring lights;
windows;
or other frontal sources.
If a bright source appears in the lenses, try:
raising the light slightly;
moving it farther to one side;
increasing the size or diffusion of the source;
or changing the angle of the light.
The objective is to maintain facial illumination while keeping the reflected source out of the lens reflection path.
Monitor Brightness Can Affect the Face Too
The computer screen itself can become a light source.
In a dark room, a bright monitor may cast a cool or uneven light across the face.
This is particularly noticeable during:
evening calls;
dark presentations;
or screen-heavy meetings.
Do not rely on the monitor as the main facial light.
Keep enough ambient and frontal illumination in the room so that screen brightness does not dominate the face.
Choose a Consistent Color Temperature
Mixed color temperatures can become more obvious on camera than they do to the eye.
For example:
warm 3000K room lighting;
cool daylight from a window;
and a very cool video light
can make skin tones and the background appear inconsistent.
Where possible, keep the main visible sources reasonably coordinated.
For a daytime work-oriented office, a neutral range around 4000K can work well.
For evening or mixed residential use, 3000K may integrate more naturally with the room.
If tunable lighting is available, it can make this balance easier to manage across different times of day.
A Simple Video-Call Lighting Setup
For a typical home office, a practical arrangement is:
1. Controlled ambient light
Keep the room comfortably visible.
2. Soft face light
Place a diffused source close to camera direction and slightly above or to one side.
3. Controlled background light
Illuminate the wall or shelving softly.
4. Manage the window
Avoid strong backlighting and direct reflections.
5. Check the camera view
Evaluate the actual webcam image rather than judging the room only with your eyes.
The camera sees contrast differently from the human eye.
A room that looks balanced in person may still appear too dark or too bright on screen.
Quick Video-Call Check
Before a meeting, check:
Is the face clearly visible?
Is a bright window behind the user?
Are there strong shadows under the eyes or chin?
Is the background much brighter than the face?
Are any lamps reflecting in glasses?
Is the monitor casting an obvious colored glow on the face?
Is the background softly visible without becoming distracting?
A well-lit video-call setup should feel like a natural extension of the home office lighting plan—not a completely separate studio arrangement.
The next step is to choose the light quality itself, including color temperature, color rendering and when Tunable White becomes useful for a home office.
CCT, CRI & Light Quality for Work
Once the quantity, placement and glare control are right, the next decision is what the light itself should look like.
For a home office, two specifications are especially useful:
CCT — Correlated Color Temperature
Describes whether white light appears warmer or more neutral.
Describes how naturally colors appear under that light.
They solve different problems.
A fixture can have the correct CCT but poor color rendering, or excellent CRI while using a color temperature that does not suit the room.
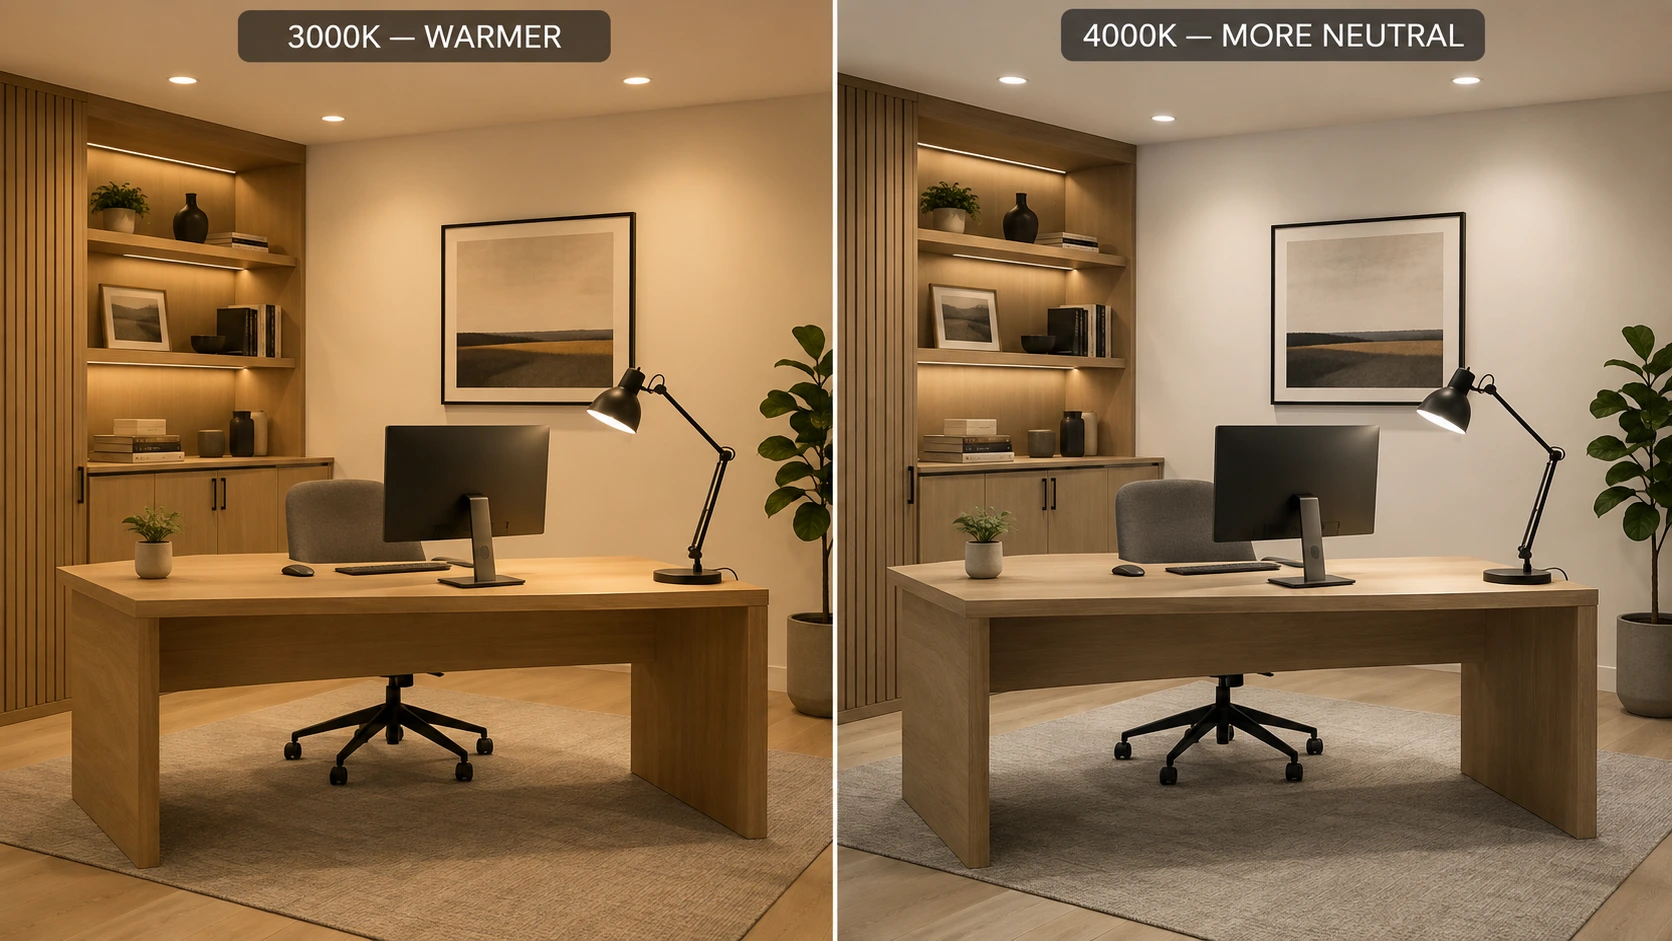
3000K or 4000K for a Home Office?
There is no single color temperature that every home office must use.
For most installations, the practical choice is between 3000K and 4000K.
4000K — A Practical Starting Point for a Dedicated Workspace
4000K produces a more neutral white appearance.
It can work particularly well when the room is primarily used for:
computer work;
administration;
technical tasks;
studying;
drafting;
or other daytime-focused activities.
A dedicated home office with white, grey, glass, concrete or other neutral finishes may also visually suit 4000K.
For this guide, 4000K is the recommended starting point for a dedicated work-oriented home office.
That does not mean 4000K is inherently brighter or more productive.
Brightness still depends on:
lumens;
beam distribution;
fixture placement;
mounting height;
and the actual light reaching the working surface.
A 4000K fixture is therefore not automatically brighter than an equivalent 3000K fixture.
3000K — Better for a Warmer Residential Office
3000K creates a warmer appearance that often integrates more naturally into residential interiors.
It is particularly useful when the home office:
forms part of a bedroom;
shares visual space with a living room;
is used extensively in the evening;
contains warm wood, beige, brass or natural finishes;
or needs to feel less like a commercial workplace after working hours.
A well-designed 3000K office can still provide excellent task visibility if the desk receives enough light.
Do not compensate for insufficient brightness by automatically moving to a higher color temperature.
If the desk is too dark, solve the lumen, lux or placement problem instead.
A Simple Choice
For most home offices:
Dedicated daytime workspace → start with 4000K
Mixed-use residential or evening workspace → consider 3000K
Neither is universally better.
The correct choice depends on the room's function, interior materials and how the space is used throughout the day.
Keep the Main Working Layers Consistent
Using several noticeably different color temperatures around one workstation can make the lighting feel accidental.
For example:
4000K ceiling lights;
a 3000K desk lamp;
and a very cool shelf light
may create visible differences across the same field of view.
Where possible, keep the main working layers reasonably coordinated.
A simple approach would be:
4000K ambient + 4000K task
or
3000K ambient + 3000K task
Background lighting can differ slightly where there is a clear design purpose, but random mixing should be avoided.
When Tunable White Makes Sense
A home office is one of the rooms where Tunable White can have genuine practical value.
Instead of choosing one fixed CCT, Tunable White allows compatible lighting to move between warmer and more neutral white light.
For example:
Focused daytime work
Use a more neutral setting around 4000K.
Late-afternoon or evening use
Move toward a warmer setting such as 3000K.
This can be particularly useful when the room changes function during the day.
A home office might operate as:
workplace during the day → reading room or residential space in the evening
Tunable White allows the visual character of the room to change without installing mismatched fixed-CCT fixtures.
However, it is not essential for every office.
A well-designed fixed 3000K or 4000K system with suitable dimming can still provide an excellent result.
Dimming and Tunable White Are Not the Same
Standard dimming changes light output.
It does not normally change color temperature.
Reducing a standard 4000K fixture to 50% brightness does not automatically turn it into 3000K.
If the user wants to change both:
brightness;
and color temperature,
the fixture and control system must specifically support that function.
This distinction matters when comparing products.
CRI — How Naturally Colors Appear
Color temperature tells us whether the light looks warmer or more neutral.
CRI addresses a different question:
How accurately do objects and colors appear under that light?
For general home-office work such as:
email;
computer use;
administration;
reading;
writing;
and general study,
CRI80+ is a practical benchmark.
For most users, that provides suitable color quality for everyday work.
When CRI90+ Becomes More Important
Some home offices are used for tasks where color accuracy matters much more.
Examples include:
graphic design;
interior design;
artwork;
illustration;
product photography;
reviewing fabrics;
choosing paint or finishes;
evaluating furniture materials;
examining product samples;
or working with color-sensitive merchandise.
For these applications, CRI90+ is preferable where available.
Higher CRI does not increase lux.
Instead, it improves how faithfully colors, skin tones and materials are rendered.
Two fixtures can therefore produce:
the same 500 lux
while making the objects on the desk look noticeably different.
CCT and CRI Must Be Considered Separately
A common mistake is assuming that neutral 4000K lighting automatically produces better color accuracy.
It does not.
You could have:
4000K + CRI80
or
4000K + CRI90
and the two sources may render materials differently.
Likewise:
3000K + CRI90
can provide excellent color rendering while maintaining a warmer visual atmosphere.
So for color-sensitive work, check both:
CCT → appearance of the white light
CRI → quality of color rendering
Replaceable Bulbs Need Separate Attention
If a home-office table lamp or ceiling fixture uses a replaceable bulb, the fixture itself may not determine the final:
CCT;
CRI;
lumen output;
or dimming performance.
The selected lamp becomes part of the lighting design.
For example, two E27 bulbs can fit the same desk lamp while producing completely different:
light output;
color temperature;
color rendering;
beam characteristics;
and dimming behavior.
Always evaluate the actual light source, not only the fixture body.
The Practical Light-Quality Rule
For most home offices:
Dedicated work-oriented room
Start around 4000K, with CRI80+ for general work.
Warm mixed-use residential office
Consider 3000K, while keeping adequate task illumination.
Color-sensitive work
Prefer CRI90+, regardless of whether 3000K or 4000K is selected.
Day-to-evening flexibility
Consider Tunable White where the product and controls support it.
Most importantly, do not use color temperature to solve a brightness problem.
Choose:
lux and lumens for quantity of light
CCT for the appearance of the light
CRI for the quality of color rendering
The final layer of flexibility comes from how these lights are controlled. In the next section, we will combine the ambient, task and background layers into practical Focused Work, Screen Work, Video Call and Evening lighting scenes.
Controls, Dimming & Home Office Lighting Scenes
A well-planned home office should not operate as one fixed lighting setup all day.
Screen work, paperwork, video calls and evening use can require different combinations of:
ambient light;
task light;
background light;
and sometimes different color temperatures.
This is why separate control of the lighting layers is more useful than relying on one switch for the entire room.
Separate the Main Lighting Layers
Where practical, control these independently:
Ambient lighting
Ceiling lights, downlights, ceiling fixtures or linear modules.
Task lighting
Desk lamp or other localized work light.
Background lighting
Wall lights, shelf lighting, indirect floor lighting or concealed LED strip.
Keeping them separate allows the user to adjust the office according to the actual task rather than running every source at full output.
Dimming Is More Useful Than Simply Adding More Fixtures
A brighter installation is not automatically a more flexible one.
If the ceiling layer is designed with enough output and can be dimmed, the same fixtures can support:
bright paperwork sessions;
lower-level screen work;
evening use;
and video calls.
This is often more useful than installing additional ceiling fixtures purely to create multiple brightness levels.
Dimming is particularly valuable for:
ambient ceiling lighting;
desk task lights;
and the background layer.
Focused Work Scene
Use this scene for:
reading;
writing;
paperwork;
technical work;
or other visually demanding tasks.
A practical combination is:
Ambient light → medium to high
Task light → increased as needed
Background light → low to medium
The task surface remains the priority, while the surrounding room stays visible and balanced.
If the room uses Tunable White, this scene can use a more neutral setting such as around 4000K.
Screen Work Scene
Long periods of computer work often do not require the task lamp to operate at full output.
A comfortable setup may be:
Ambient light → moderate
Task light → low or off unless needed
Background light → moderate
The objective is to maintain enough room illumination for visual comfort without creating unnecessary brightness on the desk or screen.
This scene is especially useful at night, when the background layer helps prevent the monitor from becoming the only bright object in the room.
Video Call Scene
For video calls, the priority changes.
The lighting now needs to support:
face visibility;
controlled background brightness;
and comfortable screen viewing.
A practical scene could be:
Ambient light → moderate
Face / task light → repositioned or adjusted toward camera direction
Background light → moderate
Window / daylight → controlled
Avoid relying on one bright ceiling fixture directly above the user.
If a dedicated face light is used, it should remain separately adjustable from the normal desk task light where possible.
Evening / Reading Scene
When the office is used after working hours, especially as part of a bedroom or living area, a softer scene may feel more appropriate.
For example:
Ambient light → reduced
Task light → localized
Background light → low
If Tunable White is available, the lighting can move toward a warmer setting such as around 3000K.
This changes the character of the room without requiring the user to turn every light off.
Dimming and Tunable White Solve Different Problems
These controls should not be confused.
Dimming changes the amount of light.
Tunable White changes the color temperature.
A system may support:
dimming only;
Tunable White only;
both;
or neither.
When comparing fixtures and control systems, confirm exactly which function is available.
Control Method Matters at the Desk
The best lighting setup is not useful if it is difficult to operate.
For a home office, convenient control may include:
wall switches;
inline switches;
touch controls;
push buttons;
rotary controls;
remote control;
app control;
or compatible smart-control systems.
The ideal method depends on the fixture and room.
For example, a desk lamp should usually be controllable without leaving the chair, while ceiling and background layers may be better grouped at a wall switch or scene controller.
Keep Controls Simple
More control is not always better if the system becomes confusing.
For a small home office, three clearly defined controls are often enough:
1. Ambient
2. Task
3. Background
If those layers are dimmable, the user already has substantial flexibility.
More advanced automation becomes useful where the office includes:
Tunable White;
track or modular lighting;
multiple work zones;
smart controls;
or repeated lighting scenes.
A Practical Four-Scene Setup
| Scene | Ambient | Task | Background | Suggested Use |
|---|---|---|---|---|
| Focused Work | Medium–High | Medium–High | Low–Medium | Reading, writing, detailed tasks |
| Screen Work | Medium | Low / Off | Medium | Long computer sessions |
| Video Call | Medium | Face-focused | Medium | Meetings and calls |
| Evening | Low–Medium | Localized | Low | Reading or residential use |
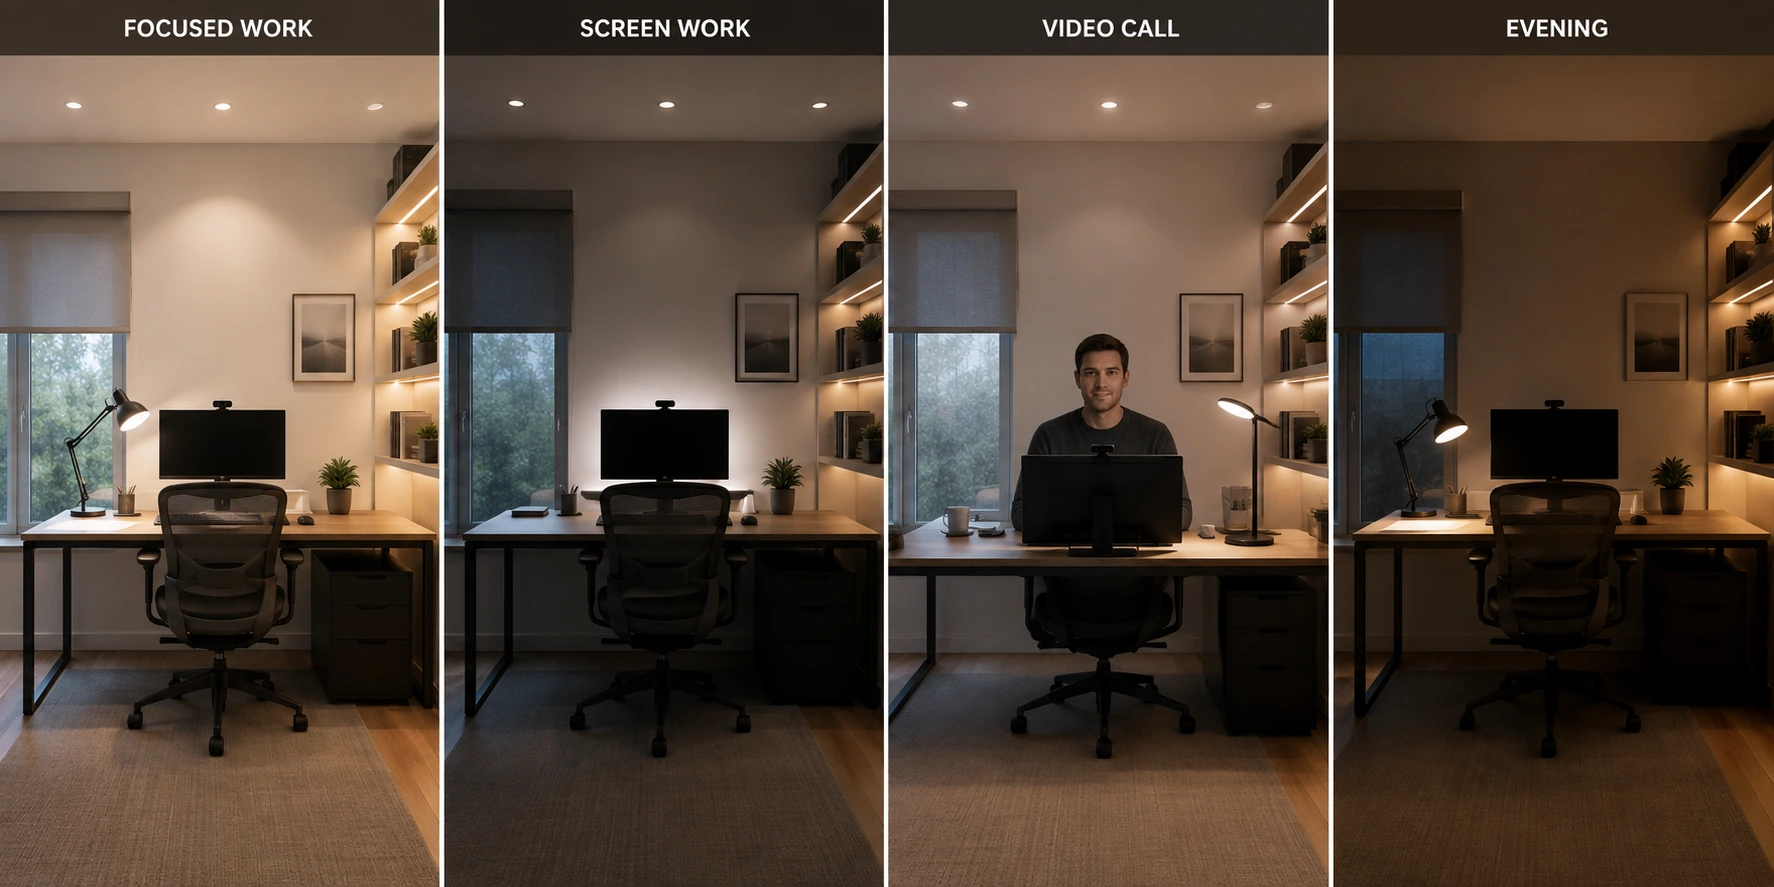
These are starting points rather than fixed percentages.
The correct output depends on:
room size;
daylight;
monitor brightness;
user preference;
fixture output;
and how the office is used.
The key is that each scene should change the lighting hierarchy, not simply make every fixture brighter or dimmer together.
The next section looks at a more flexible architectural option for offices where the layout may change over time: track, magnetic and adjustable lighting systems.
Track, Magnetic & Flexible Lighting for a Home Office
A fixed ceiling layout works well when the desk, shelving and room use are unlikely to change.
Use the track-versus-recessed comparison to choose the system, then the modular lighting planning guide for track runs and compatible components.
But some home offices need more flexibility.
The desk may move. Shelving may be added. A second workstation might appear. Artwork, samples or display surfaces may change over time.
In these situations, track or magnetic lighting systems can provide a more adaptable alternative to permanently fixed spotlights.
One System Can Perform Several Lighting Jobs
The main advantage of a track-based system is that different lighting modules can share the same architectural infrastructure.
Depending on the system, this can include:
linear modules for broader ambient illumination;
directional spotlights for shelving or artwork;
grille or focused modules for controlled light;
and adjustable modules for changing work zones.
This allows one installation to support several lighting layers instead of relying on one fixture type throughout the room.
For example:
Linear module → ambient layer
Directional spotlight → shelving or accent layer
Adjustable module → secondary work or display zone
The desk task layer can still remain separate through a desk lamp.
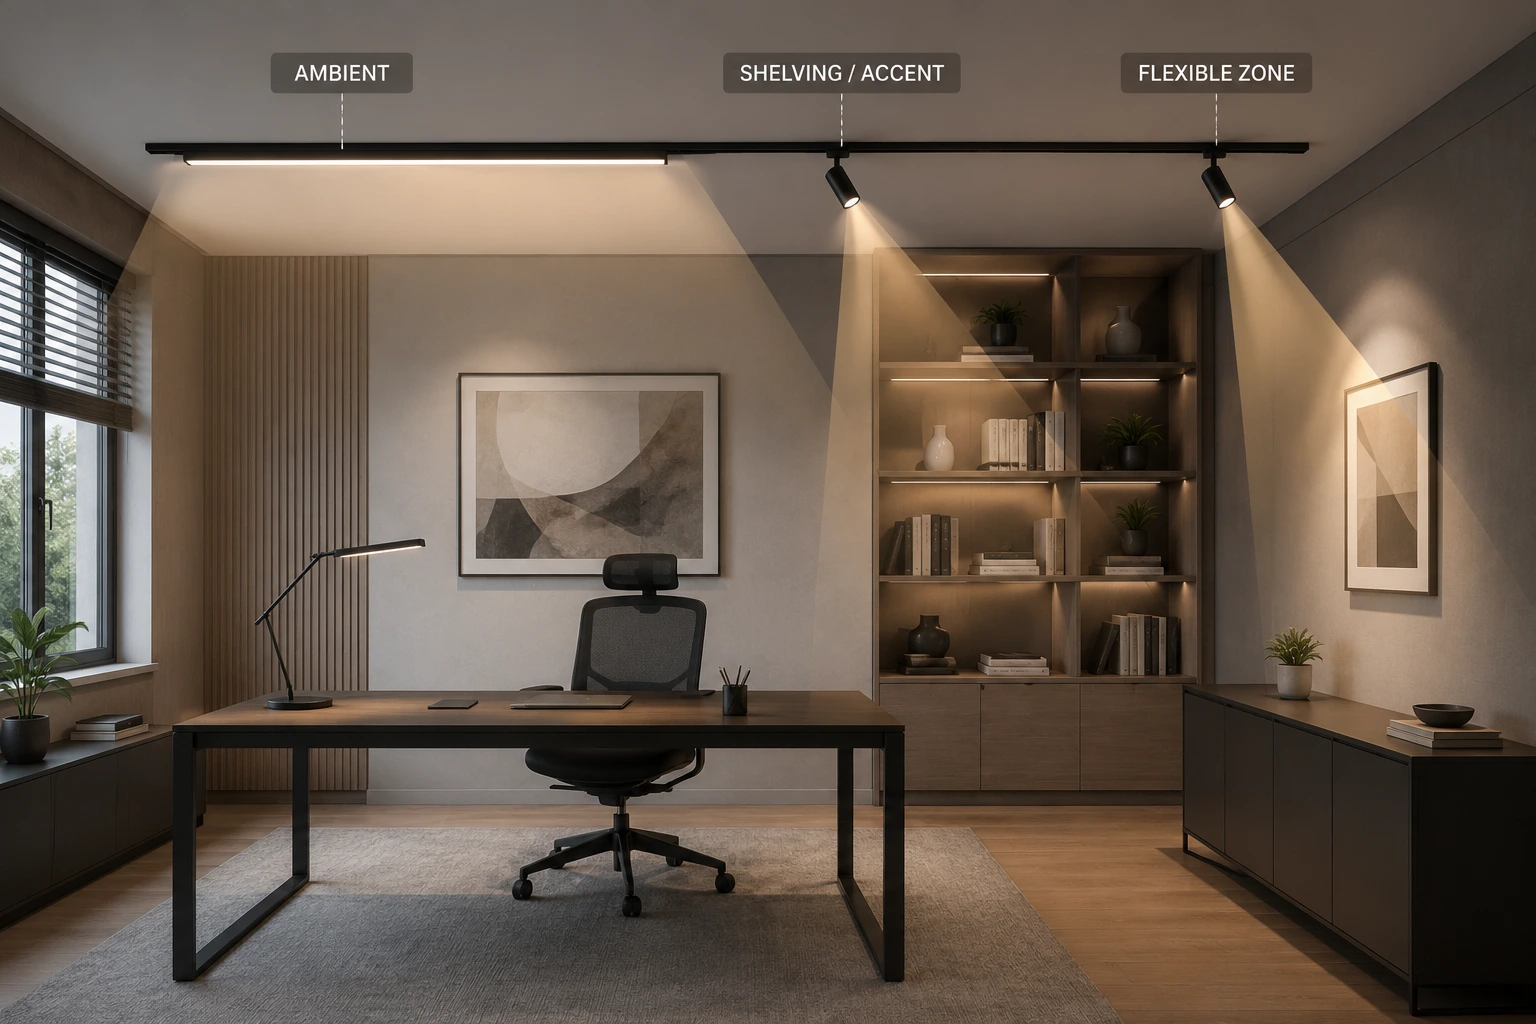
Use Broad Modules for General Illumination
If the system includes linear or wide-distribution modules, these are often the most suitable choice for the main ambient layer.
Their role is to provide smoother coverage across:
the workstation;
circulation area;
storage;
and surrounding room.
A broad module should not automatically be replaced by several narrow spotlights simply because the spotlights can be moved.
For comfortable screen work, even illumination is usually more valuable than creating several strong pools of light.
Use Directional Modules for Defined Surfaces
Directional spotlights are useful when the office contains:
bookcases;
artwork;
material boards;
samples;
certificates;
display shelving;
or architectural surfaces.
Instead of aiming every module downward, direct these fixtures toward the surface they are intended to illuminate.
This creates a clearer hierarchy:
general light for the room
plus
focused light for selected vertical surfaces
without unnecessarily increasing brightness around the monitor.
Track Lighting Does Not Remove the Need for Glare Control
The ability to reposition a spotlight is useful, but it can also make poor aiming easier.
A directional module pointed toward the desk can still:
enter the user's field of view;
reflect in the monitor;
create excessive brightness around the screen;
or produce a concentrated hotspot on the desk.
After adjusting any module, check it from the actual seated position.
Ask:
Is the light source directly visible?
Does it appear in the monitor?
Is it illuminating the intended surface?
Does the beam overlap comfortably with the surrounding light?
Is it producing useful light or simply making one area brighter?
Flexible lighting still needs a deliberate layout.
Magnetic Systems Can Make Reconfiguration Easier
Magnetic track systems can be particularly practical where compatible modules are designed to be repositioned or changed within the track.
This can be useful if the home office evolves over time.
For example:
Today: one desk + shelving
Later: two desks + display wall
The lighting layout can potentially adapt by changing module positions or types rather than redesigning the entire ceiling.
This makes magnetic systems especially relevant to:
multifunction rooms;
larger home offices;
creative studios;
design workspaces;
offices with display shelving;
and spaces where furniture layouts frequently change.
System Compatibility Must Be Checked
Track lighting is a system, not just a collection of individual fixtures.
A module must match the track and electrical architecture it was designed for.
Check:
System Compatibility;
operating voltage;
driver requirements;
track type;
connectors;
mounting accessories;
and compatible control equipment.
Do not assume that two magnetic or track-powered fixtures can be used together simply because they look similar.
For product selection, stay within the confirmed compatible family.
Plan the System Before Choosing the Modules
A track installation should normally be planned in this order:
1. Decide where the track needs to run.
Relate it to:
the desk;
shelving;
artwork;
circulation;
and possible future layouts.
2. Establish the ambient requirement.
Choose enough broad or linear output to provide comfortable general illumination.
3. Add directional modules only where they have a defined purpose.
For example:
bookshelves;
artwork;
sample wall;
or a secondary work zone.
4. Check total system load.
The connected modules must remain within the capacity of the driver and system.
5. Check glare from the seated position.
Aim modules only after the final workstation position is known.
Track Systems Can Be Useful for High or Difficult Ceilings
A track system can also simplify fixture distribution where:
recessed installation is undesirable;
ceiling construction limits downlight positions;
furniture placement may change;
or multiple lighting functions need to share one architectural line.
This does not automatically make a track system better than recessed lighting.
It simply gives the designer more flexibility.
When a Track System Is Probably Unnecessary
For a compact home office with:
one permanent desk;
simple storage;
no display lighting;
and a fixed ceiling layout,
a few properly positioned ceiling fixtures plus a task lamp may be simpler and more economical.
Do not add a magnetic or track system purely because it looks more technical.
Use it when the flexibility actually solves a lighting or layout problem.
The Practical Flexible-Lighting Rule
Consider track or magnetic lighting when:
The room layout may change.
Several different lighting functions need to share one ceiling system.
Shelving, artwork or displays need directional light.
Recessed installation is difficult or undesirable.
Future repositioning would be valuable.
Then assign every module a specific job:
ambient
accent
display
or
secondary task
rather than filling the track with spotlights simply because space is available.
For a straightforward home office, a fixed ambient layout may still be the better solution.
For a flexible workspace, however, a well-planned track or magnetic system can provide both architectural consistency and the ability to adapt the lighting as the room changes.
The next section brings all of the principles in this guide together in one complete example: a 3 × 4m home office with calculated ambient light, localized task lighting, background illumination, beam spread and exact fixture placement.
Worked Example: Complete 3 × 4m Home Office Lighting Plan
Now we can bring the previous sections together and design one complete home office from the desk outward.
The purpose of this example is not to prescribe one universal fixture layout. It is to show how room size, lux targets, beam spread, task lighting and background lighting can be combined logically instead of calculating the entire room at 500 lux.
Room Assumptions
We will use a compact residential home office with:
| Item | Example |
|---|---|
| Room size | 3m × 4m |
| Floor area | 12m² |
| Ceiling height | 2.8m |
| Desk size | 1.6m × 0.75m |
| Desk area | 1.2m² |
| Desk height | 0.75m |
| Main desk target | ≈500 lux |
| Immediate surroundings | ≈300 lux |
| Background | ≈100 lux+ as a reference |
| Ambient CCT | 4000K |
| General CRI target | CRI80+ |
| Glare benchmark | UGR≤19 where verified |
For the calculation example, we will also use:
Utilization Factor: 0.65
Maintenance Factor: 0.80
These are planning assumptions used to make the example more realistic than simply dividing fixture lumens by floor area. A final project using specific fixtures can be checked more precisely with photometric data.
Step 1 — Position the Workstation First
Place the 160 × 75cm desk along the 3m wall.
The monitor sits approximately in the center of the desk, while the main window is positioned along the side wall so daylight enters approximately perpendicular to the screen.
This gives us the workstation relationship established earlier:
Window → beside desk
rather than:
Window → directly behind monitor
or
Window → directly behind user
The desk and screen are now fixed before any ceiling fixtures are positioned.
Step 2 — Set the Desk Target at Approximately 500 Lux
The primary working surface is the desk.
For normal:
computer work;
reading;
writing;
and paperwork,
our planning target is:
≈500 lux at the desk
But this does not mean the entire 12m² room needs 500 lux.
Instead, we will create:
ambient light across the room
plus
additional task light at the desk
Step 3 — Design the Ambient Layer
For this example, target approximately:
225 lux average ambient illumination
across the room.
Using the lumen method:
Required fixture lumens =
(Area × Target Lux) ÷ (Utilization Factor × Maintenance Factor)
So:
(12m² × 225 lux) ÷ (0.65 × 0.80)
=
≈5,190 lumens
A practical fixture package is:
4 × 1,300lm ceiling fixtures
Total installed ambient output:
4 × 1,300lm = 5,200lm
Estimated maintained ambient illuminance:
(5,200lm × 0.65 × 0.80) ÷ 12m²
=
≈225 lux
This gives us a comfortable room-wide base without trying to turn every part of the office into a 500-lux task area.
Step 4 — Position the Four Ceiling Fixtures
Use a 2 × 2 layout, but position the desk-side row forward of the monitor rather than placing a fixture directly above the screen.
Example fixture centers:
| Fixture | Distance from left wall | Distance from entrance wall |
|---|---|---|
| A | 0.75m | 1.10m |
| B | 2.25m | 1.10m |
| C | 0.75m | 2.55m |
| D | 2.25m | 2.55m |
This creates:
approximately 1.50m between columns;
approximately 1.45m between rows;
and useful clearance between the desk/monitor and the nearest ceiling fixtures.
The important point is not that every home office must use these exact dimensions.
The important point is:
The fixture layout responds to the monitor position rather than placing a downlight directly above it for the sake of symmetry.
Step 5 — Check the Beam Spread
Assume the ceiling fixtures use a broad 60° beam.
Ceiling height:
2.8m
Desk height:
0.75m
Mounting height above the desk:
2.8 − 0.75 = 2.05m
Approximate beam diameter at desk level is:
Beam diameter = 2 × mounting height × tan(beam angle ÷ 2)
For 60°:
2 × 2.05 × tan(30°)
=
≈2.37m beam diameter
The ceiling fixtures are spaced only around 1.45–1.50m apart, so their beams overlap substantially.
That overlap helps create a smoother ambient layer.
What If We Used a 36° Beam Instead?
Using the same mounting height:
2 × 2.05 × tan(18°)
=
≈1.33m beam diameter
Now the beam is narrower than the fixture spacing.
The same four fixtures would therefore create much less overlap.
This illustrates an important principle:
Four 1,300lm fixtures with a 60° beam are not equivalent to four 1,300lm fixtures with a 36° beam.
If the beam becomes narrower, the design may require:
more fixtures;
closer spacing;
adjustable aiming;
or another ambient-lighting solution.
Fixture count must therefore be checked together with beam angle and mounting height.
Step 6 — Calculate the Task-Light Requirement
Our ambient layer contributes approximately:
225 lux
around the workstation.
Desk target:
500 lux
Approximate additional task illumination required:
500 − 225
=
275 lux
Desk area:
1.6 × 0.75
=
1.2m²
For the task lamp, assume:
Utilization Factor: 0.70
Maintenance Factor: 0.80
The approximate required emitted output is:
(275 lux × 1.2m²) ÷ (0.70 × 0.80)
=
≈590 lumens
Rather than selecting a lamp at exactly 590lm, use a practical adjustable specification of approximately:
800lm maximum output
This gives enough headroom for:
reading;
writing;
detailed paperwork;
and changing ambient conditions.
The user can then dim or reposition it when less light is required.
Step 7 — Estimate the Desk Lux With the Task Lamp
Suppose the 800lm task lamp is dimmed or positioned so approximately 600lm of emitted output is being used for the task.
Estimated task illuminance:
(600lm × 0.70 × 0.80) ÷ 1.2m²
=
≈280 lux
Add the ambient contribution:
225 lux ambient
280 lux task
=
≈505 lux at the desk
That puts the working surface very close to our 500-lux target.
The significance is more important than the exact number:
The ceiling does not have to produce all 500 lux.
The ambient and task layers work together.
Step 8 — Position the Task Lamp
For a right-handed user, place the adjustable task lamp toward the left side of the desk.
For a left-handed user, reverse the arrangement.
Aim the light diagonally across:
paperwork;
notebook;
keyboard;
or other detailed working surfaces.
Do not aim the beam toward the monitor.
The task lamp should also remain outside the normal viewing direction so the bright source itself does not become distracting.
Step 9 — Add the Background Layer
Now add approximately:
400–600lm of soft background illumination
For this example, use:
1 × 600lm dimmable background source
Possible solutions include:
a softly diffused wall light;
concealed shelf lighting;
indirect floor lighting;
or LED strip concealed inside a profile.
The objective is not to raise desk lux.
Its role is to:
soften the wall or shelving behind the workstation;
prevent the monitor from sitting against a black background;
add visual depth;
and improve the room during video calls.
This layer should remain softer than the task area.
Step 10 — Final Fixture Schedule
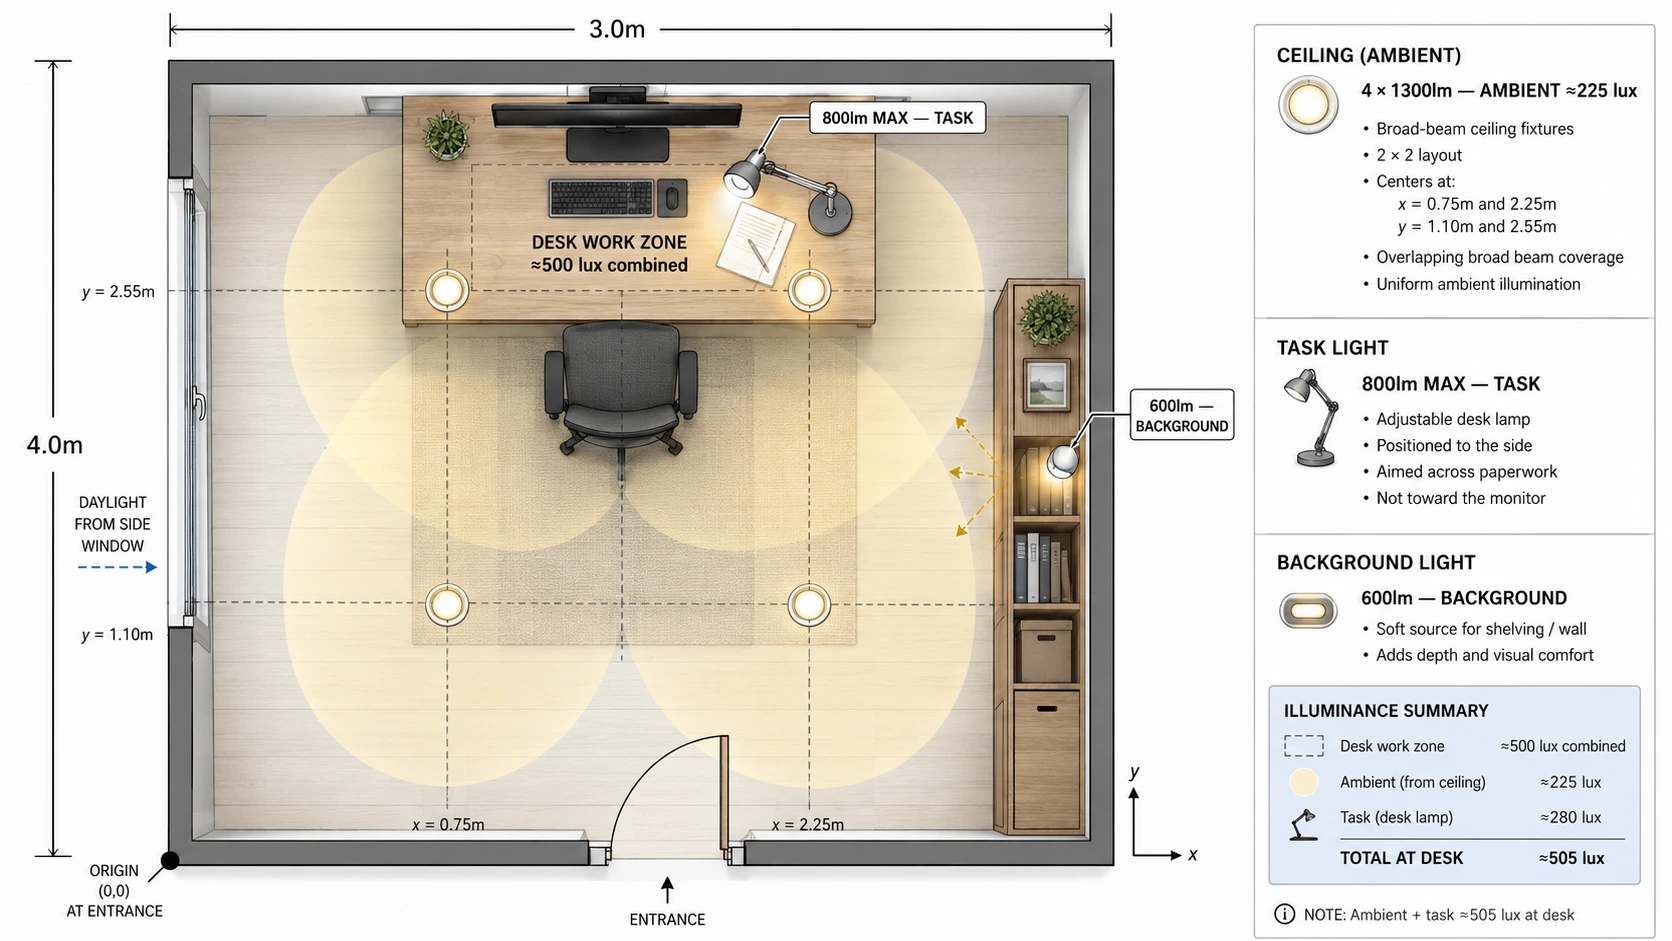
| Lighting Layer | Quantity | Output | Installed Output | Main Purpose |
|---|---|---|---|---|
| Broad ceiling fixtures | 4 | 1,300lm each | 5,200lm | Ambient room illumination |
| Adjustable desk lamp | 1 | 800lm max | 800lm | Local task illumination |
| Background source | 1 | 600lm | 600lm | Wall / shelving balance |
| Total | 6 sources | 6,600lm installed | Three separate lighting functions |
Do Not Divide 6,600 Lumens by 12m²
This distinction is important.
The room contains 6,600lm of installed output, but those lumens are not all serving the same surface.
They are deliberately divided between:
5,200lm → ambient room layer
up to 800lm → localized desk task layer
600lm → background layer
So:
6,600lm ÷ 12m² = 550 lux
would not be an accurate description of the finished lighting plan.
The different sources have different:
directions;
target surfaces;
utilization;
and functions.
This is why total installed lumens alone cannot describe a layered room.
Step 11 — Check Glare From the Seated Position
Before considering the layout complete, sit at the desk and check:
Ceiling fixtures
Are any bright sources directly above or beyond the monitor?
Are they visible in the normal line of sight?
Monitor
Are any ceiling fixtures reflected in the screen?
Is the side window visible as a reflection?
Task lamp
Does the beam stay on the work surface?
Is the lamp itself visible uncomfortably from the chair?
Background
Is the wall softly visible?
Is any shelf or wall light brighter than necessary?
If a problem appears, adjust the fixture position or aiming before adding more light.
Step 12 — How the Same Office Works in Different Scenes
The six installed sources do not need to operate at maximum output simultaneously.
Focused Work
Ceiling: medium–high
Task lamp: medium–high
Background: low–medium
Best for:
paperwork;
reading;
drawing;
detailed work.
Screen Work
Ceiling: moderate
Task lamp: reduced or off
Background: moderate
Best for long computer sessions where additional desk light is not required.
Video Call
Ceiling: moderate
Face/task source: adjusted toward camera direction
Background: moderate
Keep the background visible while ensuring the face remains clearly illuminated.
Evening Use
Ceiling: reduced
Task lamp: localized
Background: low
If Tunable White is available, the room can move toward a warmer appearance such as 3000K.
What This Example Teaches
The important result is not simply:
4 ceiling lights + 1 desk lamp + 1 background light
The design logic is:
1. Position the workstation first.
2. Set the lux target on the actual task surface.
3. Give the room a comfortable ambient base.
4. Use beam spread to determine whether the ceiling layout will overlap properly.
5. Add localized task light only where the extra lux is needed.
6. Add softer background illumination for visual balance.
7. Check glare from the seated position.
8. Control the layers independently.
This produces a home office that is not simply bright enough on paper, but designed around how the desk, monitor and surrounding room are actually used.
Common Home Office Lighting Mistakes
A home office can contain good fixtures and still perform poorly if the desk, screen and lighting layers are not planned together.
Before finalizing the room, check for these common mistakes.
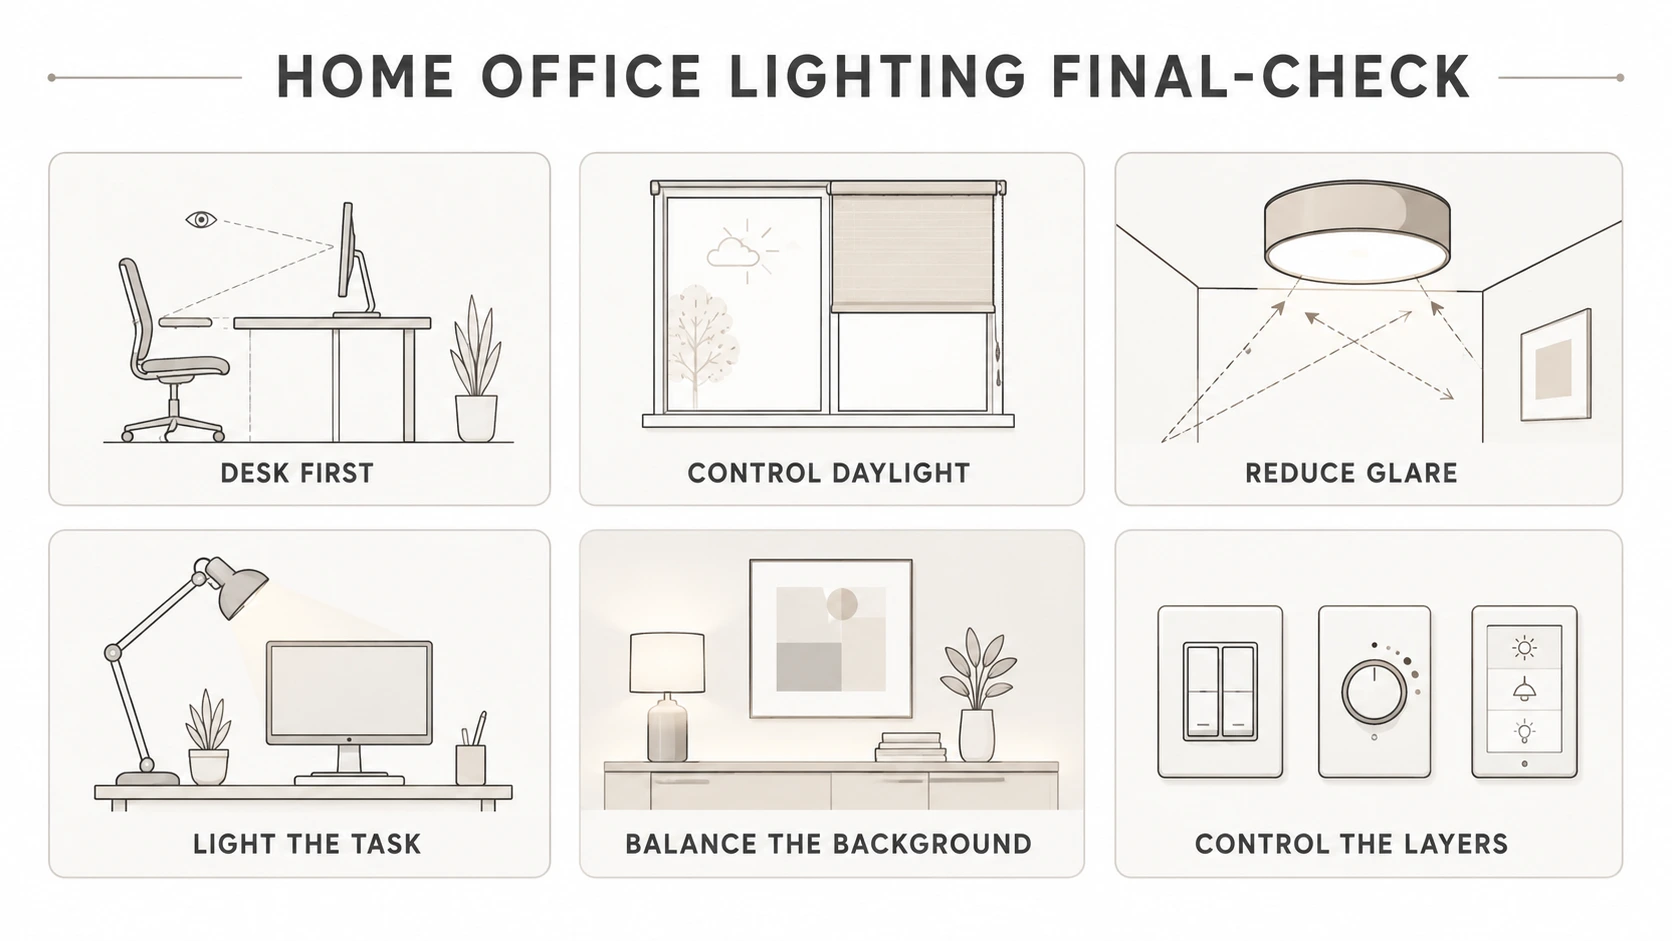
1. Lighting the Entire Room to 500 Lux
The main desk may benefit from around 500 lux, but that does not mean every square meter of the office needs the same illuminance.
Trying to achieve 500 lux everywhere can lead to:
unnecessary ceiling fixtures;
excessive brightness;
higher energy use;
and a room that feels more commercial than residential.
A better approach is:
comfortable ambient light throughout the room
additional task light where detailed work occurs
The desk receives the highest useful illumination while the surrounding room remains softer.
2. Planning the Ceiling Before Positioning the Desk
A symmetrical ceiling grid may look organized on a drawing, but it can place fixtures in exactly the wrong locations once the workstation is installed.
The desk and monitor should be positioned first.
Then plan the ceiling lighting around:
the screen;
working surface;
window;
normal viewing direction;
and surrounding room.
The most important alignment is not between the spotlights.
It is between the lighting and the way the room is actually used.
3. Putting a Bright Downlight Directly Above the Monitor
A fixture above or just beyond the monitor may:
appear in the user's normal field of view;
create discomfort glare;
reflect in the screen;
or make the area immediately around the monitor unnecessarily bright.
Move the nearest fixtures away from the direct viewing path and use appropriate beam overlap to illuminate the workstation indirectly.
4. Ignoring the Window When Positioning the Screen
A bright window can create problems even before any artificial lighting is switched on.
Avoid, where practical:
monitor directly facing a bright window
and
bright window directly behind the user
A useful starting position is to keep the main window beside the workstation, approximately perpendicular to the screen.
Then use blinds, curtains or adjustable shading to manage changing daylight conditions.
5. Using Only Ceiling Lighting
Ceiling fixtures are excellent for ambient illumination, but they do not always provide enough useful light for:
paperwork;
handwriting;
drawing;
samples;
or detailed desk tasks.
Instead of increasing the entire ceiling output, add an adjustable task light where the extra illumination is actually needed.
6. Aiming the Desk Lamp Toward the Monitor
A desk lamp should illuminate:
documents;
notebooks;
keyboard areas;
or other detailed work surfaces.
It should not illuminate the screen itself.
Poor aiming can create:
reflections;
bright patches;
and distracting contrast.
Aim the light across the task surface, while keeping the source outside the normal viewing direction.
7. Working With a Bright Monitor in an Almost Dark Room
A bright display surrounded by darkness can create excessive contrast.
The desk may technically have enough light while the overall workstation still feels uncomfortable.
Use soft:
wall illumination;
shelf lighting;
concealed LED strip;
or indirect background lighting
to keep the surrounding room visible without competing with the monitor.
8. Choosing Lighting by Watts Instead of Lumens and Lux
Wattage describes electrical consumption.
It does not tell you how much useful light reaches the desk.
For lighting design, focus on:
Lumens → fixture output
Lux → light reaching the working surface
Then consider:
beam angle;
mounting height;
spacing;
optics;
and fixture position.
Two fixtures using the same wattage can perform very differently.
9. Assuming More Spotlights Automatically Mean Better Lighting
Adding fixtures can introduce:
more glare;
more screen reflections;
excessive brightness;
and unnecessary overlap.
Fixture quantity should be determined together with:
lumen output;
beam angle;
ceiling height;
room size;
and workstation position.
Sometimes four correctly selected broad-beam fixtures will perform better than six or eight narrow spotlights.
10. Ignoring Beam Angle
Fixture quantity cannot be separated from beam spread.
At the same mounting height, a 60° beam covers a much wider area than a 36° or 24° beam.
Replacing broad-beam fixtures with narrow-beam versions one-for-one may create gaps between illuminated areas even when total lumens remain unchanged.
Always evaluate:
output + beam angle + spacing + mounting height
together.
11. Treating UGR<19 as a Guaranteed Room Result
Documented UGR performance is valuable, particularly for office lighting.
But UGR depends on more than the fixture.
It is affected by:
room geometry;
fixture quantity;
luminaire position;
surface reflectance;
viewing direction;
and the user's position.
A fixture suitable for UGR<19 applications still needs to be installed correctly.
Use UGR as an important specification—not as a substitute for layout planning.
12. Assuming 4000K Is Brighter Than 3000K
Color temperature changes the appearance of white light, not automatically the amount of light produced.
A 4000K fixture is not inherently brighter than a comparable 3000K fixture.
If the room needs more light, solve the problem through:
lumen output;
fixture quantity;
task lighting;
or placement.
Do not use CCT to compensate for insufficient illuminance.
13. Mixing Too Many Color Temperatures Around the Desk
A workstation containing:
warm ceiling lights;
neutral task lighting;
and very cool shelf lighting
can look visually disconnected.
Where practical, coordinate the main working layers.
For example:
4000K ambient + 4000K task
or
3000K ambient + 3000K task
Use deliberate variation only when there is a clear reason.
14. Using Decorative Lighting as Task Lighting
A glowing shelf, wall light or concealed LED strip may make the office look excellent.
That does not mean it provides enough illumination for reading or writing.
Keep the roles clear:
Ambient → room
Task → desk
Background → visual balance
Decorative lighting can support the plan, but it should not replace the task layer unless its actual performance proves it can.
15. Leaving LED Strip Exposed
Visible LED points near the monitor can become another distracting bright source.
Where strip lighting is used around shelving or joinery:
conceal the strip;
use a suitable aluminum profile;
add a diffuser where appropriate;
and illuminate the surface rather than the user's eyes.
The preferred effect is:
See the illumination, not the individual LEDs.
16. Ignoring Video Calls
A good desk-lighting setup does not automatically produce a good webcam image.
Common problems include:
bright window behind the user;
overhead-only lighting;
dark facial shadows;
overly bright background;
and reflections in glasses.
If video calls are frequent, check the room from the camera's point of view as well as from the user's seated position.
17. Putting Every Light on One Control
If ambient, task and background lighting always operate together, much of the benefit of layered lighting is lost.
Where practical, control them separately:
Ambient
Task
Background
Dimming adds even more flexibility.
This makes it possible to change the room from:
Focused Work
to
Screen Work
to
Video Call
to
Evening
without redesigning the lighting.
Final Home Office Lighting Checklist
Before considering the lighting plan complete, work through this checklist.
Workstation & Daylight
The desk position was decided before the ceiling-light layout.
The monitor is positioned with the main window preferably beside the workstation.
Strong daylight does not sit directly behind the monitor.
A bright window behind the user does not create screen reflections.
Blinds, curtains or shading can control daylight when required.
The workstation has been checked during the hours when the room will actually be used.
Light Levels
The main desk is planned around ≈500 lux for normal reading, writing and computer work.
The entire room is not unnecessarily designed to 500 lux.
The immediate surrounding area remains comfortably illuminated.
The background is visible enough to avoid excessive contrast with the screen.
Higher task levels are provided locally where precision work requires them.
Ceiling Lighting
Fixture output is compared using lumens, not wattage alone.
Beam angle is appropriate for the intended function.
Fixture spacing provides useful beam overlap.
No bright ceiling fixture is positioned directly in the normal monitor viewing direction without good reason.
Screen reflections have been checked from the seated position.
UGR≤19 or other glare-control data has been considered where available.
Desk Task Lighting
The task lamp illuminates the work surface rather than the monitor.
The lamp can be adjusted or aimed where practical.
Hand shadows have been considered for regular writing or drawing.
The task layer provides the additional lux required at the desk.
Dimming is available where useful.
The lamp itself is not an uncomfortable bright source in the user's field of view.
Background Lighting
The monitor does not sit against an almost completely dark room.
Wall or shelf lighting remains softer than the main working area.
LED strips are concealed from direct view where practical.
Background fixtures do not reflect in the monitor.
Background illumination can be controlled separately where useful.
Light Quality
3000K or 4000K has been selected according to how the room is used.
The main working layers use reasonably consistent color temperatures.
CRI80+ is used as a practical benchmark for general office work.
CRI90+ is considered for color-sensitive tasks.
Tunable White is used only where the fixture and control system actually support it.
Controls
Ambient, task and background lighting can be controlled separately where practical.
Dimming is used where changing work modes justify it.
Controls are convenient to reach from the workstation.
The room can support different lighting conditions for work, screens, calls and evening use.
Video Calls
The user's face is clearly visible on camera.
A bright window is not dominating the background.
Overhead lighting is not the only facial light.
The background is visible but not brighter than the face.
Reflections in glasses have been checked.
The actual webcam image has been tested—not just the room by eye.
Final Test
The most valuable final check is simple:
Sit at the desk and use the office normally.
Look at:
the monitor;
paperwork;
ceiling;
window;
shelving;
and background.
Then switch between your normal working modes.
If the desk has enough useful light, the screen is comfortable to view, the surrounding room feels balanced and each source has a clear purpose, the lighting plan is doing its job.
A successful home office should not feel like the room has more lighting.
It should feel like the lighting is in the right places.
Plan Your Home Office Lighting
A good Home Office lighting plan should now answer four questions:
How much light does the desk need?
How much ambient light should the room provide?
Where should the ceiling fixtures go?
Which fixtures should perform the ambient, task and background roles?
Rather than estimating these separately by eye, use the planning tools below to move from the principles in this guide to your own room.
Calculate Your Light Requirement
If you know the room dimensions and target lux, start with the Lux & Lumens Calculator.
Use it to estimate:
room area;
target illuminance;
approximate lumen requirement;
and an initial fixture-output target.
For a Home Office, remember the principle established throughout this guide:
Do not automatically calculate the entire room at 500 lux just because the desk requires around 500 lux.
Use the calculator to establish the ambient requirement, then account for localized task lighting separately where appropriate.
Plan Your Spotlight Layout
If recessed or surface spotlights will provide the ambient layer, the next step is to check their coverage.
The Spotlight Layout Calculator can help relate:
room dimensions;
ceiling or mounting height;
beam angle;
fixture spacing;
and approximate beam overlap.
This is important because a 24°, 36° and 60° spotlight will not produce the same coverage even when their lumen output is identical.
Use the calculator to test the geometry, then adjust the layout around the actual:
desk;
monitor;
window;
shelving;
and circulation areas.
Bring the Room Plan Together
- Start with the Lux & Lumens Calculator for the ambient requirement, then check coverage with the Spotlight Layout Calculator. For track layouts, use the Modular Lighting Planner; compare glare and colour-quality criteria with the Light Quality & Visual Comfort Selector.
Review the results together with the desk, screen and window positions. These tools support planning; check the final arrangement in the room.
Explore Home Office Lighting
Once the lighting requirement is understood, choose fixtures according to the job each layer needs to perform.
Do not try to find one fixture that solves every part of the room.
Technical Spotlights
Best suited to:
recessed or surface ambient lighting;
controlled ceiling illumination;
adjustable architectural lighting;
shelf and artwork accents.
Compare:
lumens;
beam angle;
CCT;
adjustability;
dimming;
CRI where available;
and UGR where verified.
Explore Technical Spotlights
Table Lamps
Best suited to:
localized desk lighting;
reading;
writing;
detailed paperwork;
adjustable task illumination.
Prioritize:
useful light direction;
adjustability;
lumen output;
dimming;
CCT;
and CRI where the task requires accurate color rendering.
For replaceable-lamp models, remember that the selected bulb determines much of the final lighting performance.
Explore Table Lamps
Ceiling Lights
A broad ceiling fixture can be a good alternative to multiple spotlights when the objective is:
smooth ambient coverage;
a visually calmer ceiling;
or simple general illumination in a compact office.
Compare usable lumen output and light distribution rather than selecting only by fixture diameter or wattage.
Explore Ceiling Lights
Wall Lights
Wall lights can support:
vertical illumination;
the background layer;
visual balance around the screen;
or softer evening lighting.
Keep bright decorative sources away from the direct viewing direction and check that they do not appear in the monitor.
Explore Wall Lights
Track & Magnetic Lighting
Best suited to Home Offices that need:
adaptable layouts;
multiple lighting functions;
directional shelf or display lighting;
or the ability to reposition fixtures later.
Use compatible modules within the same confirmed system and assign each module a defined function.
Explore Track & Magnetic Lighting
Other Useful Lighting Layers
Depending on the room, also consider:
For flexible task, reading or indirect background illumination without permanent installation.
For concealed shelf, joinery and indirect background lighting.
These are supporting layers rather than automatic requirements for every office.
Home Office Lighting FAQ
How many lux should a Home Office have?
For normal computer work, reading, writing and paperwork, plan around 500 lux on the main desk or task surface.
The entire room does not need to be maintained at 500 lux. The immediate surroundings can remain lower, with softer illumination in the background.
A layered approach is generally more useful than applying one uniform lux target to the entire floor area.
Is 3000K or 4000K better for a Home Office?
Both can work.
4000K is a practical starting point for a dedicated daytime or work-oriented Home Office.
3000K may suit a warmer residential office, mixed-use room or space used extensively in the evening.
If the room needs greater day-to-evening flexibility, Tunable White can be useful where the fixtures and controls support it.
Color temperature should not be used as a substitute for insufficient light output.
Where should a Home Office desk face relative to a window?
A useful starting position is to keep the main window beside the workstation, with the monitor approximately perpendicular to it.
Avoid, where practical:
a very bright window directly behind the monitor;
and a window directly behind the user where it may reflect in the screen.
Use blinds, curtains or other shading to manage changing daylight.
Should a ceiling light be directly above a computer desk?
Not automatically.
A bright fixture directly above or beyond the monitor may enter the user's normal viewing direction or appear as a reflection in the screen.
Plan fixture positions around the:
desk;
monitor;
beam spread;
and seated viewing direction.
The objective is useful illumination at the workstation—not perfect ceiling symmetry.
What does UGR<19 mean?
UGR stands for Unified Glare Rating.
For general office tasks, UGR≤19 is an important glare-control benchmark.
However, UGR depends on the complete installation, including:
fixture position;
room geometry;
surface reflectance;
quantity of luminaires;
and viewing direction.
A fixture documented for UGR<19 applications is therefore useful, but correct placement still matters.
How do I stop ceiling lights reflecting on my monitor?
Start by checking the screen from the actual seated position.
A dark or switched-off screen makes reflections easier to see.
If a fixture appears in the display, consider:
changing its position;
adjusting its aiming;
moving the monitor slightly;
choosing a better-shielded fixture;
or changing the lighting distribution.
Also check windows and desk lamps, since reflected glare does not come only from ceiling lights.
How many spotlights does a Home Office need?
There is no reliable fixture count based only on room area.
The quantity depends on:
fixture lumens;
beam angle;
ceiling height;
fixture spacing;
room dimensions;
desk position;
and the amount of task lighting used separately.
For example, the 3 × 4m worked example in this guide uses four broad-beam ceiling fixtures, but four narrow-beam fixtures would not provide equivalent coverage.
Calculate output and beam spread together before deciding the quantity.
Do I need a desk lamp if I already have ceiling lights?
Not always, but it is often useful.
If the ceiling lighting already provides enough comfortable illumination for the tasks performed at the desk, an additional lamp may not be necessary.
However, a task lamp gives more flexibility for:
paperwork;
reading;
writing;
drawing;
and detailed work.
It allows the desk to become brighter without increasing the output of the entire room.
What CRI is best for a Home Office?
For general computer work, administration, reading and writing, CRI80+ is a practical benchmark.
For color-sensitive work such as:
graphic design;
artwork;
photography;
fabric selection;
material samples;
or product evaluation,
CRI90+ is preferable where available.
CRI affects how naturally colors appear; it does not determine how bright the desk will be.
What lighting is best for video calls?
A good video-call setup combines:
controlled ambient light;
soft frontal or slightly side facial illumination;
a background that remains visible but softer than the face;
and controlled daylight.
Avoid relying only on a ceiling light directly overhead or sitting with a very bright window behind you.
Always check the actual webcam image, because the camera may interpret contrast differently from your eyes.
Final Recommendation
Plan a Home Office from the workstation outward.
Start with:
desk → monitor → window
Then build:
ambient → task → background
Finally check:
lux → beam spread → glare → CCT → CRI → controls
The objective is not to install the maximum amount of light.
It is to put the right light on the right surface, from the right direction, at the right time.