
Retail lighting does more than make a space visible. It directs attention, reveals colour and texture, supports customer movement and helps merchandise look consistent from the entrance to the point of sale.
A successful scheme balances several layers rather than relying on one uniform level of brightness. General lighting makes the space comfortable to navigate, display lighting clarifies shelves and vertical surfaces, and accent lighting gives selected products greater visual importance.
This guide explains how to plan those layers for shops and showrooms without repeating the detailed calculations covered in Saleh Deco’s specialist lighting guides and tools.
In This Guide
What retail lighting must accomplish
How to divide a store into lighting zones
Recommended lux levels
Ambient, display and accent lighting
Vertical merchandise illumination
Beam angles and spotlight aiming
Flexible retail lighting systems
Colour temperature and colour quality
Shop-window and entrance lighting
Fitting-room and mirror lighting
Showroom-specific requirements
Daylight and lighting controls
Energy use and maintenance
Commissioning and final aiming
Common mistakes and a planning checklist
Frequently asked questions and related resources
1. What Retail and Showroom Lighting Must Accomplish
Retail lighting has to serve the customer, the merchandise and the operation of the space at the same time.
Customers need enough light to move comfortably, examine products and recognise important destinations. Merchandise needs appropriate illumination to reveal its shape, colour, finish and detail. The business also needs a system that can be adjusted as displays, promotions and layouts change.
A good retail lighting scheme should:
Make the entrance and customer route easy to understand
Give merchandise greater visual importance than circulation areas
Reveal colours and materials accurately
Illuminate shelving, wall displays and vertical surfaces
Distinguish feature products and promotional displays
Limit uncomfortable glare and distracting reflections
Support staff at counters and service points
Adapt to merchandising changes
Control energy consumption and maintenance demands
Retail stores and showrooms share these objectives, but they do not always use light in the same way.
A shop may have compact merchandise, dense shelving and regularly changing promotional displays. A showroom may contain larger products, longer viewing distances and customer consultation areas. Its lighting may need to demonstrate materials, finishes or even the operation of the products themselves.
The design should therefore begin with what is being presented and how customers will experience it—not with a fixture type or a single target lux level.
2. Start with Merchandise, Customers and Retail Zones
Before selecting luminaires, divide the floor plan according to how each area functions.
Typical retail zones include:
Shop windows
Entrance and transition area
Main customer route
General sales floor
Perimeter walls
Shelving and display units
Feature tables and promotional displays
Service or consultation counters
Checkout area
Fitting rooms
Storage and staff areas
Each zone has a different visual task. A circulation route needs comfortable orientation, while a display wall needs enough vertical illumination for customers to see products from top to bottom. A feature table may need focused accent lighting, while a checkout counter needs clear task lighting without glare for customers or staff.
The merchandise must also be considered directly:
Is it viewed from the front, above or several directions?
Is accurate colour judgement important?
Does it have glossy, reflective or transparent surfaces?
Are details small or viewed from a distance?
Will shelves or display units create shadows?
How often will the layout change?
Does the merchandise require protection from heat or excessive light exposure?
Map these requirements before deciding where fixtures should go. This prevents a common problem: producing a neat ceiling layout that does not align with the actual merchandise below it.
A useful retail plan treats the ceiling, displays and customer route as one coordinated system.
3. Recommended Retail and Showroom Lux Levels
Lux measures the amount of light reaching a surface. It is useful for establishing a starting point, but it does not describe contrast, direction, glare, colour quality or the appearance of vertical displays.
The following ranges are practical preliminary targets. Final requirements should be checked against the applicable local standards, the visual task and project conditions.
| Retail area or task | Preliminary maintained illuminance |
|---|---|
| General sales floor | 300–500 lux |
| Dense merchandise or detailed browsing | 500–750 lux |
| General showroom floor | 300–500 lux |
| Wall shelving and vertical displays | 300–750 lux vertically |
| Checkout or service counter | Around 500 lux |
| Fitting room | 300–500 lux |
| Stockroom and basic back-of-house areas | 200–300 lux |
| Feature and promotional displays | Higher than their immediate surroundings |
| Shop windows | Determined by daylight, reflections and desired contrast |
These are not fixed values for every project. Dark finishes may absorb more light, while pale surfaces can make the same measured illuminance feel brighter. Small products and detailed visual tasks may need more light than large objects viewed from a distance.
Shop windows cannot be designed from an indoor lux target alone. Their required brightness changes with exterior daylight, glazing reflections, orientation and viewing distance.
For project calculations, use the Lux and Lumens Lighting Guide and the Lux & Lumens Calculator.
The objective is not to reach the highest possible reading. It is to provide sufficient maintained light in the correct place while preserving visual hierarchy.
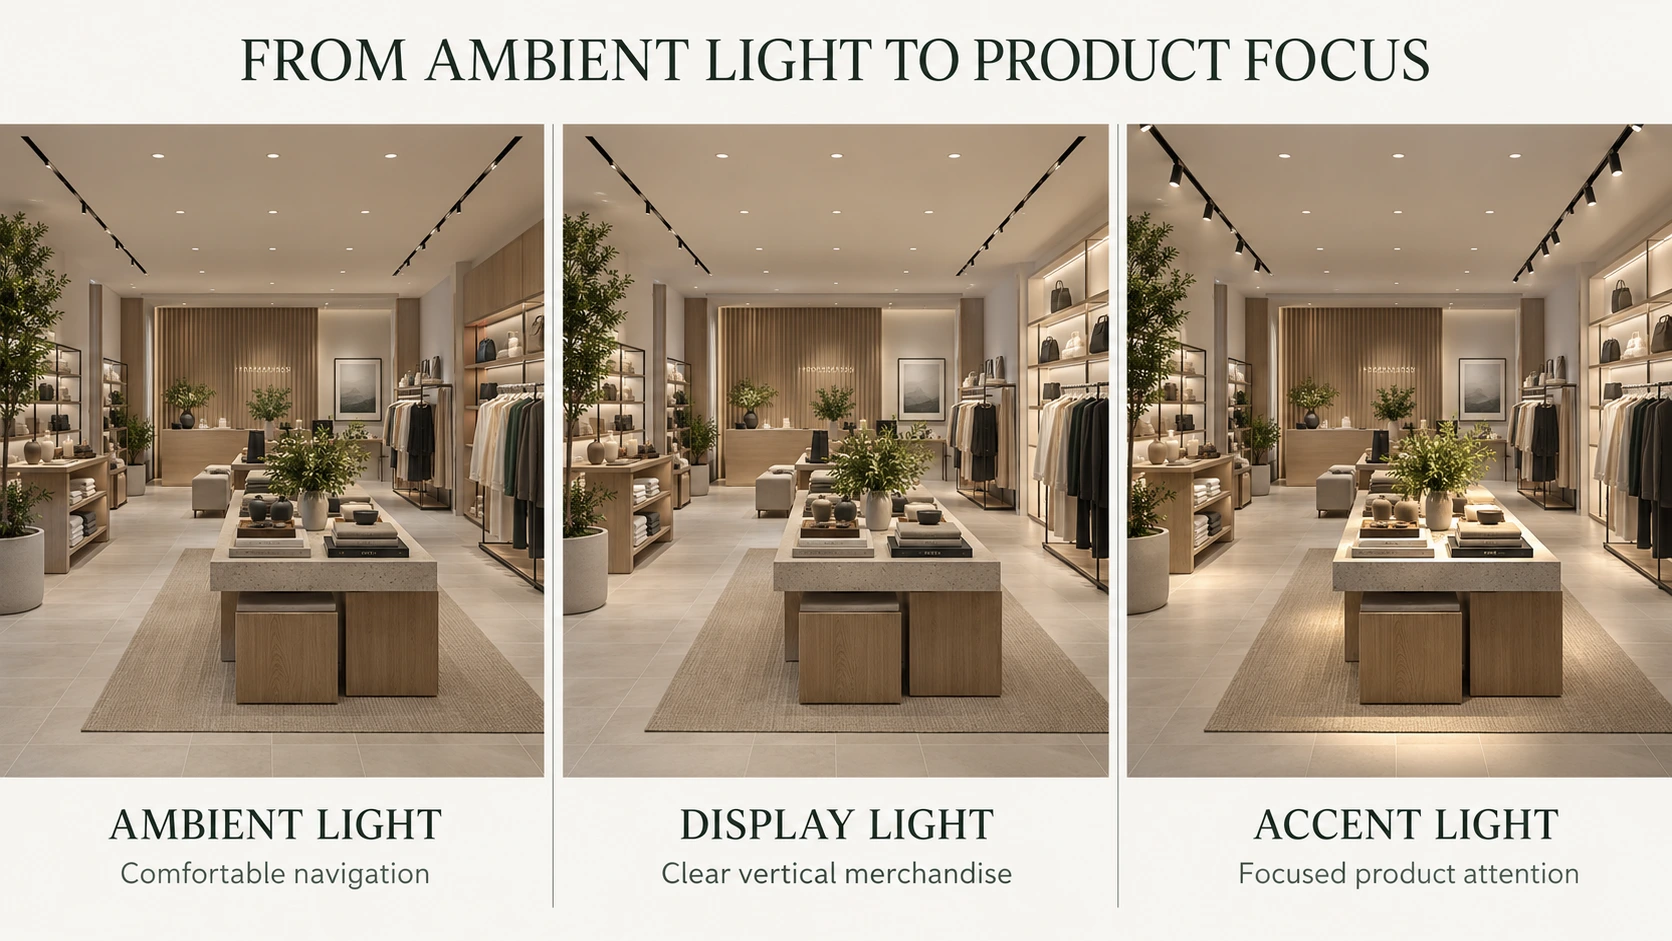
4. Create Visual Hierarchy with Ambient, Display and Accent Lighting
A retail space becomes easier to understand when light is organised into layers.
Ambient lighting
Ambient lighting provides the general background level needed for circulation, orientation and overall comfort. It may come from downlights, linear luminaires, panels, indirect lighting or a combination of systems.
It should make the space feel complete without competing with every product display.
Display lighting
Display lighting serves shelving, wall bays, cabinets, niches and merchandise surfaces. Its main purpose is to make products legible and to reduce shadows created by shelves or surrounding construction.
It may be delivered by wall-washers, adjustable spotlights, linear profiles or carefully integrated shelf lighting.
Accent lighting
Accent lighting increases the visual importance of selected products, feature tables, graphics or architectural elements. It uses direction and contrast to create a focal point.
The accent does not need to be extremely bright. It needs to be visibly stronger than its immediate background. The amount of contrast required depends on the merchandise, finishes, ambient level and intended atmosphere.
A premium showroom may use a restrained background with carefully controlled highlights. A high-density store may use a brighter overall environment with more moderate accents. Neither approach is automatically better; the correct hierarchy should support the brand and make the merchandise easy to understand.
5. Illuminate Merchandise Vertically
Customers usually see merchandise on shelves, walls and display panels before looking down at the floor. Retail lighting must therefore be planned vertically as well as horizontally.
A floor-level lux calculation can appear satisfactory while products on the wall remain dull or uneven.
For successful vertical illumination:
Position luminaires in relation to the display face, not only the room grid
Direct light toward the merchandise rather than the aisle floor
Check illumination at the top, centre and bottom of tall displays
Prevent upper shelves from shading lower merchandise
Coordinate lighting with shelf depths and display projections
Use dedicated vertical lighting where a general downlight cannot reach the display
Review the effect of dark packaging, deep shelves and recessed products
Continuous wall displays often benefit from broad, overlapping distributions. Isolated products may respond better to individual accent beams.
Integrated shelf lighting can improve visibility beneath deep shelves, but it should be concealed from normal viewing angles. Visible LED points and exposed bright lines can distract from the merchandise.
Shelf-integrated lighting also requires proper driver access, voltage-drop control, thermal management and service planning. These electrical considerations are covered in the LED Strip Lighting Design Guide.
The goal is not to illuminate every surface equally. It is to reveal the merchandise clearly while allowing selected displays to lead the customer’s attention.
6. Select Beam Angles and Aim Accent Lighting
Beam angle determines how widely a directional luminaire spreads its light. The result also depends on the distance between the fixture and the target.
Narrow beams
Narrow beams concentrate light onto smaller products or distant targets. They can create strong emphasis but require accurate aiming. Used carelessly, they may produce bright spots surrounded by abrupt darkness.
Medium beams
Medium beams are useful for feature tables, mannequins and many general merchandise displays. They offer a practical balance between focus and coverage.
Wide beams
Wide beams cover larger displays and reduce the number of visible hot spots. They are useful for broad merchandise groups, but excessive overlap can flatten the visual hierarchy.
Do not select a beam angle from its number alone. Consider:
Target dimensions
Fixture-to-target distance
Aiming angle
Required coverage
Overlap with adjacent beams
Spill light
Product reflectance
Manufacturer photometric data
Aiming also affects reflections. A beam directed at glossy packaging, mirrors, glass cabinets or polished furniture may reflect toward the customer instead of revealing the product. Adjust the fixture position and aiming angle while observing the display from normal customer viewpoints.
Use the Beam Angle Lighting Guide to compare common optics. The Beam Angle & Light Spread Calculator can estimate coverage from the beam angle and throw distance. For preliminary fixture spacing, continue with the Spotlight Layout Calculator.
These tools support early planning. Final selection should use the actual luminaire photometric data and on-site aiming.
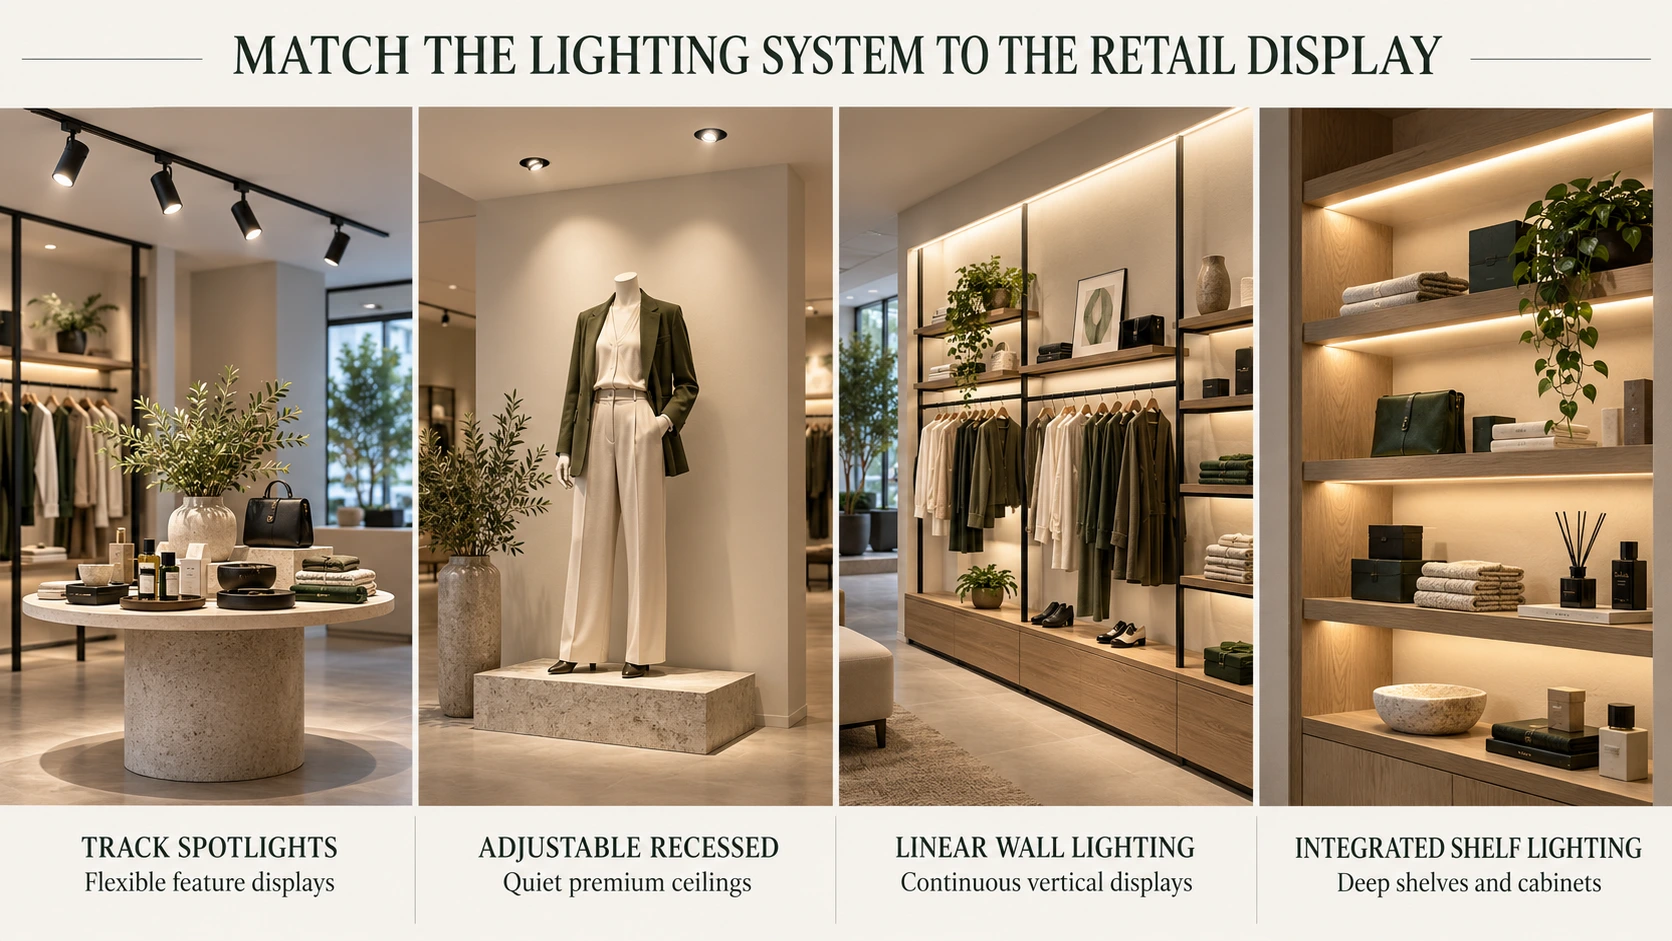
7. Choose Flexible Retail Lighting Systems
Retail layouts change. The lighting system should accommodate seasonal displays, product launches and revised customer routes without requiring the ceiling to be rebuilt.
Track lighting
Track lighting is useful where display positions change frequently. Adjustable spotlights can be moved, redirected or replaced with different outputs and optics.
Track position should still follow likely display zones. A flexible system cannot compensate for track installed too far from walls or placed without reference to the merchandising plan.
Adjustable recessed spotlights
These provide a quieter ceiling appearance while allowing controlled aiming. They suit premium environments where the ceiling should remain visually restrained, but their positions are less adaptable than track-mounted fixtures.
Linear lighting
Linear luminaires can provide continuous ambient light, illuminate aisles or support broad display surfaces. The optical distribution should match the task; a decorative line of light is not automatically an effective wall-lighting system.
Integrated display lighting
Lighting incorporated into shelves, cabinets and joinery can reveal merchandise at close range. It is particularly useful where overhead light is blocked, but it requires coordination between the lighting, furniture and electrical teams.
Decorative luminaires
Decorative fittings can reinforce the brand and help define consultation or waiting areas. Their visual contribution should be considered separately from the functional light needed on merchandise.
Many projects perform best with a combination: a stable ambient system, a flexible accent system and integrated lighting where displays require it.
8. Colour Temperature and Colour Quality
Colour temperature influences the atmosphere of a store, but it should also support the merchandise and surrounding materials.
Warm-white light around 3000K can complement timber, hospitality-led retail, warm metals, leather and relaxed premium environments. Neutral-white light around 4000K can produce a cleaner appearance for contemporary showrooms, work-oriented retail and some technical products.
Neither is universally correct. Test the proposed colour temperature on the actual merchandise, packaging, finishes and brand colours. Mixing colour temperatures without a clear purpose can make neighbouring displays appear inconsistent.
Colour rendering is equally important. CRI provides a general indication of colour fidelity, while R9 gives additional information about the rendering of strong red tones. This can matter for clothing, cosmetics, food, timber, skin tones and warm-coloured products.
For colour-critical merchandise, a high-CRI source—often CRI 90 or above—is a strong starting point. However, one number does not guarantee a successful result. Review:
R9 and other relevant colour samples
Colour consistency between luminaires
SDCM or MacAdam-step information
Spectral suitability for the merchandise
Dimming behaviour
Flicker performance
Long-term colour stability
The same product can look different under two light sources with similar CCT and nominal CRI. A physical mock-up is valuable whenever colour appearance influences purchasing decisions.
For a complete explanation, read Light Quality Explained: CRI, Glare and Flicker. For atmosphere and application differences, see 3000K vs 4000K Lighting.
9. Design Shop Windows and Entrance Transitions
The shop window is viewed from outside, often through reflective glass and under changing daylight conditions. It requires a different approach from the interior sales floor.
During the day, exterior brightness can reduce the apparent impact of interior lighting. Reflections may obscure the display, especially when the exterior scene is brighter than the merchandise behind the glass.
A successful window-lighting strategy should consider:
Glazing reflectance and tint
Window orientation
Daylight exposure
Day and night operating conditions
Viewing distance
Display depth
Product position
Background brightness
Reflections from individual light sources
Access for re-aiming and maintenance
Use layered lighting rather than flooding the entire window uniformly. Light the principal products, support the background where necessary and leave enough contrast for the display to remain legible.
The entrance should provide a visual transition between the exterior and interior. In strong daylight, the first interior zone may need greater apparent brightness so the store does not look closed or uninviting. At night, the same settings may become unnecessarily bright.
Separate window and entrance control zones allow the lighting to respond to these changing conditions.
Fixtures should also be positioned so customers looking through the glazing do not see excessive source brightness or distracting reflections.
10. Light Fitting Rooms and Mirrors Properly
A fitting room is part of the purchasing experience, not simply a private cubicle with a ceiling light.
Strong light directly above the customer can create shadows around the eyes, face and body. It may also make fabrics appear different from how they looked on the sales floor.
A better arrangement combines soft vertical illumination near the mirror with controlled overhead support.
Consider the following:
Light the customer from the front or slightly from both sides
Conceal bright sources from direct view
Avoid a single harsh downlight above the head
Provide enough vertical light for the face and clothing
Limit reflections of exposed luminaires in the mirror
Keep colour temperature consistent with the relevant sales area
Use strong colour rendering for skin tones and fabrics
Check the appearance from standing and seated positions where applicable
Ensure the mirror and surrounding surfaces do not create multiple distracting reflections
The fitting-room lighting should be flattering without materially misrepresenting colour or texture.
The entrance to the fitting area, waiting zone and fitting room should also feel connected. A dramatic change in colour temperature or brightness can make the merchandise appear inconsistent as customers move between spaces.
11. Adapt the Design for Different Showroom Types
Showrooms often contain larger products, more open circulation and longer viewing distances than conventional retail stores. They may also include consultation tables, sample areas or working demonstrations.
Furniture showrooms
Furniture benefits from layered lighting that reveals volume, texture and material. Avoid relying entirely on narrow beams, which can fragment large objects into isolated bright patches.
Kitchen and bathroom showrooms
These displays combine worktops, cabinets, metallic finishes, glass and mirrors. Lighting should reveal vertical and horizontal surfaces while controlling reflected glare. Integrated lighting may also demonstrate how the installation would perform in use.
Material and finish showrooms
Customers may need to compare colour, grain and texture. Consistent colour quality and controlled viewing conditions are essential. Provide a clear general reference light and use accents selectively.
Automotive or large-product showrooms
Large reflective objects require broad, controlled illumination. Small intense sources may create distracting highlights. Review the scheme from multiple viewing angles and use photometric data suited to the scale of the product.
Lighting showrooms
A lighting showroom has two separate tasks: illuminating the space and demonstrating the luminaires.
The background system should provide safe navigation without overwhelming the products being demonstrated. Display circuits should allow individual products, families or scenes to be activated independently. Controls and drivers must remain accessible, and staff should be able to explain differences without operating an unnecessarily complicated system.
Across all showroom types, provide comfortable lighting at consultation desks while preserving the visual priority of the products.
12. Coordinate Daylight, Controls and Retail Scenes
Lighting controls allow the store to respond to daylight, opening hours, merchandising changes and different operational activities.
Useful control zones may include:
Shop window
Entrance
General sales floor
Perimeter displays
Feature displays
Checkout and consultation areas
Fitting rooms
Back-of-house spaces
Cleaning and restocking lighting
Security or after-hours lighting
Daylight-responsive control can reduce energy use near glazing, but the system must preserve the intended display hierarchy. Dimming the general lighting without coordinating the accent lighting can make the store overly dramatic. Dimming display lighting too aggressively may leave products looking inactive.
Predefined scenes can simplify operation. A practical scheme may include:
Daytime trading
Evening trading
Feature or event
Cleaning and restocking
After-hours window display
Security mode
Keep daily controls simple enough for staff to use correctly. Complex interfaces are often bypassed, leaving the store in one permanent setting.
Occupancy sensors are useful in intermittently occupied spaces such as stockrooms and staff areas. They should be used more carefully on the active sales floor, where unexpected switching or dimming can disturb customers.
Commission every scene using the completed displays rather than assuming the programmed percentages will produce the intended visual result.
13. Control Energy Use and Maintenance
Efficient retail lighting begins with an appropriate load, but energy performance also depends on operating hours, controls and maintenance.
Focus first on useful light:
Direct illumination toward merchandise and task surfaces
Avoid excessive spill into empty areas
Use appropriate optics instead of compensating with higher wattage
Separate display and general-lighting circuits
Dim daylight-affected zones when practical
Schedule window lighting independently
Reduce back-of-house operation when areas are unoccupied
Efficiency should not remove the contrast or colour quality needed to present merchandise effectively. A lower connected load is not automatically a better design if products become difficult to see.
Maintenance is especially important in retail because failed or mismatched luminaires are immediately visible. Confirm:
Expected operating hours
Driver quality and accessibility
Replaceable components
Availability of matching luminaires and optics
Cleaning access
Track and electrical loading
Heat management in enclosed displays
Consistent colour when replacement units are installed
Record fixture types, beam angles, accessories, aiming positions and control settings. This makes future replacement and display changes more reliable.
For cost comparisons and payback planning, use the LED Energy Savings and Payback Guide and the LED Lighting Cost & Energy Savings Calculator.
14. Commission and Aim the Lighting After Merchandising
Retail lighting cannot be fully commissioned in an empty store. Final aiming should take place after the main merchandise, shelving, graphics and furniture are installed.
Use the completed customer route and display plan to review the project.
Commissioning sequence
Confirm that each luminaire and control zone operates correctly.
Set the general-lighting level.
Aim perimeter and vertical display lighting.
Aim feature and promotional lighting.
Check window and entrance scenes during both day and evening conditions.
Review fitting rooms and mirrors from customer positions.
Check reflections on glass, polished finishes and screens.
Balance brightness between connected zones.
Confirm dimming, schedules and staff controls.
Photograph or record final aiming and scene settings.
Review the space from the entrance, primary route, secondary aisles, checkout and consultation positions. A spotlight that looks correctly aimed from below may create glare or reflections when seen from farther away.
Check that:
Beams remain on their intended targets
Feature products are visually prominent
Lower shelves are not excessively shaded
Bright sources are shielded from normal sightlines
Displays remain clear without excessive overlap
Colours remain consistent between adjacent fixtures
Emergency and safety requirements remain unaffected
Staff can operate the final control system
Allow time for a second review after the store begins operating. Real customer movement and completed merchandising may reveal adjustments that were not obvious during installation.
15. Common Retail Lighting Mistakes and Final Checklist
Common mistakes
Using one uniform light level
Uniform brightness removes visual hierarchy and gives customers little guidance about where to look.
Designing around the ceiling grid
A symmetrical ceiling may not align with walls, shelves or feature displays. Fixture positions should respond to the merchandise.
Checking only horizontal lux
Adequate floor illumination does not guarantee that vertical products are visible.
Using narrow beams everywhere
Too many concentrated beams can create bright spots, harsh shadows and uneven displays.
Ignoring reflections
Glossy products, mirrors, glazing and screens can redirect light toward customers.
Choosing colour temperature without testing products
A suitable atmosphere does not guarantee accurate or appealing merchandise colour.
Overcomplicating the controls
If the operating system is difficult to understand, staff may leave it in one scene or override it.
Aiming before displays are installed
Fixtures aimed into an empty room will rarely align perfectly with the completed merchandising.
Final planning checklist
| Check | Confirm before completion |
|---|---|
| Retail zones | Entrance, route, sales floor, displays, service points and support areas are identified |
| Merchandise | Size, colour, reflectance, viewing direction and display changes are understood |
| Lux targets | Preliminary maintained values suit each visual task |
| Vertical light | Wall displays and shelves are checked from top to bottom |
| Hierarchy | Ambient, display and accent layers have distinct roles |
| Optics | Beam angles match target size and throw distance |
| Glare | Bright sources and reflections are controlled from customer viewpoints |
| Colour | CCT, CRI, R9 and colour consistency suit the merchandise |
| Flexibility | Fixtures can respond to planned merchandising changes |
| Controls | Zones and scenes are practical for staff |
| Energy | Operating hours, schedules and controls are included in the assessment |
| Maintenance | Drivers, fixtures and optics remain accessible |
| Commissioning | Final aiming occurs after merchandise installation |
| Documentation | Fixture, optic, aiming and control information is recorded |
16. Frequently Asked Questions
How many lux does a retail store need?
A general sales area commonly starts around 300–500 lux, while dense merchandise or detailed browsing may require 500–750 lux. These are preliminary maintained values. The correct target depends on the merchandise, customer task, finishes and applicable project standards.
Should accent lighting be brighter than general lighting?
Usually, yes—but there is no single contrast ratio that suits every store. The feature must be visibly stronger than its immediate surroundings. The required difference depends on ambient brightness, product reflectance, brand character and viewing distance.
Is 3000K or 4000K better for retail lighting?
Neither is universally better. Around 3000K creates a warmer appearance, while around 4000K generally feels more neutral. Select the colour temperature by testing the actual merchandise, materials and brand colours.
Is track lighting suitable for every retail store?
Track lighting is highly flexible and works well where displays change. However, it may not suit every ceiling, brand style or display requirement. Some projects benefit from adjustable recessed lights, linear systems or integrated display lighting instead.
What CRI should retail lighting have?
CRI 80 may be an acceptable starting point for some general applications, while CRI 90 or above is often preferred for colour-sensitive merchandise. Also review R9, colour consistency, flicker performance and the actual appearance of products under the proposed source.
Final Principle
Successful retail lighting does not treat every surface equally. It provides comfortable background light, makes merchandise clear and uses controlled emphasis to guide attention.
Begin with the customer route and merchandise. Establish appropriate light levels, illuminate displays vertically, select optics for the real target distance and complete the design through on-site aiming after the displays are installed.