
Restaurant and café lighting must support several needs at once. Guests should see the food, menus and people around them comfortably, while the space retains the atmosphere that gives the venue its identity. Staff need brighter, practical lighting for preparation, service, payment and cleaning.
A successful lighting plan therefore does more than make the room bright. It separates the venue into visual zones, provides light where each task happens and allows the atmosphere to change between daytime and evening service.
This guide explains how to plan lux levels, table lighting, ambience, colour quality, glare control and flexible lighting scenes for restaurants, cafés and bars.
In This Guide
How restaurant and café lighting differs from general room lighting
How to divide the venue into practical lighting zones
Recommended starting lux levels
How ambient, table, vertical and accent lighting work together
How to light fixed and flexible table layouts
Choosing beam angles and fixture positions
Colour temperature, CRI and food presentation
Decorative lighting without visual discomfort
How to reduce glare at tables and counters
Lighting entrances, bars, circulation and service areas
Daylight and day-to-night lighting scenes
Controls, dimming and energy use
Installation, maintenance and commissioning
A final restaurant-lighting checklist
1. Begin With the Guest Experience
Restaurant lighting should be planned around how the space is intended to feel and operate. A bright daytime café, an intimate dining room and a fast-service restaurant may occupy similar floor areas, but they require different lighting priorities.
Begin by defining:
The desired atmosphere
The type of food and service
Daytime and evening operating hours
Average visit duration
Fixed or movable table positions
Important architectural and decorative features
Staff tasks performed in each zone
The amount and direction of available daylight
A casual café may benefit from brighter general lighting during the day, particularly where guests read, work or meet. A fine-dining restaurant will usually place greater emphasis on controlled table light, low surrounding brightness and carefully selected decorative lighting.
The lighting should express the concept without making menus difficult to read, faces uncomfortable to see or circulation routes unclear.
2. Divide the Venue Into Lighting Zones
A restaurant should not be treated as one uniformly illuminated room. Different areas support different visual tasks and should be planned separately before the fixture layout is developed.
Typical lighting zones include:
Entrance and waiting area
Main dining area
Individual tables
Café seating or communal tables
Bar and counter
Cashier or point-of-sale station
Food or product displays
Circulation routes and stairs
Kitchen and service pass
Storage and staff areas
Outdoor seating or terrace
This zoning approach prevents the common mistake of selecting one lux level and repeating one fixture throughout the venue.
The dining area may need a relaxed atmosphere, while the cashier requires clear working light. A food display should attract attention without overpowering nearby tables. Circulation should remain visible without becoming brighter than the main experience.
Create the zone plan before selecting decorative fixtures. This keeps the operational requirements clear and allows decorative lighting to support the design instead of carrying the entire lighting load.
3. Restaurant and Café Lux Levels
Lux measures the amount of light reaching a surface. It is useful for estimating whether tables, counters, menus and work areas receive enough light for their intended tasks.
The following maintained illuminance ranges are practical starting points, not universal compliance values. Final targets should reflect the visual task, operating concept, surface finishes and standards applicable to the project.
| Area or task | Practical starting range |
|---|---|
| Entrance and waiting area | 100–200 lux |
| General restaurant dining area | 100–200 lux |
| Tabletop dining surface | 150–300 lux |
| Bright daytime café seating | 200–300 lux |
| Menu-reading area | 150–300 lux |
| Customer-facing bar counter | 150–300 lux |
| Staff side of bar or service counter | 300–500 lux |
| Cashier or point-of-sale station | 300–500 lux |
| Food display or buffet | 300–500 lux |
| Corridors and circulation | 100–150 lux |
| Kitchen and food-preparation areas | Around 500 lux or as required by the task |
| Storage and secondary service areas | 100–200 lux |
These values should not all be achieved using uniform ceiling light. The tabletop target, for example, can be produced by a pendant or focused spotlight while the surrounding dining area remains softer.
Dark walls, ceilings and furniture absorb more light than pale surfaces. Two rooms with the same calculated lux level can therefore feel very different. Always consider reflectance, contrast and the direction of light alongside the numeric target.
For a more detailed explanation of illuminance and lumen calculations, read the Lux and Lumens Lighting Guide or use the Lux and Lumens Calculator.
4. Build the Lighting in Four Layers
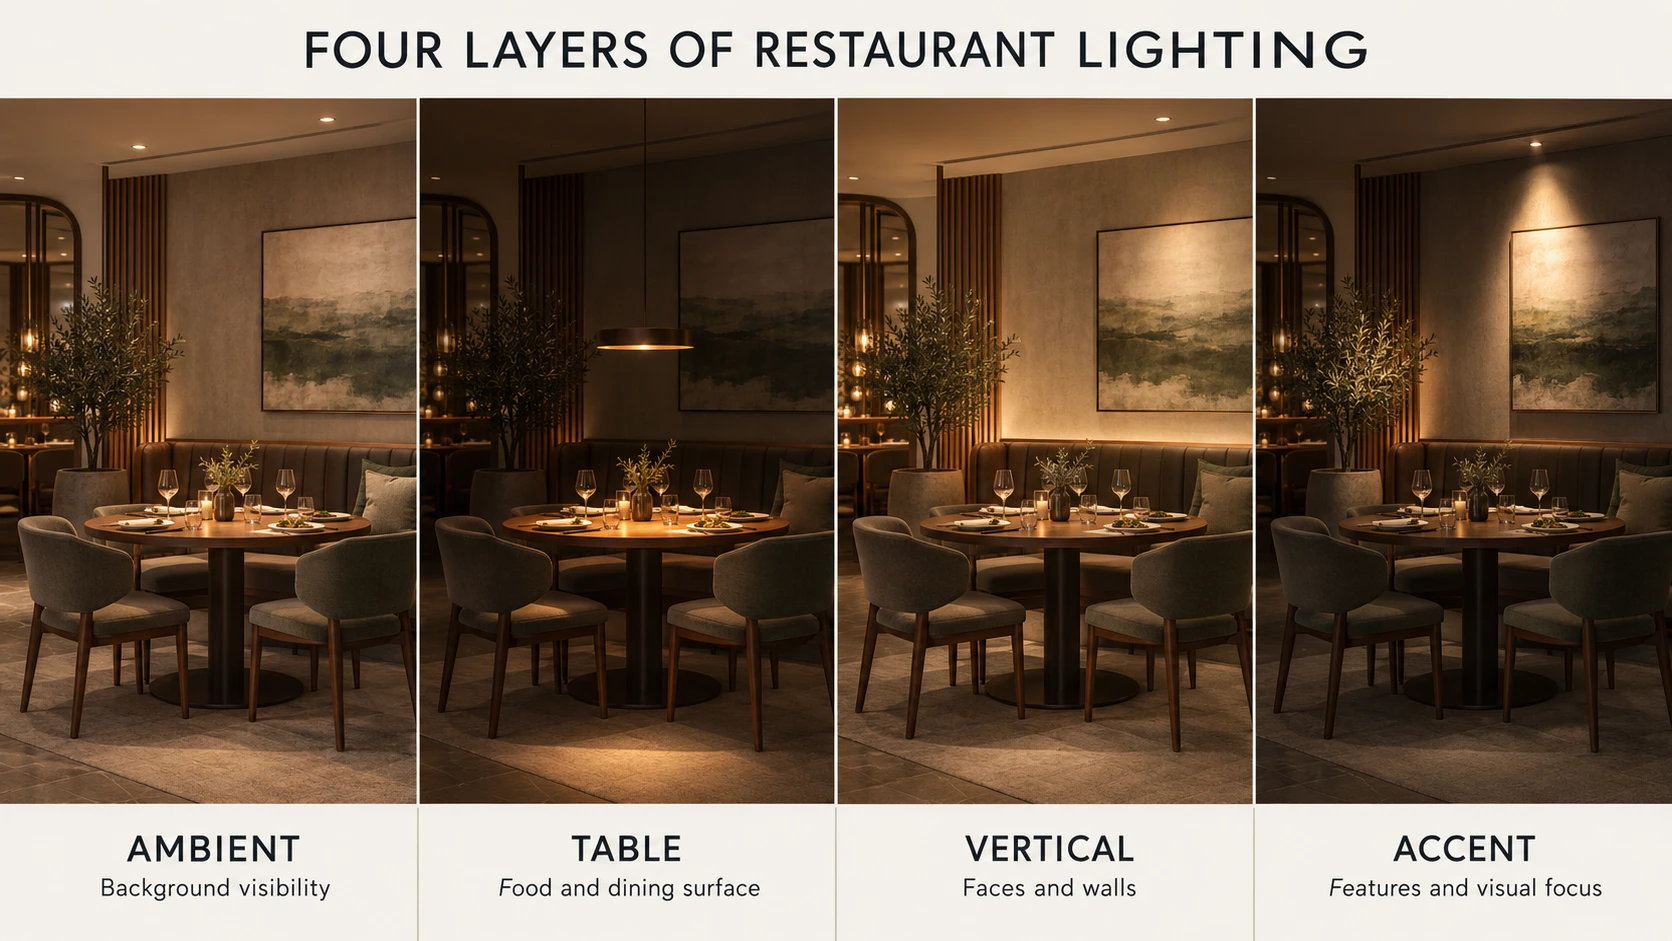
A strong hospitality scheme normally combines four lighting layers rather than relying on one fixture type.
Ambient light
Ambient lighting provides the background level that allows guests and staff to understand the room. It may come from recessed downlights, indirect lighting, wall washing, ceiling fixtures or concealed linear light.
It should support circulation and orientation without flattening the atmosphere.
Table light
Table lighting gives visual priority to the food, tableware and dining surface. It may come from pendants, adjustable spotlights, wall lights or portable table lamps.
It should create a useful pool of light without shining directly into guests’ eyes.
Vertical light
Vertical illumination helps people see faces and gives walls, shelving and architectural surfaces greater presence. Wall washers, sconces and reflected light can provide this layer.
A dining room with adequate tabletop lux but poor facial illumination can still feel uncomfortable or visually closed.
Accent light
Accent lighting highlights artwork, plants, textured walls, displays or architectural features. It creates hierarchy and helps establish the venue’s identity.
Accent lighting should remain selective. If every surface is highlighted equally, nothing appears important and the room loses depth.
5. Plan Table Lighting Around the Layout
Table lighting should follow the actual furniture arrangement. Begin with the table centres, sizes and seating positions before fixing pendant points or spotlight locations.
Fixed tables
For permanently positioned tables, pendants or aimed spotlights can create controlled pools of light. Keep the beam centred on the usable dining surface and check the effect from every seat.
A narrow beam may create strong drama but leave part of a large table dark. A very wide beam may spill onto adjacent guests, floors or circulation paths.
Flexible tables
Restaurants frequently join or separate tables for different group sizes. In these areas, a rigid pendant arrangement can become misaligned when the furniture moves.
More flexible solutions include:
Adjustable track spotlights
Wider overlapping beams
Linear lighting aligned with table rows
Multiple lighting circuits
Portable rechargeable table lamps
A combination of soft ambient light and adjustable accents
The layout should continue to work when a two-person table becomes part of a larger group arrangement.
Check the guest’s view
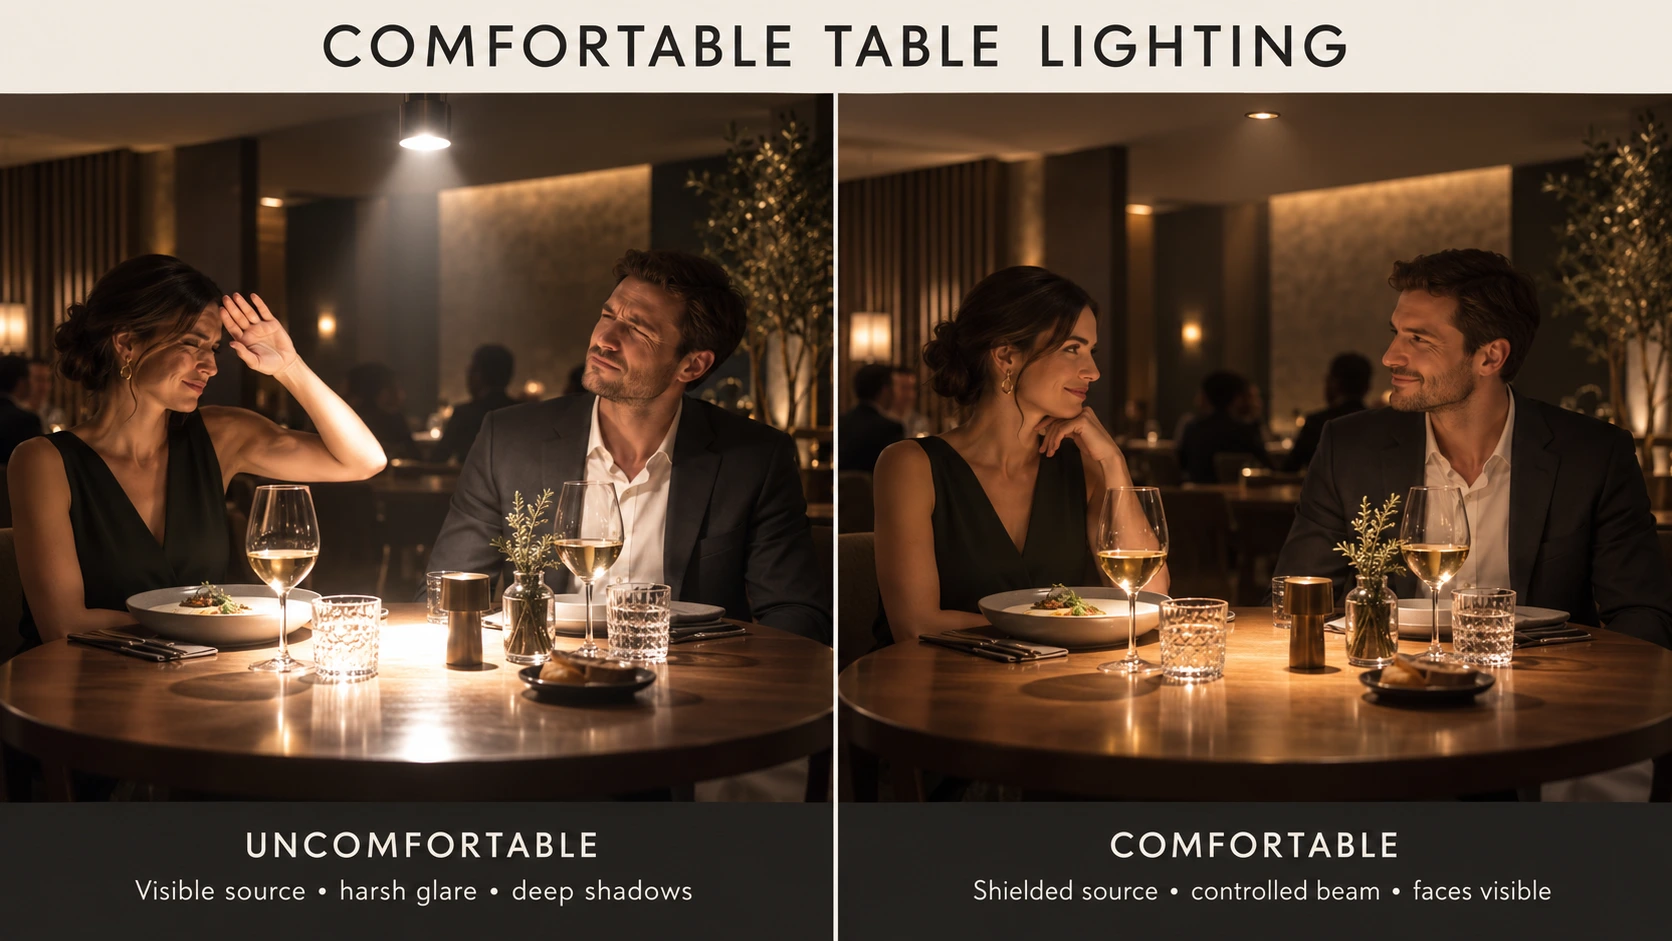
Evaluate the light while seated, not only from the floor plan. Confirm that the lamp, reflector or bright LED source is not visible at normal viewing angles. Also check whether light reflects from polished tables, glassware, cutlery or glossy menus.
Use the Beam Angle Guide and Beam Angle Calculator to estimate preliminary beam coverage.
Use the calculated beam diameter for preliminary planning. Confirm fixture quantities, aiming and uniformity with manufacturer photometric data before final specification.
6. Light People as Well as Tables
Good restaurant lighting should allow guests to see each other comfortably. Lighting only the horizontal table surface can create bright plates while leaving faces in shadow.
Vertical illumination can be introduced through:
Wall lights
Soft wall washing
Reflected ceiling light
Wide-distribution decorative fixtures
Carefully positioned downlights
Light from nearby architectural surfaces
Avoid placing strong overhead beams directly above a guest’s head. This can create deep shadows around the eyes and face, particularly when the surrounding room is dark.
A balanced composition usually combines a controlled pool of light on the table with softer light reaching faces and nearby vertical surfaces. This preserves intimacy while preventing the table from appearing isolated in a dark room.
Booths need particular attention because high backs, partitions and overhead structures can block ambient light. Test whether each seating position receives enough vertical illumination without exposing guests to a visible light source.
7. Choose Colour Temperature to Support the Concept
Colour temperature, measured in kelvin, describes whether white light appears warmer or cooler.
2700K
A warm 2700K appearance can create an intimate, relaxed atmosphere. It works well in evening restaurants, lounges, bars and spaces with timber, brass, warm fabrics or earthy finishes.
3000K
A 3000K source remains warm but usually feels slightly clearer and more adaptable. It is a practical choice for many restaurants and cafés operating through both daytime and evening periods.
3500K to 4000K
Neutral or cooler white light can suit bright daytime cafés, bakeries, modern food counters and operational areas. It should be introduced carefully in dining zones because a high colour temperature combined with high brightness may weaken an intimate atmosphere.
There is no single correct colour temperature for every hospitality project. The choice should respond to the food, finishes, brand character and service period.
Maintain consistency between fixtures that illuminate the same surface. Noticeable variation between neighbouring lamps can make walls, tables and food displays appear uneven.
If the difference between common white-light options is unclear, read 3000K vs 4000K Lighting.
8. Protect Food and Skin-Tone Colour Quality
Colour rendering affects how naturally colours appear under a light source. This matters in hospitality because guests judge food, drinks, table finishes and the people around them visually.
A high colour rendering index does not replace good lighting design, but it helps prevent ingredients and finishes from appearing dull or distorted.
As a practical starting point:
Consider CRI 90 or higher for dining tables and food presentation
Pay attention to strong red rendering where meat, fruit, pastries or warm ingredients are important
Compare actual samples of food and finishes under the proposed light
Check consistency between dining, display and service areas
Avoid noticeable colour shifts when food moves from the pass to the table
The same plate should not appear fresh and colourful beneath the kitchen pass lighting but muted when it reaches the guest.
LED quality also affects dimming, flicker, colour consistency and visual comfort. Two products with the same wattage, lumen output and colour temperature may perform very differently.
Read Light Quality Explained: CRI, R9, SDCM, Glare and Flicker before final fixture selection.
9. Control Glare at Tables and Counters
Glare occurs when a bright source or reflection enters the field of view and creates discomfort or reduces visibility. It becomes especially noticeable in restaurants where the surrounding ambience is intentionally dim.
Common glare sources include:
Exposed LED chips
Shallow downlights with bright apertures
Incorrectly aimed spotlights
Bare decorative lamps
Pendants hung within direct sightlines
Reflections from glossy tables
Bright counters beside darker seating areas
Linear lighting visible inside shelves or coves
Reduce glare by using:
Recessed or shielded light sources
Deep reflectors and controlled optics
Diffusers where appropriate
Careful fixture positioning
Lower output combined with additional lighting points
Matte or low-gloss surfaces near strong beams
Independent dimming for dining and service areas
Check glare while seated at every side of a table and while standing at the bar or cashier. A fixture that appears comfortable from the entrance may be distracting from a lower seated position.
At night, glazing can behave more like a mirror. Bright interior fixtures may reflect into windows and reduce the view outside. Position and dim luminaires near façades with this effect in mind.
10. Use Decorative Fixtures With a Clear Purpose
Decorative lighting can define the character of a restaurant or café, but appearance should not be its only role.
A decorative fixture may:
Create a focal point
Reinforce the venue’s style
Establish scale above a table or counter
Provide soft ambient or vertical light
Help divide a large room into smaller visual zones
Become part of the view from outside
Before choosing a chandelier or pendant, confirm:
Its visual scale relative to the room and furniture
Its suspension height
Whether the light source is visible when seated
The useful light reaching the surface below
Dimming compatibility
Cleaning and lamp-replacement access
Whether its brightness competes with the dining experience
A decorative pendant with an exposed lamp may appear attractive when switched off but become uncomfortable at full output. Use low-glare lamps, shielding or a separate functional light layer where required.
Large statement fixtures should be supported by quieter architectural lighting. They should not be expected to provide every lux level needed across the room.
For fixture sizing and suspension guidance, see the Chandelier Size Guide and Chandelier and Pendant Size Calculator.
11. Adapt the Lighting From Day to Night
Restaurants and cafés operating across different service periods need more than one lighting setting.
During the day, daylight may provide much of the ambient illumination. Artificial lighting should fill darker zones, support food presentation and prevent excessive contrast between the windows and interior.
In the evening, the same venue may need:
Lower ambient light
Stronger emphasis on individual tables
Warmer visual character
Reduced brightness near windows
More visible architectural or decorative accents
Clear but restrained circulation lighting
Create scenes based on actual operating periods rather than using one master dimmer for the entire venue.
A practical sequence may include:
Opening and cleaning: high, even light for preparation and inspection.
Daytime café or lunch: brighter ambient and counter lighting.
Afternoon transition: reduced general output with stronger table emphasis.
Evening dining: lower ambient light with controlled table and accent lighting.
Closing: brighter service and cleaning light after guests leave.
Scenes should be tested at the times they will be used. A setting created during daylight may look completely different after sunset.
12. Light Entrances and Waiting Areas as a Transition
The entrance forms the first impression of the venue and helps guests understand where to go. It should feel welcoming without creating a sharp brightness contrast with the dining room.
Use lighting to identify:
The main entrance
Reception or host station
Waiting seats
Menu displays
Changes in floor level
The visual route into the dining area
A bright doorway leading into a very dark interior can make adaptation uncomfortable. Create a gradual transition through layered light, illuminated walls or intermediate zones.
If the restaurant is viewed from the street, consider the complete façade composition. The entrance, interior focal points and visible tables should form a clear visual hierarchy rather than competing at the same brightness.
Avoid placing intense downlights directly above waiting guests. Softer vertical light generally creates a more welcoming first impression and helps staff recognise arriving customers.
Exterior signs and entrance lighting should remain coordinated with the indoor colour temperature and atmosphere.
13. Plan Bars, Counters and Food Displays Separately
Bars and counters combine customer experience with detailed staff tasks. The guest-facing side can remain atmospheric, while the working side needs enough light for preparation, payment, cleaning and reading labels.
Useful layers may include:
Pendants or decorative light above the counter
Concealed linear lighting beneath shelves
Accent lighting for bottles or merchandise
Task lighting on the staff side
Independent light at the cashier
Low-level lighting along the counter base
Keep visible LED strips shielded. Reflections from bottles, glass shelves, stainless steel and polished stone can produce strong glare even when the source itself is concealed.
Food displays, bakeries and buffets need sufficient vertical and horizontal light to reveal texture and colour. Direct the light toward the products rather than the customer’s eyes, and avoid excessive heat or a beam position that creates shadows from shelves or sneeze guards.
The counter may operate at a brighter level than the surrounding dining area, but the transition should remain controlled. If the counter becomes the brightest object in the entire room, it can dominate the guest’s field of view.
For more detail on display emphasis and accent ratios, see the Retail and Showroom Lighting Guide.
14. Keep Circulation and Service Areas Clear
Circulation lighting should help guests and staff move safely without weakening the restaurant’s atmosphere.
Pay attention to:
Main aisles
Changes in floor level
Stairs and ramps
Routes to washrooms
Routes between dining areas
Service paths from the kitchen
Outdoor transitions
Emergency routes and exits
The floor does not always need to be the brightest surface. Wall light, step lighting and controlled pools of illumination can define a route while preserving a lower ambient level.
Avoid strong spotlights in narrow aisles where staff or guests repeatedly pass through the beam. Also check that decorative fixtures do not project into headroom or service paths.
Kitchen, pass and storage lighting should be treated as operational lighting. These spaces may require higher illumination, clearer colour visibility and fixtures suited to heat, moisture, grease and regular cleaning.
Prevent harsh service-area light from spilling directly into the dining room. Doors, screens, fixture positions and separate controls can help maintain the intended contrast.
15. Use Controls to Improve Comfort and Efficiency
Lighting controls allow the venue to change atmosphere without requiring staff to adjust individual fittings throughout the day.
Useful control groups may include:
Entrance and waiting area
General dining light
Table or track lighting
Decorative fixtures
Wall and architectural lighting
Bar and display lighting
Exterior seating
Kitchen and service zones
Cleaning and maintenance lighting
Separate the circuits according to function rather than fixture appearance. Two similar downlights may require different controls if one serves tables and the other serves circulation.
Dimming equipment, drivers and lamps must be compatible. Poor combinations can cause flicker, unstable low-level performance, sudden cut-off, audible noise or differences between fixtures.
Label the controls using clear scene names such as Lunch, Evening, Cleaning and Closing. Staff should not need to remember a complicated sequence of circuit numbers.
Where daylight is strong, dimming or automatic response can reduce unnecessary energy use. Occupancy control may also be appropriate in storage, staff and secondary service spaces, but abrupt switching should be avoided in guest-facing areas.
For projects evaluating operating costs or an LED upgrade, use the LED Energy Savings and Payback Guide and LED Lighting Cost and Energy Savings Calculator.
16. Test, Aim and Commission the Completed Installation
A restaurant-lighting plan is not finished when the fixtures are installed. Final aiming and scene adjustment should take place after tables, artwork, displays, curtains and major finishes are in position.
During commissioning:
Aim each adjustable spotlight
Confirm that beams align with tables and displays
Check lux levels on working surfaces
View every dining position while seated
Reduce visible glare and harsh reflections
Check faces as well as tabletops
Compare food appearance between kitchen, pass and table
Test every dimming scene
Inspect the room during daylight and after dark
Confirm that circulation remains clear
Record final control settings
Give staff simple operating instructions
Return after the venue has begun operating if possible. Staff may identify practical issues that were not evident during installation, such as table positions that change regularly, counter reflections or scenes that are too bright during a particular service period.
Final restaurant and café lighting checklist
Before approving the completed scheme, confirm that:
Every zone has a defined purpose and target
Tables receive useful, controlled light
Guests can see faces comfortably
Menus remain readable
Food colours appear natural
Direct and reflected glare are controlled
Flexible seating arrangements remain usable
The bar and cashier have sufficient task light
Circulation routes and level changes are visible
Decorative fixtures are correctly scaled
Daytime and evening scenes have been tested
Drivers and dimmers operate smoothly
Fixtures can be cleaned and maintained
Kitchen and service lighting does not spill into dining areas
Staff understand the controls
Bringing the Scheme Together
Successful restaurant and café lighting balances atmosphere with visibility. The goal is not to maximise brightness, but to place the right light on tables, food, faces, displays and working surfaces while controlling glare and unnecessary spill.
Start with the guest experience, divide the venue into zones and build the design using ambient, table, vertical and accent lighting. Then refine the result through careful fixture selection, controls, aiming and on-site testing.
For additional planning support, explore the complete collection of Saleh Deco Lighting Tools.